


Thick layers of baked-on residue, burnt marinade, and charred grease can quickly ruin an otherwise pleasant cookout. Learning how to clean dirty gas grill grates restores heat transfer, prevents unpleasant acrid smoke, and stops fresh meat from sticking to the cooking surface. Regular upkeep also protects metal surfaces from premature corrosion caused by salty seasonings and acidic sauces. Setting up a dedicated outdoor workspace, such as a sturdy outdoor rolling prep table, provides a clean area to organize brushes, scrapers, and natural cleaning solutions before tackling heavy carbon buildup.
Gas grills rely on clean grate bars to deliver balanced conduction and distinct sear marks without triggering dangerous grease fires. Neglecting routine maintenance allows carbonized grease to drop into the burners, clogging fuel ports and creating erratic hot spots. Modern cleaning methods favor bristle-free scrubbers, steam power, or specialized citrus degreasers rather than risky steel wire brushes that can shed sharp metal fragments into food. Taking a systematic approach to grate care ensures your grill remains sanitary, safe, and ready for your next backyard gathering.

Pros
- Effective on heavy grease and charred food residue from low-and-slow smokes
- Works well on both cold and warm surfaces for flexible cleaning after grilling
- Economical - a little goes a long way for multiple cleaning sessions
- Rinses clean without leaving sticky residue that could affect food flavor
Cons
- May require multiple applications for heavily caked-on grime from years of use
- Strong chemical smell during application - use in well-ventilated area
- Not recommended for aluminum surfaces or painted grills
If you spend any time grilling, smoking, or cooking outdoors, you know the cleanup is the least fun part. This heavy-duty grill cleaner is designed to tackle exactly that chore, making it a solid addition to any outdoor cooking setup. It's a spray-on degreaser that works on BBQ grills, smokers, ovens, flat top griddles, and even camping stoves - basically anything that gets coated in grease and carbon after a cookout.
This cleaner is best suited for backyard grillers who fire up their gas or charcoal grills weekly, BBQ enthusiasts who smoke brisket low and slow, campers who need to clean their portable stove after a trip, and tailgaters who want their gear ready for the next game. If you own an RV and cook inside or outside, this is also handy for keeping the oven and grill grates spotless.
In real-world use, the cleaning performance is impressive. It cuts through baked-on grease and charred food residue without requiring heavy scrubbing. After a long smoking session where the grates are covered in black carbon, a few sprays and a short wait let you wipe it away. It doesn't completely eliminate scrubbing, but it reduces elbow grease significantly. The formula works on both warm and cold surfaces, so you can spray right after cooking or let it sit overnight on tough buildup.
Build quality is straightforward - it comes in a standard spray bottle with a trigger nozzle that delivers a wide or narrow stream. The nozzle doesn't clog easily, which is a common issue with thick cleaners. It's safe on porcelain, stainless steel, and cast iron grates, but you should avoid aluminum and painted surfaces. The spray can reach into tight corners of smoker racks and between grates, making it easier to clean those hard-to-reach spots.
Setup and use are simple: spray on, let it sit for a few minutes, scrub if needed, then rinse with water. Cleanup is quick, and the cleaner rinses away without leaving a sticky film that could affect your next meal's flavor. Storage is easy - just keep the bottle in your garage or under the sink. One limitation is that heavily caked-on grime from years of neglect may require multiple applications. Also, the chemical smell is strong, so you'll want good ventilation when using it.
Overall, this is a practical buy for anyone who cooks outdoors regularly. It saves time and effort on cleanup, which means more time enjoying your backyard parties, tailgates, or campsite meals. If you're tired of scrubbing forever after a great cookout, this cleaner makes the after-work much easier. Just remember to wear gloves and work in a well-ventilated area, and your grills and smokers will look like new after each use.

The Complete Guide to Restoring and Maintaining Gas Grill Grates
Cleaning gas grill cooking surfaces requires matching the cleaning technique to your grate material, the level of grease accumulation, and the current temperature of the grill. A heavily crusted cooking surface impedes heat distribution, encourages stubborn flare-ups, and transfers burnt off-flavors directly onto fresh food. You can achieve a spotless grate using thermal burn-off cycles, steam-cleaning pads, or dedicated cold-surface degreasers without risking loose metal bristles in your dinner. Establishing a consistent post-cook routine keeps your gas cooker dependable throughout the grilling season.
Why Clean Grates Matter for Gas Grill Performance and Food Safety
Carbonized fat and burnt organic debris do not create authentic barbecue flavor; instead, they produce acrid smoke and bitter tastes on delicate meats. When old grease remains on the cooking grids, it creates a sticky, porous texture that bonds to raw proteins, causing delicate fish fillets and burger patties to tear during flipping. Excess buildup also traps moisture against metal, which accelerates oxidation and ruins protective coatings over time. Maintaining a clean cooking plane ensures proper thermal conduction directly from the flame guards through the grate bars.
Food safety also depends heavily on removing rancid oils and charred food residue between backyard sessions. Leaving sweet glazes, like those from a sticky barbecue wings recipe, creates hardened carbon that harbors bacteria and attracts outdoor pests. High heat sanitizes grates, but heat alone does not eliminate the physical crust that falls onto burner tubes. Clearing this debris prevents burner ports from clogging, ensuring even gas output and predictable cooking zones.
Identifying Your Grate Material: Cast Iron, Porcelain Enamel, and Stainless Steel
Selecting the correct cleaning method begins with identifying whether your gas grill utilizes bare cast iron, porcelain-enameled metal, or solid stainless steel rods. Bare cast iron provides outstanding thermal mass and heat retention, but it remains susceptible to moisture damage and surface rust if stripped of its protective oil patina. Porcelain-coated grates feature a slick, ceramic glaze that prevents sticking, though this coating can chip if struck with hard steel scrapers or dropped onto concrete. Stainless steel grates resist rust exceptionally well and withstand vigorous scrubbing, yet they still accumulate discolored heat tint and baked-on grease.
Using overly aggressive metal tools on porcelain surfaces exposes the raw steel underneath to rapid rusting. Bare cast iron requires gentle scraping followed by re-oiling, whereas stainless steel can handle stiffer abrasive pads and heavy degreasing agents without losing structural integrity. Inspecting your grates prior to cleaning reveals whether you need a gentle nylon brush or a heat-assisted steam cleaner. Matching the tool to the surface ensures thorough carbon removal while extending the service life of your grilling hardware.
The High-Heat Burn-Off Method for Routine Upkeep
The burn-off technique remains the most common maintenance procedure because it utilizes the grill’s own heat output to incinerate grease. After completing a cooking session, close the grill hood, adjust all burner control knobs to high, and allow the chamber to heat for ten to fifteen minutes. The intense heat turns drippings and stubborn food particles into dry, powdery ash that releases easily from the metal bars. Once the ash forms, turn off the gas supply at the tank or shutoff valve and crack the lid slightly to allow initial cooling.
Brushing the grates while they remain moderately warm requires safety gear, including heat-resistant barbecue gloves to protect against radiant heat. Use a sturdy scraping blade or a heat-tolerant scraper to sweep the loosened carbon down between the bars into the grease tray. Avoid applying cold water directly to hot cast-iron grates during this step, as thermal shock can crack the iron casting. A quick sweep while warm keeps grates clean without requiring liquid chemical cleaners after every dinner.
Steam-Cleaning Grates with Bristle-Free Scrubbers
Steam cleaning provides substantial grease-lifting power by combining trapped water moisture with radiant grill heat. Tools like the Grill Rescue Grill Brush with Scraper use an absorbent cleaning pad paired with an integrated stainless scraper to lift stubborn buildup. To execute this technique, preheat your grill grates thoroughly, submerge the cleaning head into clean water, and wipe firmly along the grate bars. As the wet pad meets the hot metal, it instantly produces high-temperature steam that emulsifies grease and lifts carbonized deposits.
The head of this steam cleaner is built with a deeper face designed to reach down between adjacent grate bars where grease collects along the sides. Unlike traditional flat scrapers, this contoured design cleans multiple surfaces of the bar in a single deliberate pass. The heat-resistant material eliminates the severe danger of loose wire bristles shedding onto the cooking surface and getting ingested. Once the cleaning head becomes soiled from grease absorption, you can detach the head and wash it in a dishwasher or swap it for a replacement pad.
Cold Cleaning with Citrus Degreasers and Nylon Brushes
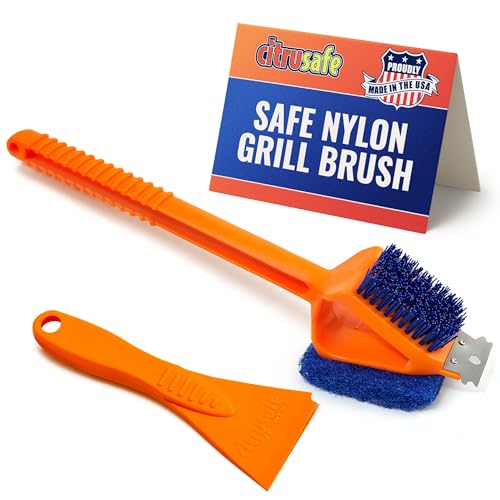
Cleaning cool grill grates provides a controlled, burn-free environment ideal for thorough seasonal maintenance or quick prep before lighting the burners. Tools such as the CitruSafe 3in1 Nylon Grill Brush with Cookbox scraper utilize durable nylon bristles that work specifically on unheated metal surfaces. Because nylon bristles will melt if exposed to open flames or hot grates, this process must always be executed on a completely cold grill. The design combines scrubbing bristles, an abrasive pad, and a cookbox scraper into one multi-purpose cleaning accessory.
To perform a cold clean, spray a natural, biodegradable citrus degreaser directly across the grates and allow the solution to sit for one to three minutes. The natural citrus oils break down sticky fat chains and dissolve carbon without releasing toxic chemical fumes. Scrub along the length of each bar with the nylon brush, applying firm downward pressure to dislodge softened residue. Finish the task by wiping down the grates with a heavy-duty damp paper towel or microfiber cloth to remove dissolved grease before igniting the burners.
Deep Soaking Techniques for Stubborn Baked-On Carbon
When routine brushing fails to dislodge thick, multi-layered carbon deposits, soaking the grates in a concentrated cleaning bath offers an effective solution. Remove the cold grates from the gas grill and place them inside a large utility tub, heavy-duty trash bag, or plastic storage bin. Mix warm water with dish soap and baking soda, or use a specialized barbecue degreasing soak to coat the metal bars completely. Let the grates soak for at least thirty to sixty minutes so the alkaline solution can penetrate hardened grease bonds.
Baking soda creates a mild abrasive paste when mixed with a small amount of warm water, making it excellent for hand-scrubbing stubborn spots. Use a non-scratch scouring pad or a stiff nylon scrubber to work the paste into stubborn corners and along grate weld points. Rinse the grates thoroughly with clean garden hose water to wash away all dissolved fats and alkaline residues. Dry the grates immediately with a clean shop towel to prevent any moisture from sitting on raw metal seams.
Cleaning the Underside of Grates and the Gas Cookbox
Focusing solely on the top cooking surface leaves the underside of the grate bars coated in drippings that produce flare-ups. Remove the grates and flip them over on a protected outdoor surface or durable prep bench to inspect the lower ridges. Scrape along the underside with a flat stainless cookbox tool to peel away greasy stalactites before they fall into the burner assemblies below. Whether you maintain a standard gas cart or manage versatile griddle and smoker combo units, addressing hidden grease reservoirs prevents uncontrolled fires.
While the grates are removed, take the opportunity to inspect the flame tamers, flavorizer bars, and burner tube ports inside the cookbox. Use an angled scraper to guide dry debris down toward the lower catch pan and grease funnel. Check the tiny gas burner holes to ensure no carbon flakes or spiderwebs are restricting propane or natural gas flow. Reinstalling clean grates over a cleared cookbox restores smooth airflow and guarantees stable flame performance across the entire cooking zone.
Seasoning and Protecting Grates After Heavy Cleaning
Stripping away grease and carbon exposes bare metal to atmospheric humidity, creating prime conditions for rapid surface oxidation. Cast-iron grates require immediate seasoning with a high-smoke-point cooking oil, such as canola, avocado, or grapeseed oil, right after cleaning. Apply a thin, uniform coat of oil over the entire grate using a paper towel folded into tongs or a silicone basting brush. Wipe away any pooling excess so only a microscopic oil film clings to the iron pores.
Ignite the gas burners on medium heat and close the lid for thirty minutes to polymerize the oil into a protective, non-stick patina. Stainless steel grates do not require full seasoning like cast iron, but wiping them with a light oil sheen prevents protein adhesion during subsequent cooks. Avoid using salted butter or low-smoke-point olive oil for seasoning, as salt promotes corrosion and olive oil burns prematurely. Proper post-clean seasoning ensures your grill is immediately ready for clean cooking without sticking.
Crucial Safety Precautions: Preventing Grease Fires and Avoiding Indoor Hazards
Thick grease accumulations inside a gas grill represent a severe fire hazard that can suddenly ignite into an uncontrollable inferno. If a flare-up turns into a continuous grease fire, immediately turn all burner knobs to the off position and shut off the propane cylinder valve if safe to reach. Never throw water on a grease fire, because vaporizing water droplets scatter burning grease droplets and spread the flames rapidly. Keep the grill hood closed to starve the fire of oxygen, and keep an approved Class B fire extinguisher nearby.
Location safety is equally vital whenever cleaning, firing up, or testing a gas barbecue. Gas grills must never be operated inside a garage, breezeway, carport, or enclosed patio, even if the overhead garage door remains completely open. Fuel combustion produces lethal carbon monoxide gas that rapidly accumulates in partially enclosed structures, posing an invisible threat to life. Maintain a minimum safe clearance from exterior walls, vinyl siding, and wooden deck railings in accordance with local fire safety codes and manufacturer guidelines.
Recommended Cleaning Frequency and Storage Best Practices
Establishing a consistent cleaning schedule prevents stubborn carbon build-up from becoming an overwhelming weekend chore. Perform a quick high-heat burn-off and scrape after every single cooking session while the metal remains warm. Schedule a deeper cold degrease or steam scrub once every month during active grilling seasons, or after preparing sugary, sauced meats. A thorough end-of-season deep clean ensures that mold and grease do not decompose inside the cooking box during winter storage.
Store your clean gas grill beneath a breathable, water-resistant protective cover to shield metal components from rain, morning dew, and blowing dust. Ensure the grates are completely dry and lightly oiled before securing the cover to avoid trapping ambient condensation against the metal. If storing the grill inside a shed or unheated outbuilding for the winter, disconnect the propane cylinder and store the tank outdoors in a shaded, well-ventilated area. Following these practical maintenance steps guarantees your gas grill grates remain hygienic, safe, and ready to deliver outstanding sear marks for years to come.
Regular care transforms grate cleaning from a frustrating chore into a quick, predictable maintenance habit. Choosing between steam cleaning on hot bars or citrus degreasing on cold surfaces allows you to clear stubborn grease without endangering family members with loose steel bristles. Inspect your grate material carefully, protect bare iron with high-smoke-point oils, and always prioritize outdoor fire safety during every burn-off cycle. Consistent maintenance rewards you with clean, appetizing grill marks and dependable heating every time you ignite the burners.


Write Your Review
No reviews yet. Be the first to share your experience!