


Unboxing a new outdoor cooker is always exciting, but cooking your first meal immediately after assembly can result in unpleasant chemical flavors. Metal stamping machines and factory shipping processes leave behind protective machine oils, anti-corrosion sprays, and fine metal shavings. Learning how to prepare a new grill for cooking guarantees that your maiden cookout remains completely food-safe and full of authentic flavor. A methodical initial preparation protects your metal surfaces from early rust, burns away noxious manufacturing residues, and sets up your cooking grates for years of reliable service.
This initial routine applies whether you plan to fire up a gas cart, a charcoal kettle, a pellet smoker, or an open-flame camp cooker. Before striking your first match or turning a burner knob, you should inspect all internal connections, wash removable components, and choose an oil with a high smoke point to cure the grates. Equipping your cooker with tools like smoker boxes works best when the underlying grill interior is already sanitized and seasoned. Taking time to complete a thorough burn-in procedure clears out industrial smells so your ingredients absorb only genuine hardwood smoke and rich seasoning aromas.


Pros
- Versatile - roast and grill at the same time over a single fire
- Height adjustment lets you dial in the perfect cooking temperature
- Portable and easy to assemble/disassemble for camping or tailgating
- Solid steel build feels sturdy and should hold up to repeated outdoor use
Cons
- Manual rotisserie requires constant attention - no motor for hands-off cooking
- At 16 pounds, it's not ultralight for backpacking but fine for car camping or backyard
- Mesh grate may be tricky to clean after greasy cooks; no non-stick coating
If you love the primal satisfaction of cooking over an open flame but want more control than a stick and a prayer, the onlyfire Adjustable Grill Rotisserie System is a smart upgrade. This manual rotisserie and grate combo turns a basic campfire into a two-zone cooking station. You get a rotating spit for roasting chicken, turkey, or even a leg of lamb, plus a generous mesh grate for grilling burgers, veggies, or fish. It's a setup that works equally well at a campsite, a tailgate party, or in your backyard fire pit.
This system is built for campers, tailgaters, and backyard cooks who want authentic smoke flavor without electricity or propane. The manual rotisserie means you'll be turning the handle yourself, but the spiral-designed handle stays cool and gives you good leverage. The height adjustment on both the grate and the spit is a real plus - you can raise or lower the cooking surface to manage heat intensity. Over a roaring fire, lift it high for gentle roasting; for searing, drop it low. It's simple, mechanical, and effective.
In real-world use, the dual cooking capability shines. While a chicken slowly rotates and self-bastes over the flames, you can grill corn, peppers, or sausages on the grate. The diamond-shaped mesh allows heat to flow through evenly, and the curved edges keep food from rolling off. The extended hooks on the sides are handy for hanging a small pot of beans or a kettle for coffee. Just be aware that without a motor, you'll need to stay nearby to keep the spit turning. It's not set-and-forget, but the hands-on approach is part of the fun for many outdoor cooks.
Build quality is solid for the price. The steel frame feels sturdy, and the detachable design makes it easy to pack up. The whole thing weighs 16 pounds, so it's fine for car camping or backyard use but too heavy for backpacking. Assembly is straightforward with thumb screws - no tools required. Cleanup is the main drawback: the mesh grate can be a pain to scrub after greasy cooks, and there's no non-stick coating. A good grill brush and some soapy water will do the job, but expect some elbow grease.
Limitations are honest. The manual rotisserie means you can't walk away for long. Also, the system is designed for open fires or fire pits - it won't work with a standard gas grill unless you improvise a support. The 16-pound weight and lack of a carrying case mean it's not the most portable option, but it packs down fairly flat. Wind can affect heat consistency, so position your fire accordingly.
All things considered, this is a great buy for anyone who enjoys cooking over a real fire and wants to expand what they can make. It's especially good for campers who already have a fire ring, tailgaters who want to impress with a rotating roast, or backyard BBQ enthusiasts looking for a manual rotisserie experience. Pair it with a good fire, some patience, and a cold drink, and you'll turn out memorable meals with that unbeatable smoky flavor.

Pros
- Massive recipe collection covering red meat, poultry, seafood, flatbreads, vegetables, and homemade rubs
- Clear instructions for building two-zone fire layouts on any charcoal, gas, or pellet setup
- Durable hardcover design built to endure outdoor kitchen and prep cart use
- Adaptable cooking charts emphasize internal temps and sensory cues over rigid timetables
Cons
- Hefty page count requires dedicated counter space on busy grill prep tables
- Focuses primarily on technique and text rather than full-color pictorial spreads on every page
- Does not cover brand-specific digital app configurations for automated pellet controllers
Mark Bittman's How to Grill Everything serves as a master reference manual for outdoor fire cooking, delivering an exhaustive culinary roadmap directly to your backyard prep cart. While often cataloged alongside generic outdoor accessories, this substantial hardcover guide acts as an essential tool for backyard grillers, barbecue purists, campers, tailgaters, and patio hosts. It strips away intimidation and replaces guesswork with dependable, repeatable techniques that work across virtually any flame-based cooking platform.
Solid outdoor cooking hinges on precise heat management, sear quality, and steady airflow. Bittman walks outdoor cooks through the core mechanics of two-zone fire setups, showing exactly how to balance blistering direct heat for steaks and burgers with gentle indirect warmth for whole chickens and ribs. Whether you cook over hardwood lump charcoal, a multi-burner gas station, or a flat top griddle, the text provides actionable methods to harness smoke flavor, manage flare-ups, and hit exact internal doneness every time.
Built to withstand frequent outdoor use, the physical book features a rigid hardcover shell and robust page stock suited for busy prep stations. While it is an instructional guide rather than a piece of metal hardware with grates and folding legs, its rugged construction holds up against outdoor patio winds, splatters, and sauce-covered fingers. The spine opens flat, allowing you to glance at marinades, timing guidelines, and heat zone layouts while keeping your hands focused on the grill tongs.
Transporting this guide to a tailgating lot, campsite, or RV galley is simple since it slips neatly into a standard dry-goods bin or gear box. A realistic consideration is its substantial physical weight and footprint, which requires dedicated shelf space away from open flame zones. In addition, cooks seeking glossy lifestyle photography for every single dish will find this text-rich reference oriented firmly around practical utility and versatile culinary technique.
For anyone wanting to broaden their outdoor cooking capabilities beyond pre-packaged burgers and standard hot dogs, this guide represents an outstanding investment. It proves its worth during large neighborhood cookouts and weekend smoking sessions where timing multiple courses over charcoal or gas is critical. Having Bittman's reliable blueprints at the ready transforms any patio griller into a confident, versatile pitmaster.
Mastering live-fire outdoor cooking requires clear control over fuel consumption, airflow, and heat distribution. The guide breaks down multi-zone cooking arrangements so you can sear proteins directly over screaming coals while resting delicate sides on indirect warming sections without burning.
From smoking pork low and slow to crisping smash burgers on an outdoor griddle, the techniques translate seamlessly across propane burners, briquettes, charcoal kettles, and wood smokers. It functions as an indispensable playbook for weekend gatherings, game-day cookouts, and patio entertaining.
Pros
- Comprehensive coverage of all grilling methods from direct heat to smoking
- Clear illustrations make complex techniques easy to understand and apply
- Digital format means instant access on any device - no waiting for shipping
- Written by a trusted barbecue authority with decades of hands-on experience
Cons
- Requires practice to truly master the techniques - it's not a plug-and-play tool
- No physical copy for those who prefer to flip through a printed book while cooking
- Some advanced techniques assume access to specific equipment not covered in the book
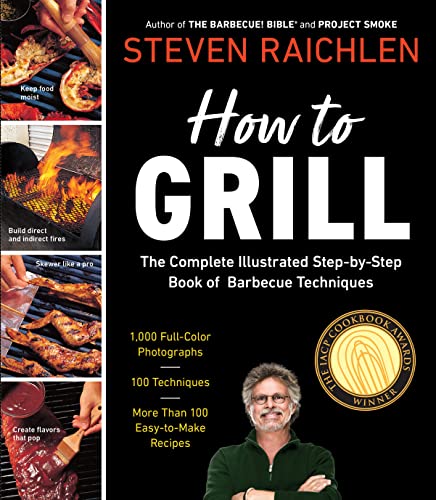
Steven Raichlen's How to Grill is more than just a cookbook - it's a complete illustrated course in outdoor cooking. Designed for backyard grillers, BBQ enthusiasts, campers, tailgaters, RV owners, and patio cooks, this digital guide covers everything from lighting a charcoal chimney to smoking a whole pork shoulder. If you've ever wanted to understand why your burgers char unevenly or how to get that perfect smoke ring, this book is your starting point.
The real strength of this guide lies in its emphasis on technique over recipes. You'll learn how to manage heat consistency for searing steaks, control temperature for low-and-slow smoking, and even how to adjust your grill for different fuel types. The step-by-step illustrations break down complex processes like indirect grilling and charcoal banking, making them accessible even for beginners. Whether you're fast-grilling burgers for a crowd or babysitting a brisket all afternoon, the methods here help you achieve better results with less wasted fuel.
Since it's a Kindle eBook, the portability factor is outstanding. You can pull it up on your phone while tailgating, reference it on a tablet at the campsite, or read it on your laptop before a backyard party. The knowledge inside is far more valuable than any single piece of gear - it teaches you how to get the most out whatever grill you own, whether it's a propane gas grill, a charcoal kettle, or a pellet smoker. For those who enjoy learning on the go, the digital format is a huge plus.
Setup and cleanup are non-issues here - you simply download the file and start reading. But like any skill-based resource, the real work happens when you step away from the book and fire up your grill. Some techniques require practice to get right, and a few assume you have specialized tools like a rib rack or a fish basket. That said, the lessons on grease management, flare-up control, and airflow are universally applicable and will improve any outdoor cook's confidence immediately.
If you're serious about improving your barbecue game, this book is a smart investment. It's not a gadget that will do the work for you, but it will teach you principles that last a lifetime. Pair it with your favorite grill and some good meat, and you'll be cooking like a pro in no time.
Complete Walkthrough: Preparing Your New Grill for Its First Meal
Preparing a brand-new cooker requires a clear sequence of cleaning, fuel verification, high-heat burn-off, and oil seasoning before any ingredients touch the grates. Skipping these critical steps exposes your food to industrial lubricants and risks early surface corrosion on bare metal grates. Taking a methodical approach ensures your equipment reaches proper cooking temperatures safely and maintains a non-stick, rust-resistant barrier. Following the detailed guidance below will get your cooker ready for everything from quick weeknight burgers to slow weekend barbecue feasts.
Unboxing Inspection and Assembly Verification
Carefully inspect every component as you unpack the cartons to ensure no internal parts suffered shipping damage. Look closely at gas burner tubes, heat diffusers, charcoal grates, and ignition wiring to verify that all clips and fasteners sit securely in their factory slots. Many manufacturers hide internal packaging materials such as bubble wrap, zip ties, cardboard supports, or adhesive tape underneath the grease tray or inside the hood lid. Burning these synthetic packaging remnants creates toxic plastic residue that is extraordinarily difficult to remove once melted onto your firebox surfaces.
Take time to verify the physical alignment of structural joints, cart legs, and lid hinges. A loose bolt on a side shelf or a wobbly caster wheel can create severe stability hazards once the grill holds heavy cast-iron cookware or scorching fuel beds. For units with electrical blowers, digital controllers, or rotisserie spit brackets, test their fitment before lighting any fires. Tightening all hardware during the initial build prevents frustrating rattles, air leaks, and heat loss during subsequent cookouts.
Safe Outdoor Placement and Ventilation Clearances
Never operate any outdoor grill inside an enclosed garage, shed, breezeway, or screened patio, even if the exterior doors remain fully open. Fuel combustion produces dangerous carbon monoxide, an invisible and odorless gas that quickly accumulates to lethal levels in semi-enclosed spaces. In addition, intense radiant heat and sudden grease flare-ups present severe fire risks to dry drywall, exposed framing studs, and ceiling joists. Grills belong strictly outside on stable, level ground where rising thermal drafts and airborne grease particles can disperse harmlessly into the open sky.
Maintain adequate clearance between your grill and any combustible structures, including house siding, deck railings, roof eaves, and low-hanging tree branches. Most grill manufacturers recommend a minimum buffer zone of ten feet away from walls and overhanging vinyl eaves. Ensure that the chosen outdoor surface consists of fire-safe material such as concrete pavers, flagstone, or an approved heat-resistant grill mat placed over wooden decking. Positioning your grill away from strong prevailing winds also prevents erratic draft issues, burner blowouts, and uneven cooking temperatures.
Washing Away Factory Oils and Dust
Manufacturing facilities coat sheet metal, burner tents, and cooking grates with petroleum-based machine lubricants to protect raw metal against warehouse moisture and shipping corrosion. These mechanical oils are unsafe for food contact and will taint your initial recipes with harsh chemical fumes if not washed away. Fill a large bucket or sink with warm water and a modest amount of mild, grease-cutting liquid dish soap. Remove all loose interior components, including the primary cooking grates, warming racks, heat shields, and grease catch pans.
Scrub the surfaces gently using a soft sponge, microfiber cloth, or non-abrasive nylon dish pad. Avoid using abrasive steel wool, scouring powders, or aggressive wire brushes, which can scratch porcelain enamel coatings and expose underlying sheet metal to moisture. Rinse every piece thoroughly with clean fresh water to remove any lingering soapy suds or detergent films. Dry all metal parts immediately and completely with a clean towel, as sitting water droplets can trigger rapid flash rusting on unseasoned steel and cast-iron surfaces.
Conducting Pre-Ignition Fuel Safety Checks
For gas and liquid propane grills, conducting a leak test across all fuel connections is an indispensable safety check prior to your initial lighting. Mix equal parts water and liquid dish soap in a spray bottle or small cup, then brush or spray the solution over the propane tank valve, regulator hose, and manifold fittings. Open the gas cylinder valve slowly while keeping the main grill burner control knobs turned to the off position. If you see growing soap bubbles or smell distinct rotten-egg odorants, close the tank valve immediately, re-seat the gas fittings, and test again.
Charcoal, wood pellet, and open-flame cookers require their own mechanical inspections before adding fuel. Check that charcoal intake dampers and exhaust vents slide smoothly through their full range of motion so you can manage airflow effectively. For pellet cookers, look into the hopper to ensure no foreign debris, loose metal hardware, or damp, swollen pellets block the auger tube. Confirm that all grease drainage channels slope cleanly toward the drip bucket to avoid dangerous grease accumulation during future high-heat cooking sessions.
The Initial High-Heat Burn-Off Procedure
The initial high-heat burn-off, often called the burn-in, vaporizes remaining industrial oils and cures high-temperature powder-coated exterior paints. Reinstall the clean, dry heat diffusers and cooking grates inside the firebox, then close the heavy grill hood. Light your grill according to the manufacturer instructions, ensuring that gas grill lids remain open during ignition to prevent dangerous gas accumulation. Once the flame catches, close the lid and adjust the burner dials or intake vents to reach a steady high temperature between 450 and 500 degrees Fahrenheit.
Maintain this elevated heat output continuously for approximately thirty to forty-five minutes. During the first twenty minutes, you will likely notice thick, foul-smelling white smoke venting from the seams as the factory lubricants burn away. This visual smoke will gradually thin out, transitioning to clear heat waves as the internal steel surfaces become clean. Once the smoke clears and the metallic smell dissipates, shut off the burners or close the charcoal dampers, letting the grill cool down completely before handling the grates.
Seasoning Cooking Grates and Metal Surfaces
Seasoning creates a durable, non-stick polymer layer that repels moisture and prevents delicate proteins like fish, chicken, and burgers from sticking to the grates. This process is essential for bare cast-iron and raw steel grates, and it also provides valuable non-stick protection on stainless steel and porcelain-coated surfaces. Select a cooking oil with a high smoke point and neutral flavor profile, such as canola oil, refined peanut oil, grapeseed oil, or melted vegetable shortening. Avoid extra virgin olive oil, butter, or unrefined coconut oil, which break down at low temperatures and produce sticky, acrid soot instead of smooth polymerized coatings.
Apply a very thin, even layer of your chosen high-heat oil across all sides of the clean, cool grates using a lint-free cotton cloth or silicone basting brush. Wipe away any pooling oil with a clean paper towel so that only a microscopic sheen remains on the metal bars. Relight the grill, bring the cooking chamber to medium heat around 375 to 400 degrees Fahrenheit, and allow the grates to bake for thirty minutes until the oil hardens. For cast-iron surfaces, repeating this oiling and baking cycle two or three times establishes a deeply resilient protective barrier.
Calibrating Temperature Zones and Cooking Techniques
Built-in lid thermometers measure ambient air temperature near the top of the hood rather than the actual heat level on the cooking surface. Grate-level temperatures can run twenty-five to fifty degrees hotter than hood readings due to direct radiant energy from the burner tubes or charcoal coals. Practicing two-zone fire management allows you to sear meats directly over intense heat while providing a cooler indirect zone to gently finish cooking without burning. Mastering airflow dampers on charcoal grills or modulating individual burner knobs on gas units establishes reliable temperature stability for diverse ingredients.
If you want to broaden your understanding of fundamental outdoor culinary techniques, consulting trusted reference guides can shorten the learning curve. Authoritative books such as [Mark Bittman]-How to Grill Everything and How to Grill: The Complete Illustrated Book break down the mechanics of direct searing, indirect roasting, and smoke circulation. These foundational texts explain how radiant energy interacts with different cooking surfaces, helping novice pitmasters avoid dry steaks and undercooked poultry. Understanding heat behavior lets you approach your first meal with confidence and precise control over flame flare-ups.
Integrating Specialized Tools and Flavor Systems
Preparing an open flame campfire setup or outdoor spit requires specialized hardware care alongside your primary grill maintenance. For instance, the only fire Adjustable Grill Rotisserie System features durable steel construction with an adjustable spit rod and diamond-shaped mesh grate that need thorough cleaning and light oiling before their maiden spin. Testing spit rod balance, securing meat fork prongs, and checking thumb screw tension ensure smooth rotation when roasting whole chickens or pork roasts over campfires. The diamond mesh top allows wood-fired heat to circulate freely while keeping smaller side dishes safely contained.
Your first meal provides an excellent opportunity to test your freshly cured grates with flavorful marinades and balanced spice rubs. Seasoning your cuts with specialized blends, such as those found in the Grill Masters Club The Grate Tailgate BBQ Box, introduces rich savory notes that complement a clean grill surface. You can also craft a batch of cranberry barbecue sauce to balance smoky proteins with tart, fruity acidity. Utilizing the heat-resistant gloves included in premium accessory sets protects your hands and wrists while adjusting hot vents or flipping tender cuts.
Planning a versatile menu helps you evaluate how evenly your new firebox distributes thermal energy across the front, middle, and back grates. Searing a flavorful batch of Korean beef barbecue on the freshly oiled bars will immediately reveal any hot spots across your cooking zones. Thinly cut meats cook quickly, allowing you to gauge heat responsiveness without burning expensive cuts of beef. Once you identify how your specific grill manages grease drippings and heat flow, executing complex multi-course meals becomes predictable and rewarding.
Common Mistakes to Avoid During Initial Setup
The most frequent mistake novice grill owners make is rushing to throw food onto unwashed grates the moment assembly concludes. Skipping the high-heat burn-off leaves factory chemical coatings on the grates, imparting bitter, petroleum-like tastes to your food and potentially releasing noxious vapors. Another common pitfall involves applying far too much seasoning oil, which puddles in grate corners and bakes into a sticky, gummy residue rather than a slick patina. Always wipe away excess oil before heating so that the metal absorbs only a paper-thin microscopic coat.
Avoid using cheap brass or wire bristle cleaning brushes that can shed sharp steel wires onto newly seasoned grates. Ingesting loose wire bristles that adhere to grilled food presents serious internal health hazards for family and guests. Instead, rely on wooden scrapers, heavy-duty pumice grill stones, or twisted stainless wire mesh pads designed to eliminate shedding. Finally, never leave a newly assembled grill unattended during its initial high-heat burn-in cycle, as sudden packing material flare-ups require immediate shut-off intervention.
Routine Upkeep to Preserve Your Initial Seasoning
Preserving the protective non-stick seasoning you built during setup requires simple, consistent habits after every cookout. Once you transfer cooked meats to serving platters, give the grates a brisk brush while they remain warm to sweep away charred food residues. While the metal is still warm but safe to touch, dip a folded paper towel in a small amount of cooking oil and wipe the bars to refresh the rust-protective coating. Avoid scrubbing grates with harsh soapy water after the initial wash, as dish detergents strip away the hard-earned polymerized patina.
Allow the entire grill to cool completely before emptying the ash catcher or wiping down exterior side shelves. Check the grease collection tray regularly to prevent rancid grease buildup, which can spark dangerous grease fires during subsequent high-heat preheating cycles. Invest in a heavy-duty, waterproof, and UV-resistant grill cover to shield your unit from rain, snow, bird droppings, and morning dew. Consistent maintenance keeps your cooking surfaces sanitary, prevents premature firebox corrosion, and ensures your grill is always primed for the next cookout.
Final Practical Takeaway for New Pitmasters
Taking the time to wash away factory residues, execute a thorough burn-in, and polymerize your cooking grates pays immediate dividends on your very first plate of food. Clean metal ensures that your marinades, rubs, and natural meat juices develop rich caramelization without chemical contamination or sticky tearing. Regular visual inspections of your burners and fuel lines keep every backyard gathering safe and free from unexpected mechanical failures. With your new cooker fully sanitized, calibrated, and seasoned, you can fire up the burners with complete confidence and enjoy outstanding outdoor cooking.






Write Your Review
No reviews yet. Be the first to share your experience!