


A dead push-button sparker should never derail an outdoor meal or force an unexpected menu change. Learning how to light a propane grill manually gives backyard cooks a dependable, safe method to fire up their burners when electronic igniters fail. Most gas barbecues feature built-in access ports specifically engineered to accept an extended flame source directly beside the primary burner tubes. Approaching this process with calm precision ensures that cooking proceeds smoothly without unnecessary hazards. Knowing the proper physical sequence keeps you in complete control of the fuel flow at all times.
Safety starts with strict adherence to gas ventilation protocols and clear visibility across the cookbox. Trapped liquid petroleum gas can accumulate rapidly beneath a closed hood, which makes proper airflow essential before introducing any flame. Backyard chefs who plan outdoor cooking spaces and inspect outdoor barbecue island setups with task lighting understand that clear line of sight directly impacts operational safety. Checking the burner area thoroughly prevents unburned fuel from lingering near ignition points. With the right handheld flame tool and a clear understanding of burner anatomy, manual ignition becomes a simple, repeatable routine.
Pros
- Dual-light pack provides balanced illumination across cooking grates and side shelves
- Flexible 5-inch gooseneck and zoomable beam allow customized lighting coverage without tools
- Heat-resistant aluminum alloy housing holds up well near active cooking areas
- Strong magnetic base allows quick placement and repositioning on magnetic steel surfaces
Cons
- Magnetic base will not adhere to non-magnetic stainless steel, aluminum, or non-ferrous alloy grill bodies
- Requires three AAA batteries per light that must be purchased separately
- Five-inch gooseneck length may be slightly short if your only magnetic mounting spot is far from the grates
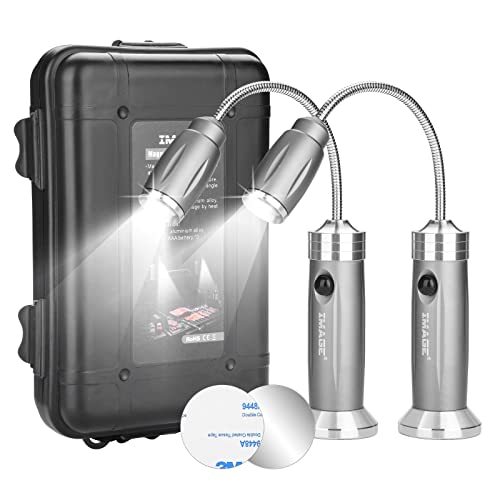
The IMAGE Magnetic Barbecue Grill Light Set includes two compact, battery-powered LED lights designed to solve poor visibility during evening cooks. Grilling steaks, burgers, or chicken after sundown often leaves you squinting over darkened cooking grates or fumbling with a handheld flashlight. This two-piece set is aimed at backyard barbecue enthusiasts, weeknight family cooks, campers, and patio grillers who want simple, direct illumination over their grill surface without dealing with bulky clamps or extension cords.
Each light features a bright LED emitter paired with an adjustable focal length. This zoomable head allows you to switch between a wide floodlight that covers a broad section of the grates and a tighter spotlight aimed at specific items or temperature zones. The 5-inch flexible gooseneck and swivel head let you position the beam precisely where you need it, helping you monitor searing progress and food placement without tying up your hands while handling tongs or spatulas.
Crafted from durable aluminum alloy, the light housings are designed to withstand heat when placed near the perimeter of active outdoor grills. The base houses a magnet designed to cling firmly to magnetic steel grill bodies, side shelves, or metal cart frames. Because the unit uses an aluminum casing rather than lightweight plastics, it is better equipped to handle standard outdoor cooking environments and warm operating conditions.
Operating these lights is straightforward, with tool-free angle adjustments and a simple push-button interface. Each light requires three standard AAA batteries, which are not included, and the manufacturer lists up to 48 hours of run time per set of batteries. Their lightweight build of under half a pound makes them easy to reposition, store in a patio drawer between uses, or toss into a tailgating bag. Beyond the grill, the magnetic base makes them useful around the garage or workshop for mechanical repairs.
A crucial limitation highlighted by the manufacturer involves grill material compatibility. The magnetic base requires a ferrous, magnetic metal surface to grip properly. Many modern grills feature non-magnetic high-grade stainless steel, cast aluminum, or alloy parts that will not hold a magnet. In addition, the 5-inch gooseneck is relatively compact, meaning you must mount the light reasonably close to your cooking grates to achieve adequate coverage.
For grillers who own a steel-framed grill, cart, or side shelf and frequently find themselves cooking family dinners or game-day meals after dark, this two-pack from IMAGE provides solid practical value. As long as you confirm your grill surface holds a magnet before buying and keep extra AAA batteries on hand, these lights offer an affordable, hands-free lighting solution for your outdoor setup.
The mounting system relies entirely on a built-in magnetic base. This allows rapid attachment and repositioning anywhere on a ferrous metal surface, including painted steel grill frames, steel side shelves, smoker firebox surrounds, and metal carts.
Before purchasing, it is essential to check your grill with a household magnet. High-nickel stainless steel, cast aluminum hoods, and specialized alloys frequently used on outdoor cookers are non-magnetic and will not support this light without an added steel mounting plate.
Each unit is powered by three standard AAA batteries, keeping the setup cordless and portable. The manufacturer estimates up to 48 hours of run time, though real-world battery life will depend on battery quality and operating temperatures.
The adjustable focus collar moves forward and backward to transition the LED beam from a concentrated spot beam to a broad flood. This flexibility helps illuminate either a single zone on your grates or a broader food preparation surface.


Pros
- Expanding side wings widen the beam pattern to light up larger grate areas
- Sturdy handle clamp attaches to most standard gas, charcoal, and pellet grill handles
- Lightweight 0.75-pound design does not weigh down the grill lid during lifting
- LEDs are rated for an impressive 10,000 hours of life
- Operates on widely available AAA batteries without the hassle of cords or recharging
Cons
- Three AAA batteries are required for operation but are not included in the box
- Clamp mechanism may not fit unusually thick or custom-molded grill handles
- Plastic construction should be positioned carefully to avoid contact with extreme lid heat
The Cuisinart CGL-330 Grilluminate Expanding LED Grill Light is a targeted accessory designed specifically for outdoor cooks who refuse to let the sunset end barbecue season. When daylight fades during late-fall family dinners, winter weeknight meals, or post-game tailgates, seeing the true color and surface texture of your food can be frustrating. This compact handle-mounted light provides a direct, hands-free lighting solution for gas, charcoal, pellet, and hybrid grill owners who need clear visibility over their cooking surface.
Visibility is the core performance benefit of the Grilluminate. Built with nine bright LEDs, the unit projects a clean, focused beam straight onto the cooking grates when the lid is lifted. Its standout mechanical feature is a pair of extendable side panels that slide outward from the central housing. By expanding the light source horizontally, it casts a wider swath of illumination from edge to edge, reducing dark spots where indirect chicken pieces, burger patties, or delicate grilled vegetables might otherwise be overlooked.
In terms of build and design, the fixture weighs just 0.75 pounds and measures 7.5 by 1.5 by 8.5 inches, making it easy to store in an outdoor accessory drawer when not in use. The LEDs are rated for up to 10,000 hours of runtime, which translates to years of dependable evening grilling. The integrated mounting clamp is engineered to attach securely to most round or rectangular grill hood handles, holding firm as you raise and lower the lid throughout your cook.
Setting up and maintaining the Grilluminate is straightforward. It runs on three standard AAA batteries rather than an internal rechargeable battery, which means you never have to wait for a power bank or USB cable to charge before starting dinner. Simply insert fresh batteries, hand-tighten the clamp bracket to your handle at a comfortable angle, and press the power switch. When it comes time to put on a tight-fitting grill cover for weather protection, loosening the clamp to remove the light takes only a few seconds.
Realistic limitations should also be kept in mind before buying. The three AAA batteries are not included, so you will need to have a pack on hand for initial setup. While the clamp fits standard tubular and bar-style handles on most popular grills, it may struggle on extra-thick, uniquely shaped, or flush-mounted lid handles. Additionally, because the housing is constructed primarily of molded materials, cooks should position the clamp so the body does not press directly against blistering hot cookbox seams or chimney exhausts.
For backyard cooks looking to solve poor patio lighting without balancing a phone or flashlight, the Cuisinart CGL-330 Grilluminate offers practical value. Its expanding wings provide noticeably wider coverage than basic spotlight-style attachments, and the simple clamp system makes it an easy upgrade for anyone who loves cooking outdoors after dark.
Outdoor lighting on decks and patios is often positioned overhead or behind the griller, creating harsh shadows directly across the grates when you lean in with a pair of tongs. The Cuisinart Grilluminate solves this common backyard problem by putting the light source directly in front of the food. Mounting to the lid handle angles the light downward exactly where you are working, giving you an unobstructed view of burger sear marks, hot dogs, and barbecue glazes.
The sliding wing design provides an advantage over traditional single-beam grill lights. By pulling the outer LED pods outward, the beam spread broadens across both primary and secondary cooking zones. This extra width makes it easier to monitor multiple heat zones at once, whether you are searing steaks over direct heat on one side or resting chicken wings on indirect heat on the other.
Installation requires no specialized tools. The integrated clamp uses an adjustable screw bracket that grips around standard handle profiles found on typical freestanding gas grills, charcoal kettles, and backyard pellet cookers. The lightweight 0.75-pound build ensures your grill lid does not feel heavy or unbalanced during one-handed opening.
To ensure long service life, it is best practice to remove the light before slipping a heavy all-weather grill cover over your equipment. Because the screw clamp is simple to adjust, detaching the unit for indoor storage between cooks takes minimal effort and protects both the clamp and lens from moisture accumulation and prolonged outdoor exposure.

Pros
- Versatile mounting options with both a sturdy handle clamp and a magnetic base for steel surfaces
- Wide COB flood beam covers broad cooking areas far better than narrow spotlight alternatives
- Quick-release slide mechanism makes USB-C recharging simple without unbolting the bracket
- Durable aluminum alloy construction withstands ambient cookbox heat and outdoor conditions
Cons
- Solar charging operates much slower than a direct USB-C cable connection
- The 1.5-inch mounting arm may require precise positioning on extra-deep grill hoods
- Magnetic mounting requires ferrous metal surfaces and will not stick to non-magnetic stainless steel
The Anicooking Rechargeable LED Grill Light is a specialized outdoor cooking accessory engineered to solve one of the most common backyard challenges: poor lighting over the cooktop after sunset. Whether you are managing burgers on a patio gas grill, flipping pancakes on an outdoor griddle, or checking dinner during a camping trip, having clear visibility over your food is essential. This light caters to weeknight family cooks, weekend entertainers, and griddle enthusiasts who want dependable task lighting without holding a flashlight or relying on weak porch bulbs.
In terms of illumination performance, the unit utilizes an updated COB LED panel configured for a wide floodlight spread rather than a narrow spotlight beam. This broader dispersion helps cast even light across larger grates and flat-top surfaces, making it easier to monitor sear marks, check surface browning, and spot flare-ups. The light includes two selectable brightness settings, allowing users to choose a softer output for early evening twilight or high brightness for pitch-black night cooks.
Build quality centers around a durable gray aluminum alloy housing designed to handle high ambient heat around grill hoods as well as outdoor weather conditions. Unlike basic plastic accessories that become brittle when exposed to patio heat and sun, the metal housing provides solid protection. The light head connects to a 1.5-inch arm that rotates 360 degrees, allowing you to angle the beam directly down onto the food surface regardless of whether the grill lid is opened flat or tilted back.
Mounting versatility is one of the standout practical features of this model. The package includes a universal strip mounting bracket engineered to fit round, oval, square, and dome-shaped handles found on brands such as Weber, Blackstone, Napoleon, Ninja, and Broil King. Additionally, the integrated magnetic base allows the light to attach directly to ferrous metal shelves or grill frames. A slide-lock mechanism lets you detach the light body from the handle bracket in seconds, making indoor charging or handheld use straightforward without having to unscrew the mounting clamp from your grill.
While the light offers great everyday convenience, there are a few realistic limitations to keep in mind. The built-in solar panel provides passive top-off charging, but it naturally charges much more slowly than plugging the unit into a standard USB-C power source. Furthermore, while the magnetic base is convenient, it requires magnetic metal to stick, meaning users with non-magnetic stainless steel side shelves must rely primarily on the handle mount. The 1.5-inch arm length provides decent clearance, though some extra-tall or recessed hoods may require careful angle adjustment to achieve optimal beam placement.
For outdoor cooks looking to improve nighttime cooking visibility on gas grills, charcoal kettles, pellet smokers, or flat-top griddles, the Anicooking Rechargeable Grill Light delivers impressive practicality. Its combination of durable aluminum construction, wide COB flood lighting, detachable quick-slide charging, and flexible mounting options makes it a sensible and convenient addition to any backyard setup.
The Anicooking grill light provides dual mounting methods to adapt to a wide variety of outdoor cooking configurations. Its primary attachment is a universal strip bracket designed to clamp securely around diverse handle shapes, including round, oval, square, and dome profiles commonly found on backyard gas grills, smokers, and griddles.
For units with steel side tables or flat surfaces, the built-in magnetic base provides quick placement without tools. The clever quick-release slide mount ensures you can pull the light off for quick storage or USB-C charging while leaving the mounting bracket permanently secured to your grill handle.
This grill light features an integrated rechargeable battery system designed to end the frustration of dead alkaline batteries mid-cook. The primary charging method is via modern USB-C, providing dependable power replenishment between cooking sessions.
In addition to cable charging, the top housing incorporates a solar panel designed for supplementary charging while resting outdoors in sunny patio areas. Two brightness levels give users control over runtime, allowing lower output during early dusk to conserve power for longer evening grilling sessions.
Step-by-Step Manual Ignition and Safety Procedures for Gas Grills
Manual ignition provides an immediate workaround when a battery-powered spark generator or mechanical piezo switch stops working. Performing this task safely requires an understanding of gas behavior, proper sequencing, and strict adherence to firebox ventilation rules. Every step outlined below focuses on controlled flame introduction to prevent sudden gas flares. Following these foundational steps will keep your barbecue operating smoothly even when electronic components malfunction.
Gas Dynamics and the Critical Rule of an Open Grill Hood
Liquid petroleum propane is heavier than ambient air, causing it to sink and pool along the bottom of the grill body when released. Operating with the grill lid down allows this dense vapor to collect into a hazardous fuel-air pocket within seconds. Introducing an ignition source to an enclosed volume of pooled vapor can produce a sudden flash fire capable of damaging equipment and causing severe burns. Keeping the grill hood completely open ensures natural air currents disperse excess fuel continuously.
Standard operating procedures established by grill manufacturers universally require opening the hood before opening the propane tank valve or turning burner knobs. This rule applies equally to manual ignition attempts and standard push-button lighting routines. Opening the lid wide also allows full visual inspection of the burner tubes, crossover channels, and grease trays before starting. Lingering fuel vapors clear quickly when the air moves freely across the open grates. Cooks should make opening the lid the automatic first physical action of every single barbecue session.
Essential Flame Tools for Safe Manual Ignition
Standard pocket lighters or short paper matchbooks place hands far too close to the burner ports during fuel release. Backyard cooks should always choose an extended butane utility wand or extra-long wooden fireplace matches. These extended reach tools allow hands to remain safely outside the perimeter of the hot grate and away from the initial combustion zone. Standard short lighters force dangerous finger positioning right where the initial flame ball expands. Keeping a dedicated long utility lighter inside the grill storage cabinet prevents scrambling when an electronic igniter suddenly fails.
Visual confirmation of the burner flame is vital, especially when lighting a grill under low-evening patio light. Cooks who attempt to ignite burners in dim conditions often struggle to align the flame wand with the internal gas ports. Maintaining clear firebox visibility prevents fuel from discharging too long before the flame makes direct contact. Dedicated task lighting mounted on the grill handle or side shelf turns manual lighting into a safe, visible procedure.
The Complete Step-by-Step Manual Lighting Sequence
Begin the process by ensuring all burner control knobs rest firmly in the off position. Check that the propane cylinder connection is hand-tight and that the flexible rubber hose exhibits no visible cracks or sharp kinks. Slowly rotate the main valve handwheel on top of the propane tank counterclockwise until it reaches the fully open position. Opening the cylinder valve gradually prevents the internal excess flow safety check valve from accidentally restricting gas output.
<nLocate the designated manual lighting hole, which usually sits on the lower side panel or bottom casting of the firebox. If your specific grill model does not feature an external lighting hole, you will need to guide the flame down through the cooking grates directly beside the primary burner tube. Ignite your extended wand lighter or fireplace match before turning on any gas at the front control panel. Holding a live flame beside the burner port ensures instantaneous ignition the moment fuel begins exiting the orifices.
Depress and rotate the primary burner control knob to the high setting while keeping the flame wand steady beside the burner holes. The primary burner is usually the left-most dial or the specific control labeled with the ignition symbol. Within two to three seconds, a soft combustion sound signals that the gas has caught the flame and established a continuous ring of fire. Remove your lighter wand immediately once the burner maintains an active, stable blue flame.
Using the Factory Matchstick Holder Lanyard
Most modern gas grills come equipped with a thin wire match holder attached to the cart frame by a small chain or metal lanyard. Many owners overlook this accessory, mistaking it for temporary packaging material or an unnecessary hanging piece. This spring-coiled wand is specifically engineered to grip a standard wooden match firmly at its tip. The flexible wire design extends your physical reach through deep cooking grates safely. It allows cooks to guide a lit match deep into the firebox without risking burned fingertips or dropped matches.
Insert a sturdy wooden match securely into the coiled loop at the end of the holder before striking it against the matchbox strike strip. Guide the burning match down through the cooking grates until the flame rests directly adjacent to the primary burner ports. Once the match is positioned correctly, depress and turn the primary burner control knob to the high position. The match ignites the gas instantly, after which you can withdraw the wire holder and extinguish the spent match in a cup of water.
Protocol for Delayed Ignition and Fuel Dissipation
Patience and decisive action prevent dangerous gas buildup whenever a burner fails to ignite within three to five seconds. Turn the burner control knob immediately back to the full off position if no ignition occurs after several seconds. Leaving the burner knob open while adjusting your position or relighting a match allows gas concentration to multiply rapidly inside the cookbox. Unburned gas expands across the manifold and burner bay while you hesitate. Shutting off the dial stops fuel accumulation before a hazardous vapor density forms.
Leave the grill lid completely open and step away from the cooking area for at least five full minutes. This mandatory waiting period allows natural air circulation to dissipate all accumulated propane vapors into the surrounding open atmosphere. Never attempt to strike another match or activate a lighter while the distinct odor of unburned fuel remains detectable. Rushing this waiting period represents the single most common cause of singed arm hair and minor flash flare-ups.
Cross-Lighting Secondary and Warming Burners
Gas barbecue systems are engineered with crossover channels that run horizontally between neighboring burner tubes. These crossover tubes carry fuel and flame across the firebox once the initial primary burner is operating properly. Because of this cross-lighting design, you rarely need to light every individual burner tube manually with an open flame. Transfer channels bridge the gap between burner assemblies so ignition travels across smoothly. You simply ignite the primary burner first, confirm a stable flame, and then activate neighboring dials sequentially.
Turn the adjacent secondary burner control knob to the high position once the primary burner burns steadily. The crossover channel allows the flame from the first burner to ignite the gas flowing from the second tube within two seconds. Listen for the soft ignition pop and visually inspect the flame pattern across the entire length of the newly lit tube. Repeat this sequence moving from left to right until all required cooking zones are operational and adjusted to your desired heat level.
Troubleshooting Obstructions and Fuel Delivery Issues
A burner that refuses to catch manually often points to an obstructed fuel path or an empty propane cylinder. Small spiders and garden insects frequently build dense silk nests inside the narrow venturi tubes that feed the burners. These blockages restrict air-fuel mixing and can force gas to escape backward out of the air shutter rather than reaching the ignition point. Inspecting burner tubes with a small venturi brush or flexible pipe cleaner during routine maintenance keeps these channels clear.
Tripped excess flow valves represent another widespread reason for weak gas delivery or complete ignition failure. Modern Type 1 propane tank regulators contain a built-in safety ball that restricts gas flow if it senses a sudden pressure drop. Opening the tank valve too quickly with the burner knobs turned on frequently triggers this bypass mode, reducing flame output to a faint whisper. Resetting the regulator by turning off all dials, disconnecting the coupler, waiting several minutes, and reconnecting clears this restricted state completely.
Backyard cooks who incorporate flavor accessories like smoker boxes for outdoor grills must also monitor burner airflow around those additions. Placing heavy metal boxes directly over the lighting ports can disrupt local gas distribution and make initial manual ignition tricky. Always position smoking accessories after the main burners have been successfully lit and verified. Ensuring unobstructed airflow around the burner ports guarantees swift ignition and consistent temperature regulation.
Enhancing Firebox Visibility During Low-Light Ignition
Attempting to light a gas grill manually in twilight or total darkness adds substantial and unnecessary physical risk to the procedure. Cooks struggling to locate the manual lighting port while juggling a live butane wand can easily fumble the controls. Utilizing dedicated exterior grill illumination ensures that burner ports, control markings, and flame patterns remain distinctly visible. Clear lighting helps you distinguish between healthy blue combustion flames and problematic yellow sooting flickers.
Several purpose-built lighting accessories attach securely to grill bodies to resolve visibility challenges during evening cooks. The IMAGE Magnetic Ultra-Bright Barbecue Grill Light offers dual magnetic bases and five-inch flexible goosenecks that attach firmly to steel side shelves. For grills featuring non-magnetic alloy construction or composite handles, clamp-on designs like the Cuisinart CGL-330 Grilluminate Expanding LED Grill clamp directly to the lid handle. The LED Concepts Flexible Magnetic Grill Light combines a magnetic base with an extra-long twenty-two-inch gooseneck and an adjustable screw clamp for versatile mounting across various cart frames.
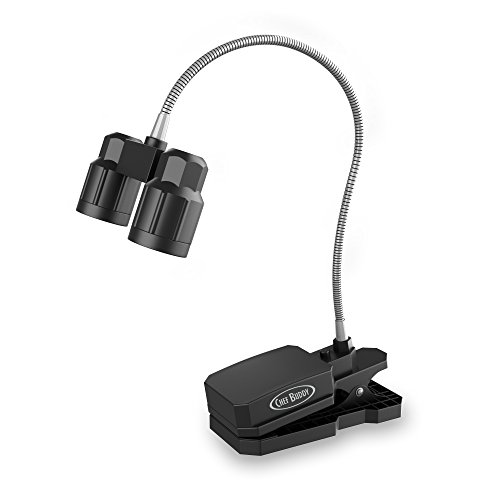
Rechargeable options also provide great utility across patio settings without relying on disposable battery replacements. The Grill Lights for Outdoor Grill with USB-C & Solor features universal strip mounting brackets that fit round or dome handles alongside a detachable COB LED head. Similarly, the Chef Buddy Grill Light provides a heavy-duty clip base paired with a magnetic mount and six bright LEDs on a fifteen-inch flexible neck. Positioning these lights directly toward the lower firebox plate eliminates guesswork during match placement and flame verification.
Enclosed Space Hazards and Carbon Monoxide Risks
Operating any fuel-burning grill inside an enclosed or partially enclosed structure creates extreme life-safety hazards. Liquid propane combustion produces odorless, colorless carbon monoxide gas that can accumulate quickly to lethal concentrations. Even operating a grill inside a residential garage with the main vehicle door propped completely open fails to provide adequate convective ventilation. Enclosed walls restrict natural air currents and allow heavy fumes to linger in corners. Stagnant air pockets capture dangerous exhaust gases and trap volatile fumes close to interior living quarters.
In addition to asphyxiation risks, the radiant heat and potential flare-ups from gas grills present severe structural fire threats to residential buildings. Vinyl siding, wooden framing, overhead storage shelves, and stored combustible chemicals like gasoline or paint thinners ignite rapidly under high heat. Fire safety standards from organizations like the National Fire Protection Association mandate that fuel-fired cooking appliances remain outdoors, clear of overhangs, and well away from exterior walls. Grilling outdoors in an open-air environment remains the only safe operational choice for any barbecue enthusiast.
Burner Flame Inspection and Transitioning to Cooking
Once manual ignition is achieved across your cooking zones, observe the burner flames for thirty seconds to assess combustion quality. A well-adjusted propane burner produces steady blue flames with small, light-blue inner cones and minimal yellow tipping. Yellow, lazy flames indicate incomplete combustion, which often stems from improper air shutter adjustment or dirty burner ports. Clean burner orifices generate sharp flame cones that hug the tube evenly along both sides. If the flames appear erratic or lift off the metal burner surface, shut off the fuel immediately and inspect the burner alignment.
Allow the grill to preheat with the lid closed for ten to fifteen minutes once proper flame stability is confirmed. Preheating burns off residual food oils from previous cooks and brings the cooking grids up to searing temperature. After the grates reach cooking heat, you can prepare flavorful main courses such as grilled Korean barbecue beef or slow-roasted cuts with confidence. Maintaining a dependable lighting routine ensures you spend less time troubleshooting equipment and more time enjoying perfectly cooked meals.
Mastering manual ignition transforms a frustrating equipment hiccup into a minor, two-minute adjustment. By respecting propane gas dynamics, keeping the firebox open, and using proper extended lighting tools, you ensure complete control over your grill. Keep an extended utility lighter and a reliable grill light handy so you are always prepared to cook safely whenever the electronic igniter fails. With these basic precautions in place, you can handle any igniter breakdown safely and keep your backyard cookout on schedule.


Write Your Review
No reviews yet. Be the first to share your experience!