


Starting a compact outdoor cooker can seem deceptively simple, but managing combustion in a confined cookbox requires careful technique. Small cookers feature limited fuel chambers, which means airflow changes impact internal temperatures far faster than in full-sized backyard rigs. Learning how to start a small grill requires matching your ignition method to your fuel type, whether you cook over lump charcoal, standard briquettes, or small propane canisters. Setting up your cooker on a level, heat-safe surface outdoors ensures you maintain complete control from the moment the fire catches.
Preparing your supplies ahead of time prevents frantic adjustments while hot coals or open flames are actively developing. Cooks often keep heat-resistant gloves, fuel tools, and food trays within arm’s reach on a rolling BBQ prep table to keep the immediate cooking zone organized and safe. Establishing steady airflow early prevents acrid white smoke from settling onto your food during the initial preheat. Once you establish a dependable ignition routine, your compact cooker can deliver restaurant-level sears and reliable everyday meals with minimal fuss.


Pros
- Fast and consistent ignition with excellent airflow design.
- Built like a tank – premium ductile iron means years of reliable service.
- Compact and lightweight enough to toss in a camping kit or tailgate gear.
- Works for both charcoal and firewood, adding versatility for different outdoor cooking setups.
Cons
- Small capacity – best for small to medium charcoal loads; not ideal for large offset smokers or huge campfires.
- Takes time to cool down after use – you can't immediately pack it away.
- May require practice to get the lighting technique down perfectly with different fuel types.
The Brutal BBQ Fireguard is a simple but brilliantly effective tool for anyone who regularly lights charcoal or firewood. Instead of fumbling with lighter fluid, chimney starters, or newspaper, this compact ductile iron device lets you stack your fuel inside and light a small fire beneath it. The built-in air inlet feeds oxygen directly into the base, creating a powerful updraft that gets your charcoal glowing in about 10 to 15 minutes. It works equally well with lump charcoal, briquettes, and even small pieces of firewood for a fireplace or campfire.
This fire starter is built for real outdoor use. The high-grade ductile iron casting feels solid in your hands and resists the kind of warping or rusting you see with cheaper steel chimneys. You don't need any maintenance beyond shaking out the ashes once it's cool. That ruggedness makes it a great companion for backyard grillers who want a dependable tool every weekend, as well as campers and tailgaters who need something that can survive being tossed in a truck bed or gear bin.
When it comes to cooking performance, the Fireguard shines at getting your coals ready fast and evenly. Because the airflow is optimized, you get a consistent bed of hot embers without cold spots. That means better searing ability on steaks or burgers and more reliable heat for low-and-slow smoking if you're using a charcoal smoker. It's also great for patio cooks who want to avoid chemical starters that can leave off-flavors on the food.
Portability is a big plus. The Fireguard measures just over nine inches tall and about four inches wide – small enough to fit inside most kettle grills, portable camp grills, or even your camping stove bag. It doesn't take up much space in your trunk for tailgating or in an RV storage compartment. The only limitation is capacity: it can hold enough charcoal for a two-burger grill session or a small campfire, but if you're running a large offset or cooking for a big crowd, you may need to do two batches.
Cleanup is about as easy as it gets. Once the Fireguard cools completely (and you should definitely wait until it's at room temperature before handling), just give it a shake to remove the ash. No water, no soap, no scrubbing. The iron may develop a natural patina over time, but that doesn't affect performance. Just avoid getting it wet while it's hot to prevent any thermal shock.
Overall, the Brutal BBQ Fireguard is a smart upgrade for anyone who lights charcoal or firewood regularly. It's not a complete grill or a huge chimney starter – it's a focused tool that does one job very well. If you're a backyard BBQ enthusiast who wants to ditch lighter fluid, a camper looking for a compact fire starter, or a tailgater who wants quick hot coals, this is a solid buy. Just keep its size in mind and you'll appreciate the simplicity and durability it brings to your outdoor cooking routine.
The Brutal BBQ Fireguard is most useful for small to medium grilling sessions. Use it to light charcoal for a Weber kettle, a portable camping grill, or a fire pit in your backyard. It's also perfect for camping trips when you want a quick campfire for cooking or warmth without messing with liquid starters. Tailgaters will appreciate how fast you can get coals ready for burgers and brats before kickoff. It even works as a decorative piece on a mantle or patio table when not in use – just be sure the fire is out and it's cool before bringing it inside.

Pros
- Very beginner-friendly, with clear instructions that avoid confusing technical jargon
- Covers a wide range of materials and designs to fit different spaces and budgets
- Teaches both construction and smoking techniques, so you get a complete skill set
- Portable enough to adapt existing structures, making it flexible for campers or patio setups
Cons
- Only 70 pages long, so some advanced builders may want more depth on complex designs
- Focuses on building from scratch, which may require more time and effort than buying a pre-made smoker
- No information on specific grill or smoker brands, so it's more of a general guide
If you have ever dreamed of building your own smokehouse but felt intimidated by complex blueprints or technical terminology, the Smokehouse Building Guide for Novices is exactly what you need. This compact, 70-page book cuts through the noise and gives you a straightforward path to constructing a smokehouse from wood, brick, or metal. Whether you are a backyard griller looking to expand your skills, a camper who wants to smoke fresh catch at the campsite, or a homesteader aiming to preserve meat, this guide has you covered.
The book is written for absolute beginners, so you do not need any prior construction experience. It walks you through every step, from digging and leveling the ground to framing the structure, adding fireboxes and chimneys, and setting up an interior that delivers consistent smoke flow and heat. The author emphasizes transformation over construction, meaning the focus is on how your smokehouse will turn raw ingredients into flavorful, smoky masterpieces. You will learn how different wood types impact flavor, how to brine and cure meat for better taste and preservation, and how to apply both traditional and modern smoking methods.
For outdoor cooking enthusiasts, this guide shines by connecting the building process to real-world cooking results. It covers smoking meats, fish, and even vegetables, making it versatile for weekend BBQs, tailgating, or patio cooking. The tips on finding cheap, local materials help keep your project affordable, while the safety and maintenance rules ensure your smokehouse lasts for years. The book also touches on African smoking traditions, adding a unique cultural perspective that many generic guides lack.
Build quality and durability are addressed through material selection advice. Whether you choose wood, masonry, or metal, the guide explains how to weatherproof your smokehouse for outdoor use. It does not go into extreme depth on rust resistance or folding legs, since this is about permanent or semi-permanent structures, but it does cover how to protect your build from the elements. For campers or tailgaters who want a portable option, the book suggests adapting an existing structure, which keeps the project flexible.
One limitation is the book length. At 70 pages, it is a quick read, and experienced builders might wish for more detailed plans or advanced techniques. However, for novices, this brevity is a strength because it avoids overwhelming you. The instructions are clear and actionable, so you can start building quickly. The guide also lacks brand-specific recommendations, but that is fine since it focuses on DIY construction rather than buying a pre-made smoker.
Overall, this is a practical, hands-on resource for anyone wanting to build their own smokehouse. It is best suited for backyard BBQ enthusiasts, rural homesteaders, and campers who enjoy processing their own meat and fish. If you are ready to take your outdoor cooking to the next level and love the idea of crafting your own smoker, this guide is a solid investment. Grab a copy, gather your materials, and start building your way to incredible smoked flavors.
This guide focuses on helping you build a smokehouse that delivers consistent, delicious results. You will learn how to design the interior for even heat and smoke distribution, which is key for low-and-slow cooking. The book covers both traditional smoking methods and modern improvements, so you can achieve the perfect balance of smoke flavor and tenderness. While it does not specify BTU ratings or searing ability, the emphasis is on creating a setup that excels at smoking meats, fish, and vegetables. For backyard BBQ enthusiasts, this means you can expect rich, smoky flavors and moist, tender textures from your brisket, ribs, or salmon.
This book is ideal for backyard grillers who want to add a dedicated smoker to their outdoor setup. It is also perfect for campers who enjoy processing their own catch, as the guide includes instructions for smoking fish. Homesteaders will appreciate the preservation techniques, such as brining and curing, which extend the shelf life of smoked goods. Tailgaters can use the guide to build a portable smokehouse that fits in a truck bed, turning any parking lot into a BBQ station. For patio cooks, the book offers tips on adapting smaller structures, so you can enjoy smoked flavors without a large footprint.
Step-by-Step Guide to Starting and Operating a Small Grill
Compact cookers require focused fire management because their reduced grate space leaves little room to recover from runaway heat or smothered fuel. Whether you plan to sear steaks or roast poultry, getting the fire lit cleanly sets the baseline for the entire cooking session. Small fireboxes react quickly to oxygen shifts, so understanding fuel volume and draft controls helps prevent sudden temperature spikes. Mastering these basic principles ensures your grill reaches a clean, cooking-ready temperature without scorching your ingredients.
Outdoor Placement and Safe Clearances
Every outdoor grilling session must begin with proper grill placement on a stable, level surface. Small portable cookers can tip over easily if placed on uneven turf, loose gravel, or wobbly patio tables. Keep your cooker situated at least ten feet away from house walls, deck railings, vinyl siding, and low-hanging tree branches. A steady, heat-resistant base prevents accidental spills and keeps the hot cooker isolated from combustible backyard materials.
Fuel-burning grills must never be operated inside a garage, breezeway, shed, or any enclosed structure under any circumstances. Opening a garage door or cracking a window does not provide enough natural ventilation to prevent lethal carbon monoxide accumulation. Charred wood, lump charcoal, and burning propane also release invisible fumes and airborne embers that can ignite stored household goods quickly. Always keep the cooker fully outdoors in the open air, following local fire safety regulations and the manufacturer instructions.
Inspect the firebox and grease management system before adding any source of heat to the cooker. Old grease accumulations and residual animal fats from previous cooks can trigger aggressive flare-ups as soon as fresh flames develop. Clearing out cold gray ash from previous charcoal cooks ensures that bottom air intake vents remain completely open. Proper airflow through clean intake passages allows the fire to pull in fresh oxygen smoothly without suffocating.
How to Start a Small Charcoal Grill with a Chimney
A compact chimney starter represents one of the cleanest and most reliable ways to light small charcoal setups. Chemical lighter fluids leave petroleum fumes on the metal walls and taint delicate food with unpalatable chemical odors. A miniature metal chimney relies solely on natural convection to draw heat upward through briquettes or lump charcoal. This airflow design ignites the fuel evenly from the base to the top in roughly fifteen to twenty minutes.
Begin by measuring out the exact amount of charcoal required for your specific small cooking grate. Overfilling a small kettle or tabletop cooker creates intense convective heat that chars food before the interior cooks through. Place one or two sheets of crumpled newsprint or a paraffin fire starter block on the charcoal grate beneath the chimney. Fill the upper cylinder of the chimney with your measured charcoal, keeping the larger chunks near the middle to preserve steady air passages.
Light the paper or starter block through the bottom ventilation cutouts using a long utility lighter. Flames will quickly travel upward through the cylinder, creating dense white smoke during the first few minutes of ignition. Put on heavy barbecue gloves once the top layer of charcoal develops a light coating of gray ash. Carefully lift the hot cylinder, pour the glowing coals across the charcoal grate, and place the cooking grate over the fire immediately.
Starting Small Charcoal Setups with Dedicated Fire Starters
Some cooks prefer compact hardware that stays inside the grill body to ignite fuel directly on the grate. Heavy-duty cast options, like the Brutal BBQ Fireguard Firewood and Charcoal Starter, sit directly on the fire grate to focus ignition heat right where charcoal rests. These cast-metal starters feature built-in air inlets designed to optimize oxygen flow through tightly packed coals. This focused draft allows natural fuel to catch quickly without requiring a separate chimney cylinder on the patio.
Using a dedicated starter block or iron starter requires arranging dry charcoal loosely around and above the device. Packing the coals too tightly restricts oxygen intake and causes the initial flame to starve before spreading outward. Natural wax cubes, wood shavings, or tumbleweed fire starters provide clean burn characteristics that leave zero chemical residue behind. Once the base fuel catches, it transfers heat directly to neighboring briquettes across the charcoal basket.
Always let any cast-iron or heavy steel starter device remain undisturbed until the cook is finished and the coals have cooled completely. Attempting to lift or shift glowing hot metal components mid-cook presents severe burn hazards and risks dropping burning embers onto your deck. Manufacturer guidelines recommend allowing cast components to return to ambient outdoor temperature before brushing away fine ash. Routine inspection of your fire tools ensures reliable service across many outdoor cooking seasons.
Using Instant Disposable and All-in-One Small Grills
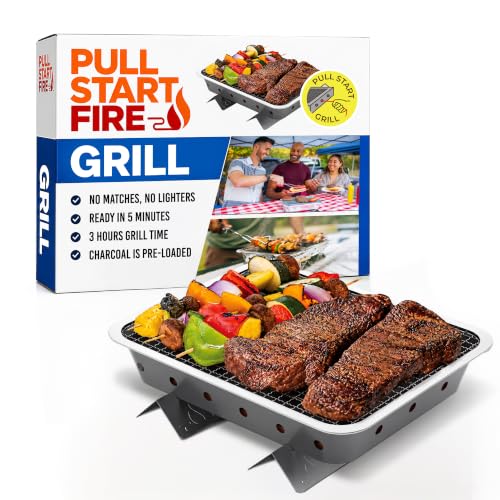
Disposable and instant tabletop cookers offer convenient solutions for remote campsites, tailgates, and emergency situations where storing permanent equipment is impractical. Units such as the Pull Start Fire Grill, Natural Hardwood Charcoal incorporate pre-loaded hardwood charcoal blocks inside a compact footprint. These self-contained designs eliminate the need to carry separate bags of charcoal, matches, or starter tools in your vehicle. They pack down flat and provide a dedicated cooking surface ready for fast outdoor setup.
Instant units typically feature simple ignition mechanics, such as a built-in pull string or integrated ignition strip that sparks the interior fuel block. Once activated, the pre-loaded charcoal reaches cooking temperatures in approximately five minutes without lighter fluid. The integrated stainless steel grate sits directly over the glowing charcoal block to support burgers, sausages, and vegetable skewers. Because heat distribution remains consistent across the small surface, cooks can utilize the full grate without cold edge zones.
Safe disposal remains the most critical responsibility when cooking on single-use portable grills. Even when the surface appears cool, compacted charcoal cores can retain dangerous residual heat deep inside for several hours. Douse the spent tray thoroughly with water or allow it to sit undisturbed in a fire-safe outdoor location until cold to the touch. Never toss warm disposable metal trays into household trash cans or park dumpsters where dry paper could ignite.
How to Start a Small Portable Gas Grill
Portable propane grills rely on pressurized gas from small one-pound disposable cylinders or regulated bulk tank hoses. Before attempting to light the burner, inspect the brass threads and rubber O-ring inside the regulator connection for signs of grit or cracking. Thread the propane canister onto the regulator smoothly by hand, taking care not to cross-thread the delicate fittings. A snug hand-tight seal prevents flammable gas leaks around the fuel intake valve during operation.
Always open the grill lid completely before initiating the ignition sequence on any gas cooking appliance. Leaving the lid closed allows escaping propane to pool under the dome, creating a hazardous gas pocket that can ignite violently. Opening the lid provides continuous ventilation and ensures you can visually verify the flame as soon as the burner catches. This simple precaution represents one of the most fundamental rules of safe gas outdoor cooking.
Rotate the burner control knob to the high position and press the spark igniter button firmly. You should hear a soft ignition sound and see a ring of blue flames appear along the ports of the burner tube. If the grill fails to light within five seconds, turn the knob back to the off position immediately and wait five minutes with the lid open. Once the air clears, retry the ignition sequence or use a long match through the manual lighting hole on the cookbox.
Managing Airflow and Temperature in Small Fireboxes
Temperature management in a small charcoal cooker depends directly on the adjustment of the bottom and top air dampers. The bottom vent controls the volume of oxygen entering the firebox, which directly regulates how hot the coals burn. The top exhaust damper pulls hot air and smoke across the food while venting combustion gases out of the lid. Opening both dampers fully provides maximum oxygen for intense searing, while partially closing them restricts heat for roasting.
Small grills lose internal heat rapidly when cooks open the lid repeatedly to check on cooking progress. Every time the lid lifts, ambient air rushes across the coals while radiant heat escapes into the outdoor atmosphere. This rush of oxygen can cause charcoal to flare up temporarily, followed by a sharp drop in overall cooking temperature. Keeping the lid closed preserves steady radiant heat and allows the dampers to regulate the cookbox environment predictably.
Setting up a two-zone fire configuration provides a safety zone on compact grates where food can finish cooking without burning. Bank your glowing coals against one side of the charcoal grate while leaving the opposite side completely bare. This setup gives you direct radiant heat for searing over the coals and an indirect heat zone over the empty space. When preparing foods like a crispy barbecue wings recipe, moving pieces to the indirect zone ensures the interior cooks thoroughly without charring the exterior skin.
Grate Preparation, Food Safety, and Flare-Up Control
Once your small grill reaches cooking temperature, allow the metal grates to preheat for ten minutes before placing food over the heat. High heat carbonizes leftover food residue on the grates, making it easy to brush clean with a brass or nylon grill brush. Wiping the hot grates lightly with a high-smoke-point oil on a folded paper towel helps create a naturally slick cooking surface. This preheating step prevents delicate proteins like fish or lean burgers from tearing upon release.
Checking doneness with a calibrated digital meat thermometer eliminates guesswork and ensures meals meet authoritative food safety standards. Visual cues like surface browning or cooking time estimations vary widely depending on wind conditions, ambient outdoor temperatures, and fuel volume. Poultry requires an internal temperature of 165 degrees Fahrenheit, while ground meats should register at least 160 degrees. Inserting the thermometer probe into the thickest portion of the meat guarantees food is safe and perfectly cooked.
Fat drippings hitting glowing charcoal or hot gas flavor bars frequently trigger sudden flame flare-ups in compact cookboxes. If high flames lick your ingredients, use long tongs to shift the food immediately to your indirect cooking zone. Avoid squirting water from spray bottles onto charcoal fires, as this kicks up fine ash onto food and lowers chamber temperature drastically. Closing the lid slightly reduces available oxygen and suffocates minor grease fires naturally without creating an ash cloud.
Expanding Cooking Horizons Beyond Portable Setups
Learning basic fire management on a compact grill builds essential fundamentals that transfer seamlessly to larger outdoor appliances. Backyard cooks often graduate from portable kettles to versatile setups like a versatile griddle and smoker combo for hosting larger gatherings. Larger combination units offer dedicated zones for high-heat smash burgers alongside spacious smoke chambers for low-and-slow briskets. The exact same airflow and temperature discipline you practice on a tabletop grill governs these expanded outdoor systems.
Curious outdoor cooks often explore custom woodcraft projects or home masonry smoking using resources like the Smokehouse Building Guide for Novices. Constructing dedicated timber or brick smokehouses teaches you how smoke movement, thermal mass, and wood seasoning influence flavor development. Those who discover an enduring passion for outdoor hospitality sometimes even consult operational manuals like How to Start Your Own Barbecue Grill Business to explore commercial catering or food truck ventures. Regardless of the scale of your setup, solid cooking technique always starts with controlled, deliberate fire building.
Proper post-cook shutdown keeps your small grill clean and ready for your next outdoor gathering. For charcoal grills, close both top and bottom dampers completely to starve the fire of oxygen and extinguish remaining coals. For gas units, shut off the fuel valve at the cylinder before turning off the burner control knob to clear lingering line pressure. Once all surfaces cool to ambient outdoor temperatures, wipe down the exterior and store your grill under a protective weather cover.
Starting a small grill cleanly requires patience, thoughtful fuel arrangement, and constant attention to outdoor airflow. Whether lighting lump charcoal with a chimney, sparking a portable propane canister, or using an all-in-one instant grill, safe habits ensure consistent cooking results every time. Keeping your equipment clean, checking meat with a digital thermometer, and managing your intake dampers gives you complete control over your outdoor kitchen. With regular practice, your small cooker will deliver rich smoky flavor and satisfying backyard meals wherever you choose to cook.


Write Your Review
No reviews yet. Be the first to share your experience!