


Gusting breezes often turn a casual backyard cookout into an exercise in frustration. Strong air currents scatter dry sparks, cool the exterior grill body, and blow out matches before you can ignite your kindling. Learning how to start a charcoal grill when it’s windy requires an understanding of airflow, fuel stability, and site protection. Preparing your ingredients on a sturdy rolling prep station before stepping outside helps you keep your outdoor area organized while you manage gusty conditions. With the right setup, you can establish an even bed of glowing coals without chasing embers across your lawn.
Wind does not just complicate ignition; it also accelerates combustion once the charcoal catches fire. Uncontrolled oxygen rushes through lower vents, causing fuel to burn faster and hotter than normal. If you plan to cook something delicate like a classic barbecue wings recipe, temperature spikes can scorch the meat before the interior reaches a safe doneness. Setting up effective windbreaks and using stable ignition sources keeps your cook on schedule. Taking deliberate safety precautions ensures that high gusts do not derail your outdoor cooking plans.
Mastering Charcoal Grill Setup and Ignition in Windy Weather
High winds change the dynamics of outdoor cooking by introducing turbulent drafts into your firebox. Instead of allowing heat to build gradually within the charcoal bed, strong breezes strip away surface warmth while simultaneously injecting excess oxygen into the fuel. The core secret to starting charcoal in gusty conditions lies in breaking the wind’s direct path while maintaining controlled airflow through the bottom intake. Once you establish physical protection and choose a reliable ignition method, your coals will ash over safely without spreading hazardous sparks across your yard.
The Impact of High Winds on Charcoal Combustion
Wind acts as an unpredictable bellows on outdoor charcoal cookers. When gusts force air through open intake vents, oxygen levels spike and rapidly drive combustion temperatures far higher than intended. At the same time, cold air sweeping over the exterior metal body strips away ambient heat from the cooking dome through rapid convective cooling. This dynamic creates scorching hot spots directly above the charcoal grate while chilling the circulating air inside the cooking chamber. Cookers with thin stamped-steel construction suffer the most, as their walls offer minimal thermal insulation against changing outdoor temperatures.
Beyond rapid temperature swings, windy conditions create immediate physical hazards for your property. Loose ash and glowing micro-embers easily lift off the fuel grate and blow across dry patios, mulch beds, or wooden decks. Even microscopic sparks can ignite dry lawn debris or patio cushions when propelled by sustained gusts. Recognizing these aerodynamic pressures allows outdoor cooks to focus on deliberate wind deflection rather than battling the weather unprepared.
Selecting a Safe Outdoor Cooking Location
Choosing where to position your grill on a blustery afternoon is the single most critical safety decision of the entire cook. You must set up the cooker on a firm, level surface at least ten feet away from house walls, deck railings, vinyl siding, and low-hanging tree branches. Grills should never be brought inside a garage, carport, covered breezeway, or screened porch to escape the wind. Operating any charcoal grill within an enclosed or semi-enclosed structure causes lethal carbon monoxide accumulation and poses an extreme structural fire risk.
Ground stability is equally crucial when outdoor gusts begin to pick up. Lightweight kettle grills on narrow tripod legs can tip over unexpectedly if struck by an aggressive crosswind. Placing wide concrete pavers beneath lightweight stands or choosing cookers with low-profile stabilizing feet prevents dangerous tipping incidents. Positioning your grill near a sturdy outdoor structure, like a dedicated patio island with a backsplash, provides reliable physical shielding that deflects incoming drafts while keeping accessories organized.
Creating Effective Windbreaks Without Creating Fire Traps
Establishing a windbreak shields your fire from erratic drafts without choking off the natural exhaust ventilation your charcoal requires. Permanent structures like brick landscape walls, stone retaining perimeters, or solid patio borders serve as outstanding natural barriers. If natural barriers are unavailable, you can position portable non-combustible panels several feet upwind of the cooker to blunt the breeze. Never wrap plastic tarps, cardboard sheets, or plywood boards close against the grill body, as blowing embers can easily ignite these flammable materials.
Angle your grill so the prevailing wind strikes the solid back of the kettle rather than blowing straight into the front or side intake vents. Positioning the lid hinge or solid metal rear toward incoming gusts deflects air smoothly around the bowl instead of pressurizing the firebox. Always maintain at least three feet of open clearance between the exterior grill body and any temporary barrier. This designated buffer zone preserves adequate airflow for clean charcoal combustion while preventing heat buildup against nearby vertical surfaces.
Charcoal Selection: Briquettes, Lump, and Pre-Loaded Bricks
The density, size, and shape of your fuel dictate how predictably your fire establishes itself during windy weather. All-natural hardwood lump charcoal ignites rapidly due to its porous structure, but irregular pieces often burn through prematurely when exposed to heavy draft currents. Standard charcoal briquettes offer uniform density and steady burn rates, making them much easier to manage when sustained gusts blow through the vents. High-density briquettes resist crumbling under thermal stress and produce heavier, compacted ash that is far less likely to become airborne.
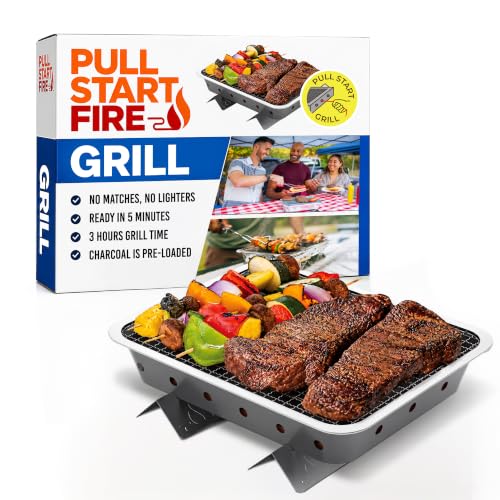
Pre-formed charcoal bricks provide an exceptionally dependable alternative when gusty winds make loose coal arrangements difficult to light. Self-contained units such as the Pull Start Fire Grill, Natural Hardwood Charcoal integrate dense natural hardwood charcoal into a solid brick that reaches full cooking heat in five minutes. This portable cooker packs down to thirteen by ten by two inches and stands on stabilizing feet that keep it secure on level outdoor surfaces. Because the fuel brick rests securely beneath a stainless steel cooking grate, there are no loose coals to tumble or blow away in high winds. The self-contained setup provides even heat across the grate for up to three hours without requiring mid-cook fuel replenishment.
Lighting Strategies: Chimney Starters and One-Pull Ignition
Routine lighting techniques that work on quiet summer afternoons almost always fail when gusty breezes sweep across the yard. Traditional wooden matches blow out immediately, and liquid lighter fluid creates dangerous hazards as gusts blow atomized petroleum vapors across hot surfaces. A cylindrical metal chimney starter provides tall metal walls that shield initial kindling from horizontal drafts while drawing air upward through the fuel column. Placing dense wax starter cubes or lightly oiled paper beneath the chimney grate creates a sheltered pocket of flame that cannot easily be extinguished. Once lit, the chimney concentrates heat vertically until the top layer of charcoal develops a fine coating of gray ash.
Built-in mechanical pull-string starters eliminate the struggle of lighting kindling in windy environments altogether. The Pull Start Fire Grill features a single-tug ignition mechanism that starts combustion internally without needing matches, lighters, or fluid. This internal ignition system ensures that strong surface winds cannot blow out the flame before the surrounding charcoal brick catches fire. Bypassing external flames and volatile liquids makes this style of portable cooker an excellent choice for blustery beach cookouts and remote campsites.
Damper and Vent Management During Strong Gusts
Precise adjustment of your intake and exhaust dampers is the primary method for controlling internal cooking temperatures in blustery conditions. Lower intake vents pull fresh air into the fuel bed, while upper exhaust dampers allow combustion gases to escape and create internal convective draft. When high winds press against the grill, close the bottom intake vents halfway or more to restrict excessive oxygen entry. Leaving intake dampers wide open during strong gusts turns your charcoal bed into a miniature blast furnace, burning through fuel at an unsustainable rate.
Keep the upper exhaust vent open at least one-quarter of the way to maintain steady airflow and avoid smothering the coals in stale smoke. Adjust your exhaust damper gradually in small increments, allowing five to ten minutes for the internal air temperature to stabilize after each tweak. If shifting gusts force ash upward through the cooking grates, rotate the grill lid so the exhaust damper faces downwind. Orienting the exhaust away from oncoming gusts prevents wind from forcing its way down into the cooking chamber and blowing ash onto your food.
Lid Discipline and Flare-Up Prevention
Opening the grill dome repeatedly is the fastest way to lose heat and trigger flare-ups when cooking in windy weather. Every time you raise the lid, oncoming gusts force a fresh charge of oxygen directly onto the glowing coals below. This sudden oxygen burst triggers immediate fat flare-ups while blowing accumulated heat out of the cooking chamber. Practice strict lid discipline by keeping the dome firmly closed throughout the cooking cycle and relying on digital meat thermometers with remote probes.
When you must inspect, baste, or flip your food, lift the lid smoothly and slide it slightly sideways rather than pulling it straight up. Lifting the lid abruptly creates an upward vacuum suction that pulls loose ash off the bottom grate and deposits it onto your meat. Keep your long-handled spatulas, basting brushes, and tongs arranged within immediate reach so you can complete adjustments in seconds. Closing the lid immediately restores thermal equilibrium and shields the cooking grate from cooling crosswinds.
Arranging a Two-Zone Cooking Fire
Setting up distinct direct and indirect heating zones is vital for maintaining cooking control when exterior temperatures fluctuate. Pile your lit charcoal entirely on the upwind half of the lower grate, leaving the downwind side completely bare. This arrangement establishes an intense direct radiant heat zone directly over the coals and a protected indirect convection zone on the opposite side. If sudden wind gusts ignite rendering fat over the coals, you can swiftly move food to the indirect zone to avoid bitter charring.
This two-zone configuration is particularly useful when cooking delicate cuts or recipes with sugary marinades, such as a tender Korean beef skewers preparation. Sweet marinades burn quickly if strong drafts spike grate temperatures beyond normal cooking limits. Searing meat briefly over the active coals before shifting it to the cooler indirect zone allows the interior to cook through safely without scorching. Placing a heavy cast-iron pan or heat deflector between the zones further stabilizes temperatures against chilly gusts.
Fire Safety Protocols and Ember Control
Managing an open-air charcoal fire in gusty weather demands heightened caution and immediate access to emergency suppression gear. Keep a dedicated ten-quart metal bucket filled with clean water or dry sand sitting right next to your cooking station. A certified multi-purpose ABC dry chemical fire extinguisher should always be stationed outdoors within quick reach of your patio exit. Check your grill’s bottom ash catcher before lighting to ensure the collection bowl is securely locked into place and cannot blow away.
Dress appropriately for windy grilling by avoiding loose sleeves, open flannel shirts, or synthetic clothing that could melt if touched by an ember. Heavy-duty leather barbecue mitts that extend past your forearms protect your skin from unexpected flare-ups when adjusting hot dampers. Regularly scan the downwind perimeter of your cooking area to ensure drifting embers have not landed in dry landscaping or furniture cushions. Maintaining constant observation over your cooking area ensures that unexpected gusts never escalate into an outdoor fire emergency.
Proper Shutdown and Ash Disposal When Wind Persists
Safely extinguishing your charcoal grill after the meal is just as critical as managing the initial ignition. Completely seal both the bottom intake vents and top exhaust dampers to cut off oxygen and smother the remaining embers. Fasten any lid latches or clamps securely so that late-evening gusts cannot dislodge the dome and re-ignite dormant coals. Allow the grill to remain fully sealed and undisturbed for several hours until the entire metal body is cool to the touch.
Once the coals are completely cold, transfer the leftover ash into a dedicated galvanized metal ash can equipped with a snug lid. Never discard warm ashes into plastic garbage bins, paper bags, or garden compost piles, where hidden embers can reignite hours later. Store your sealed metal container on a non-combustible concrete surface at least five feet away from any structure or wooden fence. Soaking the extinguished ash thoroughly with water provides an extra layer of fire prevention before final disposal.
Practical Takeaways for Grilling in the Wind
Starting and running a charcoal cooker during blustery weather requires patience, stable equipment, and disciplined draft management. Shielding your grill behind non-flammable barriers keeps unpredictable gusts from disrupting your heat output or scattering embers across your yard. Utilizing protected chimney starters or self-contained pull-ignition systems guarantees reliable ignition without the hazards of open matches or chemical fluids. Controlling your dampers and maintaining strict lid discipline will ensure dependable temperatures and great barbecue flavor no matter how hard the wind blows.





Write Your Review
No reviews yet. Be the first to share your experience!