


Unboxing a brand-new barbecue grill brings plenty of excitement, but many backyard cooks pause before lighting the burners or coals and ask: do i need to clean new grill grates? The short answer is an emphatic yes, as brand-new grates come directly from an industrial manufacturing facility rather than a commercial kitchen. During production, metal components are routinely stamped, welded, and treated with protective anti-rust coatings or machine oils to survive shipping and warehouse storage. If you place food directly onto untreated factory grates, those chemical residues can transfer into your meal, ruining dinner with foul odors and harsh flavors. Setting up a clean, organized outdoor workstation on a sturdy rolling BBQ prep table makes this initial wash simple and stress-free.
Beyond eliminating unpleasant factory contaminants, giving your grates a dedicated first wash and initial burn-in protects your long-term investment. Different grate materials, including cast iron, stainless steel, and porcelain enamel, require distinct care steps before they touch raw meat. Cleaning and seasoning the metal establishes a durable, non-stick cooking surface while preventing early corrosion and severe sticking. Taking thirty minutes to wash away packaging dust, industrial oils, and loose particles ensures that your grill operates cleanly from day one. Skipping this crucial prep step exposes your food to unwanted chemicals and compromises the longevity of your brand-new outdoor cooker.
Everything You Need to Know About Cleaning and Prepping New Grill Grates
Cleaning brand-new grill grates before laying down your first cut of meat is a mandatory safety and culinary step. When a grill is manufactured, the cooking grates undergo rigorous metal fabrication processes involving heavy machinery, metal presses, and anti-corrosive chemical treatments. These industrial procedures leave behind invisible chemical films, machine lubricants, cutting fluids, and microscopic metal shavings. Washing these surfaces thoroughly with warm water, mild degreasing dish soap, and a soft cloth eliminates those unwanted industrial residues before they ever touch your food.
Once the grates are visibly clean and washed, the preparation process continues with heat and protective seasoning. A high-temperature burn-in vaporizes any stubborn chemical compounds that mild washing agents cannot fully dissolve. Following that heat cycle with a light coat of high-smoke-point cooking oil seals the metal pores and shields the surface from moisture. Taking these initial preparatory steps guarantees that your first cookout delivers pure, savory barbecue flavor rather than a lingering taste of factory chemicals.
Why Factory Grill Grates Require Thorough Cleaning
Manufacturing plants prioritize corrosion prevention during storage and international shipping over immediate food readiness. To stop bare cast iron or raw steel from oxidizing while sitting inside damp warehouses or shipping containers, manufacturers spray the metal components with rust inhibitors and industrial mineral oils. In addition, cardboard packaging, plastic wrap, and styrofoam inserts shed tiny particles and static-charged dust that stick firmly to these oily surfaces. Simply wiping the grates with a dry paper towel will not lift these petroleum-based lubricants or bonded particulates.
Metal fabrication also leaves behind microscopic debris that poses a physical risk if ignored. During the stamping, cutting, and welding phases of grate production, tiny burrs and fine metal dust settle into the corners and welded joints of the rods. A thorough wash with warm water and a non-abrasive sponge dislodges these loose metal fragments and carries them safely down the drain. Treating your new grates with the same sanitation standards you would apply to new kitchen cookware ensures a safe cooking foundation for your family.
The Hazards of Skipping the First Wash
Skipping the preliminary wash introduces noticeable chemical contamination into your cooking. When cold raw meat hits an unwashed grate coated in rust-preventative oils, the heat from the fire cooks those petrochemicals directly into the exterior crust of your food. Meat cooked under these conditions often develops an unpalatable, bitter taste and an acrid, chemical smell that overpowers your rubs and marinades. Whether you are searing expensive steaks or preparing a batch of crispy BBQ wings, contaminated grates can easily ruin the entire meal.
Inhaling vaporized manufacturing oils also irritates the respiratory tract and creates unpleasant smoke around your patio. Industrial lubricants produce thick, pungent white or gray smoke when first exposed to direct flames or electric heating elements. Breathing these chemical fumes can cause coughing, eye irritation, and headaches for the cook standing over the firebox. Removing the bulk of these factory residues with soap and water before igniting the grill significantly minimizes smoke and toxic vapor production during your initial heat cycle.
Step-by-Step Initial Cleaning Guide for Brand-New Grates
The cleaning process begins at your kitchen sink or outside with a garden hose and a clean wash bucket. Remove the new grates entirely from the grill firebox and place them on a flat, clean surface or inside a deep utility sink. Fill your bucket or sink with hot water and add several tablespoons of a grease-cutting dish soap that contains no harsh bleach or abrasive fragrances. Submerge the grates or soak them thoroughly with a sponge, allowing the soapy solution to break down the surface oils for three to five minutes.
Scrub every surface methodically using a soft nylon wash pad, microfiber cloth, or gentle sponge. Pay close attention to the underside of the grates, the outer edges, and the small junction points where individual crossbars join the main frame. Avoid using steel wool, harsh wire brushes, or scouring powders during this initial wash, as aggressive abrasives can scratch protective porcelain coatings or gouge raw steel. Once you have scrubbed all sides, rinse the grates thoroughly with clean running water until no soap bubbles or residue remain.
Immediate and thorough drying is vital to prevent flash rust, especially on raw or non-enameled cast-iron components. Use a clean lint-free towel or heavy-duty paper towels to wipe down every rod, corner, and bracket until the metal is completely dry. Leaving cast iron or carbon steel wet for even thirty minutes can trigger rapid surface oxidation that creates stubborn orange rust spots. If the weather is warm and dry, you can set the clean grates in direct sunlight for ten minutes to evaporate any moisture trapped inside small crevices before returning them to the grill.
How to Perform a Proper Initial Burn-In
Washing with soap and water removes water-soluble dirt and loose oils, but an initial burn-in heat cycle is necessary to eliminate residual manufacturing compounds. Place the clean, dry grates back into your grill and secure the lid. If you are operating a gas grill, ignite all main burners and set them to medium heat for ten minutes before increasing the dials to medium-high or high. For charcoal grills, light a full chimney of briquettes or lump charcoal, spread the glowing coals evenly across the fire grate, and adjust the dampers to establish a steady cooking temperature.
Maintain a grill temperature between 400 and 500 degrees Fahrenheit for at least twenty to thirty minutes with the lid fully closed. During this thermal process, you will likely notice thin smoke rising from the exhaust vents as microscopic residues bake off the metal. This high-heat cycle carbonizes any remaining factory finishes, cleans the interior lid and firebox walls, and sanitizes the cooking chamber. Avoid placing any food on the grates during this cycle, and keep children and pets away from the hot exterior surfaces.
Caring for Specific Grate Materials
Different metal compositions require specific handling techniques during initial preparation and everyday cooking. Cast-iron grates are renowned for superb heat retention and deep sear marks, but their porous, iron-rich structure makes them highly susceptible to rust. Bare cast iron must always be washed gently, dried without delay, and conditioned with multiple thin coats of oil before exposure to food. Enamel-coated cast iron provides a protective glass-like barrier over the metal, meaning it does not require deep seasoning, though sudden thermal shocks and sharp metallic scrapers can chip the delicate porcelain surface.
Stainless steel grates offer exceptional corrosion resistance, longevity, and simple upkeep compared to raw iron. Heavy-gauge stainless steel rods expand slightly under intense heat and develop an amber or bronze patina over time, which is completely normal and harmless. When prepping stainless steel, focus on removing polishing compounds and machine grease, followed by a thorough initial burn-in. Applying a light sheen of oil to stainless steel right before cooking prevents lean proteins from adhering, but the material itself does not hold a baked-on seasoning layer like porous cast iron.
Porcelain-enameled steel and chrome-plated wire grates require a gentle touch to preserve their thin outer coatings. These budget-friendly grates heat up quickly and resist rust as long as the exterior finish remains completely intact. Always clean porcelain-coated steel with soft-bristle nylon tools and avoid striking the grates with heavy cast-iron skillets or metal tools. If you use a versatile multi-cooking station such as a griddle and smoker combo, check the manufacturer documentation for specific coating guidelines, as griddle plates often need carbon-steel seasoning while smoker grates may feature porcelain enamel.
Seasoning Your New Grates for Natural Non-Stick Performance
Seasoning is the chemical process of heating thin layers of cooking oil until they polymerize, bonding tightly to the metal to form a slick, protective shield. Choose a neutral cooking oil with a high smoke point, such as refined canola oil, grapeseed oil, or avocado oil, rather than low-smoke-point options like extra virgin olive oil or butter. Pour a small splash of oil onto a folded paper towel or lint-free cotton cloth, then rub it across every surface of the warm grates. The goal is to create a micro-thin sheen that looks glossy rather than dripping wet.
Excess oil pools during heating and forms sticky, gummy droplets that attract soot and cause food to stick. After wiping the oil across the bars, use a second, dry paper towel to buff away any visible puddles or droplets. Relight the grill or bring the burners to medium heat, holding the temperature between 375 and 400 degrees Fahrenheit for approximately thirty minutes. As the heat cures the oil, the shiny finish turns into a semi-matte, durable barrier that repels water and prevents meat proteins from latching onto raw metal pores.
Repeating this seasoning process two or three times before your first big barbecue yields the best non-stick results. Each successive polymerized layer fills in microscopic surface imperfections, creating a smoother barrier for delicate fish fillets, burgers, and vegetables. Over time, the natural fats rendered from your grilled meats will continue to build upon this seasoned foundation. A properly seasoned cooking surface not only delivers easier food release, but it also acts as a primary defense against seasonal humidity and rain-induced oxidation.
Safe Cleaning Tools and Why Wire Bristles Pose Hidden Dangers
Choosing the right cleaning tools is just as important as washing the grates correctly. Traditional metal wire brushes have long been a common backyard accessory, but they present significant health risks that medical professionals frequently warn against. Over time, thin steel or brass wires detach from worn brush heads, falling onto the grate bars and lodging invisibly in charred grease. When you cook your next meal, those tiny metal needles stick to burger patties or hot dogs, potentially leading to severe internal injuries if accidentally swallowed.
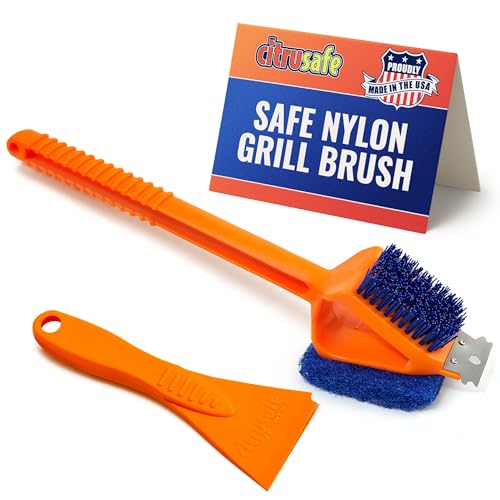
Modern grillers increasingly rely on safer, wire-free alternatives that eliminate the hazard of stray metal bristles. Non-metal tools, such as the CitruSafe 3in1 Nylon Grill Brush with Cookbox, utilize durable nylon bristles and an integrated scraper to clean cooking surfaces safely without leaving loose wires behind. Because nylon bristles can melt under extreme heat, these brushes are specifically engineered for use on completely cool grill grates, making them ideal for safe pre-cook or next-day cleanup. Pairing a cool-grate nylon brush with a heavy-duty cookbox scraper provides thorough cleaning power across porcelain, ceramic, stainless steel, and cast-iron surfaces without damaging the underlying finish.
Routine cool-grate cleaning simplifies ongoing grill maintenance and protects your family during every cookout. When cleaning a cool grill, spraying a dedicated citrus-based cleaner or mild degreaser directly onto the grates breaks down hardened fats before scrubbing. Allowing the solution to sit for a few minutes softens baked-on carbon, enabling the nylon bristles and scrubbing pad to lift debris effortlessly. Wiping the surface with a damp paper towel afterward removes loosened residues, leaving a clean, pristine grate ready for preheating.
Essential Outdoor Grilling Safety and Clearance Rules
Safe operation requires careful attention to where and how you ignite your newly cleaned grill. Grills must strictly be used outdoors in well-ventilated open-air spaces, completely clear of combustible structures, overhanging tree branches, and wooden deck railings. Never operate a gas, charcoal, or pellet grill inside a garage, breezeway, shed, or enclosed porch, even if the garage door is rolled fully open. Outdoor fuel-burning appliances produce deadly carbon monoxide gas, an odorless, colorless poison that accumulates rapidly in enclosed or semi-enclosed spaces and can cause incapacitation or death within minutes.
Enclosed spaces also trap intense radiant heat, grease vapors, and stray sparks that create severe residential fire hazards. Authoritative fire safety organizations and grill manufacturers mandate positioning outdoor cookers at least ten feet away from house walls, vinyl siding, deck eaves, and outdoor storage bins. Ensure that your grill stands on a level, stable concrete, stone, or paver foundation where it cannot tip over during windy conditions. Keeping a functioning fire extinguisher rated for grease fires nearby gives you immediate control if unexpected flare-ups occur during the initial burn-in or routine cooking.
Ongoing Maintenance and Safe Grate Preservation
Establishing good cleaning habits after your first cookout preserves the seasoned coating you worked hard to build. Rather than allowing burnt sauces and grease to sit on the bars for weeks, inspect your grates after each meal once the cooker has cooled down completely. Scraping off loose char and sweeping away ash prevents moisture-retaining organic matter from corroding the metal during periods of storage. A quick wipe with a lightly oiled cloth after cleaning restores the moisture barrier and primes the cooking grid for your next outdoor gathering.
Investing thirty minutes in washing, burning in, and properly seasoning new grill grates transforms raw industrial metal into an exceptional culinary platform. Taking these practical preparatory steps protects your food from toxic factory oils, prevents stubborn sticking, and extends the operational life of your grill for many seasons ahead. Once your cooking surface is sanitized, seasoned, and safely positioned in your backyard, you can fire up the heat with complete confidence and enjoy delicious, homemade barbecue with family and friends.


Write Your Review
No reviews yet. Be the first to share your experience!