


Removing rust from a barbecue grill is a manageable task that usually involves mechanical abrasion and chemical treatment, depending on the severity of the oxidation.
- The primary goal is to restore the cooking surface to a safe, non-porous state without damaging the underlying metal structure.
- For most homeowners, this means stripping loose flakes, treating active rust spots, and re-seasoning the grates to create a protective barrier.
- The process varies slightly between cast iron, stainless steel, and porcelain-coated surfaces, so identifying your specific grate type is the first critical step.
- Addressing rust promptly prevents it from spreading and compromising the integrity of the grill, ensuring that future meals are cooked on a hygienic and functional surface.
- While deep rust may require professional replacement of parts, surface-level oxidation can often be reversed with the right tools and patience.
Many grill owners discover rust during seasonal storage or after a period of neglect, often accompanied by burnt-on carbon that makes the problem harder to see. The combination of moisture and heat accelerates the oxidation process, particularly in coastal or humid climates. Understanding the difference between surface rust and structural rust helps you decide whether to clean, replace, or repair the affected areas. A thorough cleaning session not only removes the unsightly orange patches but also eliminates the bacteria and old grease that often hide beneath the corrosion.
By taking a systematic approach, you can extend the life of your equipment and maintain consistent heat distribution across the cooking zone. This guide provides a detailed walkthrough for handling these issues safely and effectively, focusing on methods that are accessible to the average cook. For those looking to enhance their outdoor cooking setup, checking out a bbq island guide can help you plan a dedicated space for storage and maintenance.

Pros
- Long 17-inch handle provides excellent reach and heat protection
- Replaceable bristle head adds long-term value and reduces waste
- Safe for all grill surfaces including porcelain and ceramic
- Comfortable wooden handle with good grip even when wet
- Lightweight at just 0.22 pounds, easy to carry to campsite or tailgate
Cons
- Maximum recommended cleaning temperature of 250°F may require cooling down after high-heat searing
- Wooden handle may need occasional oiling to prevent drying or cracking over time
- Bristle head replacement availability could be limited depending on retailer
If you've ever spent a beautiful Saturday afternoon scrubbing a dirty grill with a flimsy wire brush, you know the struggle. The BBQ-Aid Grill Brush and Scraper aims to change that. This is a purpose-built cleaning tool for outdoor grills, smokers, and flat tops, designed to make post-cook cleanup as painless as possible. With a 17-inch wooden handle and replaceable stainless steel bristles, it's built for backyard grillers, campers, tailgaters, and anyone who values a clean cooking surface without the hassle.
In real-world use, this brush shines on hot grates. It's rated for surfaces up to 250°F, so you can scrape away grease and charred bits while the grill is still warm, not blazing hot. The long handle keeps your hands safely away from the heat, and the wooden grip feels solid and comfortable. Whether you're cleaning a Weber kettle after a burger cookout or a portable camping grill after a weekend trip, the brush's head reaches into corners and between grates effectively. The stainless steel bristles are stiff enough to remove stubborn residue but gentle enough not to scratch porcelain or ceramic coatings.
Build quality is a strong point here. The wooden handle is thick and well-shaped, offering a secure grip even with greasy hands. The bristle head attaches firmly and can be replaced when it wears out, which extends the brush's life significantly. At just 0.22 pounds, it's lightweight and easy to toss into a camping bin or tailgate kit. The brush also rinses clean quickly under running water, so you're not left with a greasy mess to store.
One realistic limitation is the temperature cap. If you like to sear steaks at 500°F+, you'll need to let the grill cool down before using this brush. That's a minor inconvenience but worth noting for high-heat cooks. Also, the wooden handle, while comfortable, may require occasional maintenance to prevent drying or cracking if left in the elements. Storing it indoors or in a dry shed will keep it in good shape.
For backyard entertainers who host weekend BBQs, this brush is a practical upgrade from cheap wire brushes that shed bristles or bend after a few uses. Campers and RV owners will appreciate its portability and the fact that it works on various grill surfaces. Tailgaters can toss it in the truck without worrying about rust or damage. The replaceable head also means you're not throwing away the whole handle when bristles wear out, which is a nice nod to durability and value.
Overall, the BBQ-Aid Grill Brush and Scraper is a solid choice for anyone who takes grill maintenance seriously. It's not flashy, but it does its job well. If you're tired of scrubbing with undersized or poorly made brushes, this one offers a comfortable, effective, and long-lasting solution for keeping your outdoor cooking equipment clean and ready for the next meal.
Keeping the BBQ-Aid brush clean is straightforward. After each use, rinse the bristle head under warm water to remove grease and food particles. The stainless steel bristles resist rust, but it's best to dry the brush before storing it. The wooden handle should be wiped clean and kept in a dry place to prevent cracking. If the bristles become worn or bent, simply replace the head instead of buying a whole new brush. This design reduces waste and saves money over time. For deep cleaning, you can soak the head in warm soapy water for a few minutes, then rinse thoroughly.

Pros
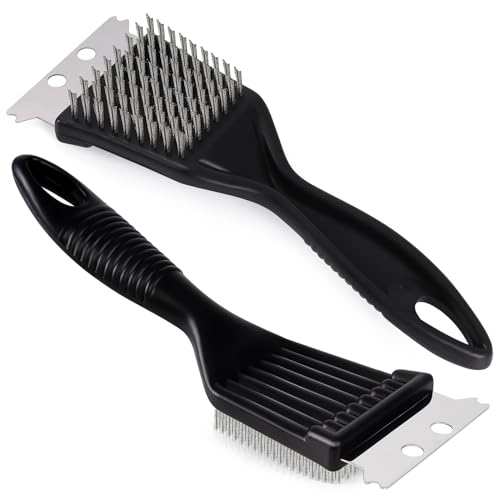
- Two-pack provides exceptional utility for RV kits, camping totes, and backyard grilling stations
- Sturdy steel scraper strips heavy buildup before you even start brushing
- Compact foot-long profile is nimble and easy to store compared to bulky extended brushes
- Durable bristles handle hot-grate maintenance without melting like nylon alternatives
Cons
- Shorter 12-inch reach keeps hands closer to the cooking zone on blazing hot charcoal beds
- Requires standard post-clean wipe-downs to inspect grates for loose wire bristles
- Lacks an extended heat shield for extra-deep offset smokers or wide multi-burner gas setups
The KINYFY 2-Piece Grill Brush and Scraper set is a practical maintenance companion designed to tackle messy grates after high-heat cooking sessions. Keeping cooking surfaces spotless is essential for backyard pitmasters, weekend BBQ enthusiasts, campers, and tailgaters who want pristine sear marks instead of bitter carbon residue from previous cooks. With two tools in the package, you can keep one hanging on your primary backyard grill cart and toss the second into your tailgating tote, RV chuck box, or camp kitchen bin.
Clean cooking grids directly influence overall outdoor cooking performance. When old marinades, charred sauces, and animal fats accumulate on cast iron or stainless steel grates, they trap moisture, produce acrid smoke, and spark unpredictable flare-ups during direct-heat grilling. Using the stiff front scraper while the grates are still hot lifts thick baked-on crust effortlessly, while the dense stainless steel wire bristles sweep through the contours of each bar. This leaves clean metal ready for burgers, steaks, or delicate fish fillets to absorb clean smoke flavor without sticking or tearing.
Built with a weather-resistant molded handle and stiff stainless steel wire rows, this cleaning tool is tailored for rugged outdoor environments. The 12-inch handle length provides direct downward leverage right over stubborn spots, avoiding the flex often felt on long wire-handle brushes. The integrated hanging hole at the base lets you suspend the brush on your grill side hooks, keeping it off dirty prep surfaces and within arm's reach while managing charcoal or propane heat.
Portability and compact storage stand out as major advantages with this design. Oversized 18-inch brushes can be awkward to fit into standard patio grill cabinets, camp drawers, or portable grill bags. At roughly one foot in length, these brushes tuck neatly into compact spaces, making them ideal companions for portable tabletop grills, tailgating setups, and backcountry campfire grates where space is at a premium.
A realistic consideration is the handle length during high-temperature cleanups. Because the tool measures 12 inches, your hands will be closer to the heat source than with an extended cleaning wand. Wearing heat-resistant grilling gloves is a smart practice when scraping grates over ripping-hot charcoal or multi-burner gas fireboxes. Furthermore, as with any wire bristle brush, cooks should wipe down the grates with a damp cloth or oiled towel after brushing to confirm no detached wires remain on the cooking area.
For backyard cooks and outdoor adventurers looking for an effective, no-fuss maintenance tool, this dual-brush set delivers solid value and dependable scraping power. It keeps your cooking surface ready for perfect high-heat searing and clean smoke infusion, making it a reliable addition to any outdoor cooking gear collection.
For optimal results, use the brush and scraper immediately after cooking while the grill grates are still hot, or during preheating once the grill reaches operating temperature. Heat softens grease and carbonized sauces, allowing the front scraper to peel away thick residue before finishing with the wire bristles.
Keep the brushes themselves clean by periodically rinsing the heads under warm running water with grease-cutting dish soap. Shake out excess water and let the brushes dry completely using the hanging loop before storing them in outdoor cabinets or camping totes. Always inspect the brush before each cleaning session and wipe your grill grates with an oiled towel prior to placing food on the grill.




The first step in addressing a rusty grill is to determine the extent of the damage and the type of metal involved. Rust is iron oxide, and it forms when iron or steel is exposed to oxygen and moisture. On a grill, this exposure happens constantly due to weathering and the acidic nature of certain foods. Before you begin any aggressive cleaning, you must assess whether the rust is superficial or if it has penetrated deep into the metal.
Superficial rust appears as a light orange or brown coating that can be scrubbed away. Deep rust, often called pitting, creates holes or weak spots in the metal that cannot be repaired by cleaning alone. If you see significant pitting, the grate may need to be replaced to ensure food safety and structural integrity. This assessment phase saves time and effort by directing you toward the appropriate cleaning method for your specific situation.
| Grate Material | Rust Resistance | Cleaning Difficulty | Re-seasoning Needed? |
|---|---|---|---|
| Cast Iron | Low | High | Yes |
| Stainless Steel | Medium | Medium | No |
| Porcelain Coated | High (if intact) | Low | No |
| Chrome Plated | Medium | Medium | No |
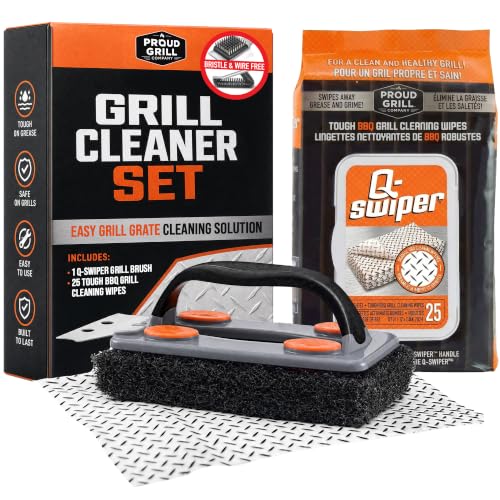
Once you have identified the material and the severity of the rust, you can select the appropriate tools for the job. Mechanical abrasion is the most common method for removing rust, but it must be done carefully to avoid scratching the surface further. Wire brushes are effective for cast iron but can damage porcelain or stainless steel if used with too much force. For these materials, a nylon brush or a non-abrasive pad is a safer choice.
Chemical treatments, such as vinegar or specialized rust removers, can help loosen stubborn deposits but require thorough rinsing afterward. The choice of tool depends on your comfort level and the specific condition of the grill. A combination of mechanical and chemical methods often yields the best results for heavily rusted surfaces. Always work in a well-ventilated area and wear protective gloves when handling chemicals or sharp debris.
- Inspect grates for deep pitting or holes that indicate structural failure.
- Identify the metal type to choose the correct abrasive tool.
- Remove loose rust flakes with a stiff brush or scraper.
- Prepare a cleaning solution or chemical rust remover.
- Apply the solution and let it sit for the recommended time.
- Scrub the surface gently to lift remaining oxidation.
- Rinse thoroughly and dry completely to prevent new rust.
Preparing the Grill for Rust Removal
Proper preparation ensures that the cleaning process is safe and efficient. Start by moving the grill to a well-ventilated outdoor area, away from flammable materials. Disconnect the propane tank if you are working on a gas grill to prevent any accidental ignition. Allow the grill to cool completely if it has been used recently. Remove the grates, flavorizer bars, and any other removable components.
This allows you to clean each part individually and prevents cross-contamination between different metal types. Use a bucket of warm soapy water to soak the parts if they are heavily soiled with grease. Grease can mask the extent of the rust, so removing it first gives you a clearer view of the metal. This step also helps to loosen burnt-on debris that may be adhering to the rusted areas. Take your time during this phase, as rushing can lead to missed spots or accidental damage to the grill components.
Techniques for Removing Surface Rust
Surface rust is the most common form of corrosion and is relatively easy to remove. For cast iron grates, a stiff wire brush is the standard tool. Scrub in a circular motion, applying moderate pressure to lift the rust flakes. You may need to repeat this process several times to remove all visible rust. For stainless steel, use a non-abrasive pad or a nylon brush to avoid scratching the finish. A mixture of baking soda and water can create a paste that helps to lift rust without scratching.
Apply the paste to the rusted areas and let it sit for fifteen to twenty minutes before scrubbing. Vinegar is another effective household remedy for rust removal. Soak a cloth in white vinegar and wrap it around the rusted area for several hours. The acetic acid in the vinegar reacts with the iron oxide, breaking it down. After soaking, scrub the area with a brush and rinse thoroughly. These methods are cost-effective and safe for most grill materials when used correctly.
Handling Deep Rust and Pitting
Deep rust, characterized by pitting or holes, presents a more significant challenge. Pitting occurs when rust penetrates the surface of the metal, creating small craters that are difficult to fill or smooth out. If the pitting is shallow, you may be able to grind it down with a flap wheel or a sanding block. However, if the pitting is deep, the structural integrity of the grate is compromised, and replacement is the safest option.
Grinding deep rust can weaken the metal further and create sharp edges that are dangerous to handle. Always wear eye protection when grinding or sanding metal to protect against flying debris. If you choose to replace the grates, ensure that you buy the correct size and type for your specific grill model. Mixing different metal types can lead to uneven heating and further corrosion issues. Replacing rusted parts is a worthwhile investment in the longevity and safety of your grill.
Re-seasoning Cast Iron Grates
After cleaning cast iron grates, re-seasoning is essential to protect the metal from future rust. Seasoning creates a polymerized oil layer that acts as a barrier against moisture and oxygen. Start by ensuring the grates are completely dry. Any remaining moisture will interfere with the seasoning process and can cause the oil to smoke excessively. Apply a thin, even coat of high-smoke-point oil, such as flaxseed, canola, or vegetable oil, to all surfaces of the grate.
Use a cloth or paper towel to spread the oil thinly, wiping away any excess. Place the grates in a preheated oven at 450 to 500 degrees Fahrenheit for one hour. Allow the grates to cool inside the oven before removing them. Repeat the oiling and baking process two to three times to build up a durable seasoning layer. A well-seasoned cast iron grate will have a smooth, dark, and slightly glossy finish that resists rust and promotes non-stick cooking.
Preventing Future Rust Formation
Prevention is the most effective way to deal with rust on your grill. Always dry your grates thoroughly after cleaning to remove any residual moisture. Store the grill in a covered area or use a fitted grill cover to protect it from rain and snow. Avoid leaving wet food or marinades on the grill for extended periods, as the acids can accelerate corrosion. Regular cleaning after each use removes grease and food particles that can trap moisture against the metal. For cast iron grates, maintaining the seasoning layer is crucial.
Wipe the grates with a little oil after each use to keep them protected. Check for signs of rust early and address them immediately before they spread. A consistent maintenance routine will significantly extend the life of your grill and ensure that it performs reliably for years to come. For more tips on maintaining your outdoor cooking equipment, see our guide on outdoor prep tables which discusses storage solutions.
By following these steps, you can effectively clean a rusty barbecue grill and restore it to a safe cooking condition. The key is to assess the damage, choose the right tools, and take the time to dry and protect the metal after cleaning. Regular maintenance and proper storage are the best defenses against future rust. Whether you have a cast iron, stainless steel, or porcelain-coated grate, there is a specific approach that will work for your situation.
Take the time to care for your grill, and it will provide you with many seasons of reliable outdoor cooking. Remember that safety is paramount, so always follow manufacturer guidelines and use appropriate protective gear when working with chemicals or abrasives. A well-maintained grill is not only safer but also more enjoyable to use, enhancing your overall outdoor cooking experience.






Write Your Review
No reviews yet. Be the first to share your experience!