


Maintaining a steady cooking temperature on a charcoal kettle or pit is one of the most rewarding skills in outdoor cooking. Many backyard cooks struggle with sudden temperature crashes, choked embers, or erratic flare-ups that ruin an otherwise great cook. Learning how to keep heat in charcoal grill setups requires understanding the relationship between oxygen intake, fuel density, and lid insulation. When you control these three elements, you can hold temperatures steady for short sears or long smoking sessions alike.
Outdoor cooks often find that managing their charcoal fire becomes much easier when their workspace is organized before lighting the first briquette. Keeping extra fuel, tongs, and heat-resistant gloves close at hand on a dedicated rolling prep table for outdoor cooking prevents unnecessary delays when your fire needs fuel. Taking time to establish a solid ember bed and dialing in your grill dampers early will save fuel and protect your food from erratic heat swings.


Mastering Temperature Control and Heat Retention in Charcoal Grills
Sustaining consistent internal heat in a charcoal grill comes down to balanced airflow, fuel arrangement, and thermal insulation. Charcoal does not produce heat independently; it depends on a steady supply of oxygen to burn and a sealed cooking vessel to retain radiant energy. When cooks understand how draft currents move through their equipment, managing internal temperatures becomes predictable rather than a matter of guesswork.
Airflow Fundamentals: How Intake and Exhaust Dampers Govern Temperature
Airflow dictates combustion rate inside any charcoal cooking chamber. The bottom damper serves as your primary throttle by regulating how much fresh oxygen enters the fire bowl from beneath the fuel bed. Opening the bottom vent wide injects maximum oxygen into the coals, causing them to ignite faster and generate intense heat. Restricting the bottom intake reduces the oxygen supply, slowing the burn rate and dropping internal cooking temperatures.
The top exhaust damper acts as the chimney and draws air upward through the fuel bed via convective pull. As hot air and combustion gases escape through the top vent, a vacuum effect pulls fresh air in through the lower vents. Leaving the top vent fully open allows clean combustion and creates a steady, predictable draft across the cooking surface. Restricting the exhaust vent holds hot air inside the lid temporarily, but closing it too far can trap bitter creosote and smother the fire.
Adjusting dampers requires patience because temperature shifts do not happen instantaneously. After making an adjustment of even a quarter-inch on your intake damper, wait roughly ten to fifteen minutes before assessing the new internal temperature. Making rapid, dramatic vent changes often leads to overshooting your target temperature, forcing you to fight wild heat swings for the rest of the cook.
Selecting the Right Fuel Type for Long-Lasting Heat
Charcoal selection directly influences how long your fire sustains high temperatures without intervention. Hardwood lump charcoal consists of charred wood pieces that ignite quickly, produce minimal ash, and burn exceptionally hot. Lump charcoal burns out faster than briquettes and can feature irregular piece sizes that cause inconsistent burn times. Cooks seeking extreme heat for rapid searing often favor lump charcoal for its clean aroma and raw thermal output.
Charcoal briquettes are manufactured from compressed charred wood, binders, and starch to provide uniform size and density. This engineered shape ensures a steady, slow burn that holds consistent temperatures over several hours. Briquettes produce more residual ash than lump charcoal, but their predictable heat release makes them ideal for longer smoking sessions. High-density briquettes without chemical additives offer the most stable thermal foundation for all-day cooking.
Fuel moisture also plays an overlooked role in heat retention problems. Storing charcoal bags in damp basements or outdoors under humid conditions allows briquettes to absorb ambient water. Wet or damp charcoal consumes valuable combustion energy just trying to boil off internal moisture, leading to low chamber temperatures and thick white smoke. Keep your charcoal bags sealed in airtight plastic bins to preserve their combustion efficiency.
Establishing a Stable Ember Bed with Chimney Starters
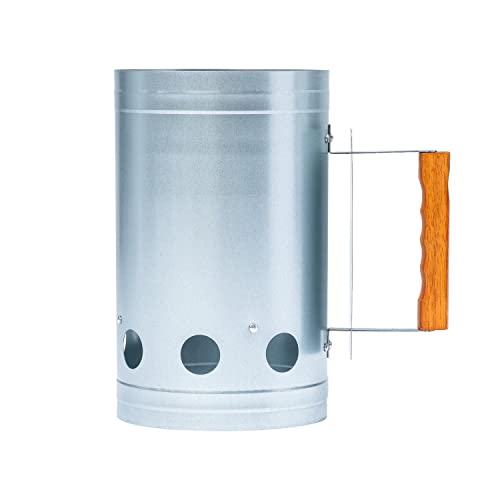
Pouring half-lit coals into your grill bowl guarantees poor heat retention from the very start. Unlit coals absorb radiant heat from burning coals nearby, causing the grill to struggle to reach cooking temperatures. A dedicated chimney starter concentrates upward draft through a metal cylinder, igniting fuel completely without foul lighter fluids. Starting with fully ashed-over coals provides a reliable thermal base that stabilizes quickly once you set the lid in place.
Large-capacity starters like the BBQGuys Signature Chimney Starter hold up to six pounds of fuel, making it practical to ignite enough charcoal for larger kettles or extended cooks in a single firing. Compact options such as the Guogiyala Charcoal Chimney Starter feature heat-resistant wooden handles and dedicated ventilation holes designed for smaller fuel loads or portable grills. Choosing a starter with adequate capacity ensures you ignite the exact amount of fuel your recipe requires without lighting multiple batches.
Allow the charcoal in your chimney to burn until the top coals show gray ash around their edges and glowing red centers below. Pouring the coals too early leaves raw briquettes that take too long to catch inside the kettle. Once poured, spread the coals into your desired cooking arrangement, replace the cooking grate, and let the metal preheat for ten minutes before placing food over the heat.
Fuel Layout Strategies: Direct, Two-Zone, and Banked Arrangements
Scattering charcoal randomly across the lower grate dissipates thermal energy and makes temperature control nearly impossible. A concentrated coal bed retains heat far better because adjacent briquettes radiate energy into one another. Establishing a two-zone fire creates a direct radiant zone on one side of the grill and a convective indirect zone on the other. This layout protects delicate ingredients from scorching while giving you a safe area to park food during flare-ups.
Using accessories like the Charcoal Basket Set of 2 helps bundle your briquettes tightly against the kettle wall. The wire mesh design allows air to circulate around the coals while keeping the fuel clustered for maximum radiant intensity. By confining coals to dedicated holders, you prevent embers from spreading thin and losing heat prematurely. These baskets also allow you to switch quickly between centered searing zones and perimeter indirect heating.
For low-and-slow cooking sessions lasting six hours or longer, methods like the snake arrangement excel at holding stable low heat. Arrange an overlapping ring of unlit briquettes around the perimeter of the fuel grate, touching two across and two deep. Place a small handful of lit coals at the beginning of the snake to start a slow, continuous chain reaction. As the lit coals burn forward, they gradually ignite new briquettes at a controlled rate, keeping chamber temperatures steady without spiking.
Grill Construction and Lid Discipline: Conserving Thermal Energy
The materials and design of your cooking chamber play a massive role in how well your grill retains operating temperatures. Classic kettles like the Weber Original Kettle Charcoal Grill – 22 inch rely on porcelain-enameled steel bowls and lids designed to reflect radiant energy back toward the grate. The porcelain coating prevents rust while sealing microscopic pores in the steel, aiding convective circulation inside the dome. High-quality construction holds heat far better than thin, unlined sheet metal.
Lifting the grill lid repeatedly is the quickest way to bleed thermal energy and drop internal temperatures. Every time you remove the lid, hot air rushes out and cool ambient air floods the cooking chamber. The coals may flare up briefly due to the sudden oxygen surge, but the radiant heat stored in the dome is lost instantly. Trust your internal dome thermometer and leave the lid secured in place except when basting, checking doneness, or flipping ingredients.
Positioning the exhaust damper properly also impacts how convective currents flow over your ingredients. For indirect cooking, rotate the lid so the exhaust vent sits directly above the food, away from the charcoal bed. This arrangement forces hot air and wood smoke to travel across the cooking grate before exiting the dome. The continuous draw washes heat evenly over the food, preventing cool pockets from stalling your cook.
Combating Weather Variables and Maintaining Ambient Deflection
Outdoor ambient conditions can sap heat from your charcoal grill faster than you might expect. Strong winds strip thermal energy from metal kettle bowls through convective cooling, forcing the coals to burn through fuel at an accelerated pace. Crosswinds can also blow directly into open intake vents, causing unpredictable temperature spikes or extinguishing embers on one side of the fire. Positioning your grill in a sheltered outdoor spot shields the bowl from direct gusts.
Cold ambient temperatures require burning a greater volume of fuel to achieve normal cooking temperatures. When grilling in winter or brisk autumn weather, open your lower intake damper slightly wider than you would on a warm summer afternoon. Expect your charcoal to burn down faster as it works to overcome cold air entering the lower bowl. Preparing extra fuel ahead of time ensures you can replenish the ember bed before chamber heat plunges.
Preheating the grill thoroughly becomes even more critical when ambient temperatures drop. Allow the closed kettle to absorb radiant heat for at least fifteen minutes after adding your lit charcoal bed. This warm-up period brings the cooking grate, kettle bowl, and lid up to temperature, creating a stable thermal reserve. Once the metal retains heat, placing chilled meat on the grate will not cause a drastic, lingering temperature drop.
Managing Ash Buildup to Prevent Choked Embers
Excessive ash accumulation is a silent culprit behind sudden temperature drops during mid-cook intervals. As briquettes burn, they shed fine gray ash that falls directly around the remaining unburned core. If this ash settles thickly across the fuel grate, it suffocates the glowing coals and blocks incoming air from reaching the fire. Clearing ash regularly preserves the necessary oxygen pathways that keep embers glowing brightly.
Modern kettle grills often include mechanical sweeps or ash catchers beneath the bowl to clear debris on the fly. Sweeping the lower damper blades back and forth a few times gently drops accumulated ash through the bottom vent slots into the collection pan. Be careful not to agitate the coals violently, as airborne ash can swirl upward into the dome and settle onto your food. A gentle sweeping motion clears the air intake without disturbing the cooking grate.
Always inspect the bottom bowl before lighting your fire to ensure leftover ash from previous cooks has been removed completely. Damp ash left in the bottom of a grill clumps together like wet concrete, completely sealing lower vent openings. Starting every grilling session with a thoroughly cleaned ash catcher provides unobstructed airflow right from ignition.
Replenishing Fuel Mid-Session Without Temperature Crashes
Long smoking cooks or multi-course meals frequently demand replenishing your charcoal supply before the fire burns down completely. Waiting until your grill temperature drops below two hundred degrees before adding fuel guarantees a long cooking stall. Add fresh charcoal when the existing ember bed still holds strong red heat, typically when roughly half the initial fuel volume remains. This remaining heat ignites new coals quickly without dragging down chamber temperatures.
Adding fully lit coals from a secondary chimney starter is the most efficient way to maintain uninterrupted heat. Pouring cold, unlit charcoal directly onto a dying fire forces the existing embers to divert heat toward igniting raw fuel. If lighting a second chimney is impractical, scatter small amounts of unlit briquettes around the perimeter of the glowing bed rather than dumping them directly on top. This gradual ignition prevents bitter smoke and stabilizes radiant heat levels.
Maintaining stable indirect heat is especially vital when preparing poultry, such as following a crispy barbecue chicken wings recipe where gentle rendering must happen before final crisping. A sudden heat drop during the indirect stage causes poultry skin to turn rubbery rather than crisp. Monitoring your fuel supply throughout the cook ensures your chicken cooks through safely without stalling halfway through the rendering process.
Troubleshooting Sudden Heat Drops and Unstable Temperatures
When internal grill temperatures suddenly plummet, work through a systematic check of your airflow components first. Inspect the lower intake damper to confirm it has not been bumped shut or blocked by falling ash chunks. Next, verify that the top exhaust damper remains open enough to pull air through the chamber. If the vents are open and the fire remains sluggish, tap the fuel grate gently with a metal tool to dislodge loose ash clinging to the briquettes.
If your fire seems weak despite clear vents, your fuel bed may simply be too dispersed to sustain concentrated heat. Use long-handled tongs to bank the glowing coals closer together into a tighter cluster. Concentrating the embers reduces radiant heat loss to the surrounding air, helping the coals maintain combustion temperature. You can also crack the grill lid open an inch for two minutes to provide a quick boost of fresh air, closing it once the embers brighten.
Direct searing cooks require intense, focused heat that can deplete a fuel bed rapidly if left unmonitored. When preparing high-heat dishes like juicy Korean beef barbecue, maintain a dense cluster of glowing coals directly below the grate to ensure quick caramelization without lingering. Keep your charcoal concentrated in one zone so you can slide thin cuts of meat off the intense heat if sugars in the marinade begin to char too quickly.
Critical Safety Standards: Clearances and Carbon Monoxide Hazards
Charcoal grill operation demands strict adherence to outdoor fire safety practices at all times. Fuel-burning charcoal grills produce dangerous levels of carbon monoxide, an odorless and invisible toxic gas that can prove fatal in enclosed spaces. Never operate a charcoal grill inside a garage, breezeway, screened porch, tent, or indoor room. Opening a garage door or operating fans does not provide adequate ventilation to make indoor charcoal grilling safe.
Always place your charcoal grill on an open, level, non-combustible surface outdoors, well away from vinyl siding, wooden deck railings, and low-hanging tree branches. Maintain a generous clearance perimeter around the entire grill bowl to eliminate fire risks from flying embers or flare-ups. Keep children and pets away from the grill exterior, as porcelain-enameled steel surfaces reach extreme temperatures during cooking.
Extinguishing and disposing of charcoal requires cautious handling long after cooking finishes. Close both top and bottom dampers completely once your food is removed to choke the fire of oxygen and extinguish remaining coals. Allow the grill to cool down for several hours before handling ash or unburned fuel. Never dump warm charcoal embers into plastic trash cans or onto dry ground; store spent ash in a dedicated metal disposal bucket until fully cold.
Consistent temperature management on a charcoal grill is entirely achievable when you respect the basics of airflow, fuel quality, and heat retention. By establishing clean combustion with a chimney starter, arranging your coals tightly, and adjusting dampers with small, patient increments, you can maintain reliable cooking temperatures for any outdoor meal. Taking a deliberate approach to fuel and vent management transforms charcoal cooking from a stressful chore into a dependable culinary craft.




Write Your Review
No reviews yet. Be the first to share your experience!