


Outdoor cooking routines can stall quickly when a built-in spark generator fails right before dinner. Knowing exactly how to turn on grill with lighter tools keeps your cookout moving forward without risking dangerous fuel accumulation. Gas grills require disciplined airflow and prompt flame application, especially when built-in electronic push buttons stop clicking. Preparing your workspace on a sturdy rolling barbecue prep table provides ample clearance for your lighting accessories and utensils. A controlled manual start protects both your cooktop and your eyebrows from sudden flare-ups.
Manual ignition relies on basic combustion principles, requiring precise timing between turning the control valve and applying an open flame. Long utility wands and flexible electric arc starters give cooks a substantial physical buffer away from the burner ports. Understanding the proper mechanical sequence prevents unburned propane or natural gas from pooling beneath closed cookbox lids. Grilling enthusiasts can easily master this backup procedure by respecting gas flow rates and choosing reliable ignition tools designed for outdoor conditions.



The Complete Manual Ignition Guide for Gas and Charcoal Grills
Manual lighting serves as the primary fail-safe technique whenever a grill’s factory ignition electrode stops sparking. Outdoor cooks encounter dead igniter batteries, corroded wiring, or misaligned ceramic electrodes at the most inconvenient times. Resorting to an auxiliary flame source remains completely safe when you adhere strictly to proper ventilation and valve timing rules. Understanding the mechanics of gas delivery ensures a smooth start every time you step outside to cook.
The Essential Ventilation Rule: Keep the Lid Completely Open
Propane and natural gas are pressurized fuels that expand rapidly once you release them through the manifold valve. Opening the grill lid stands as the most critical safety requirement before introducing an open flame or spark. Trapping fuel vapors inside a closed cookbox creates an explosive hazard that can blow the hood open with extreme force. A closed lid allows gas to pool invisibly around the burner tubes and under the heat tents.
Liquid propane remains heavier than ambient air, causing it to settle into the lower catch pan and grease tray. Natural gas, while lighter than air, still accumulates quickly inside an enclosed metal firebox. Lifting the lid fully ensures continuous air circulation, allowing minor gas drifts to dissipate safely into the atmosphere. Always confirm that the cookbox is clear of grease buildup or lingering vapors before attempting ignition.
Locating the Manual Ignition Hole and Burner Architecture
Most grill manufacturers anticipate igniter failures by integrating a dedicated manual lighting hole into the cookbox body. This small circular cutout is typically located on the lower side panel of the grill casting, aligned with the primary burner. Inserting a long lighter wand directly through this access hole positions the flame right next to the burner ports. This design eliminates the need to reach down through greasy grates or remove heavy cooking surfaces.
Grills lacking a dedicated side port require lighting from above the cooking surface. In this situation, lifting off a grate section or reaching between wide openings provides direct access to the burner tube. Main burners feature tiny precision-drilled orifices called gas ports that run along both sides of the tube. Applying your lighter flame directly adjacent to these ports ensures the exiting fuel catches the moment you open the valve.
Some grill brands provide a small wire match holder clipped inside the cart cabinet. This wire tool grips a standard match, extending your reach down through the grates without placing your fingers near the firebox. While a match holder works in an emergency, an extended utility lighter provides far better wind resistance and sustained heat. Inspecting your burner layout beforehand gives you clear sightlines for a controlled ignition.
Step-by-Step Execution for Lighting Gas Burners Safely
Preparation begins at the fuel source before touching any burner control knobs on the front control panel. Ensure all grill control knobs rest in the complete off position to prevent accidental leakage. Slowly open the main valve on your propane cylinder all the way counterclockwise, or open your natural gas supply line shutoff valve. Opening propane tank valves too rapidly can activate the internal excess-flow safety bypass mechanism, which severely restricts flame output.
Once the fuel line is pressurized and the lid remains wide open, ready your ignition tool. Activate the flame or plasma arc on your utility lighter before turning on any gas flow. Position the live flame directly next to the primary burner ports, whether through the side access cutout or just above the burner tube. With the flame holding steady at the burner surface, push in and turn the primary burner control knob to high.
The burner should ignite almost instantaneously with a soft whoosh sound. Visually inspect the burner tube to verify that blue flames encircle the entire length of the assembly. Once the primary burner establishes a continuous flame, extinguish and retract your lighter. You can now turn adjacent secondary burners to high, as the crossover carryover tubes will light them sequentially without needing additional sparks.
What to Do When the Burner Fails to Catch Immediately
Gas that fails to ignite within five seconds presents an immediate safety risk that requires decisive action. If the burner does not catch after turning the control knob, shut off the burner valve immediately. Lingering propane pools rapidly inside the lower firebox, creating a dense vapor cloud that can ignite violently if you keep sparking. Never continue holding a lighter flame over a burner while raw gas continues hissing from the manifold.
Allow a full five minutes for the pooled gas to dissipate into the open outdoor air before attempting a second try. Keep the hood completely open during this waiting period to speed up natural airflow. Use this interval to check whether your propane tank has adequate fuel or if wind is blowing out your lighter flame. Once the area smells entirely clean of sulfurous odorants, you can safely repeat the manual lighting sequence.
Persistent ignition delays often point to air trapped inside newly connected gas lines or a stuck regulator. Purging air from a new line may take a few seconds of controlled gas release, but you must still obey the five-minute clearing rule between attempts. Rushing the process increases the volume of unburned fuel sitting at the bottom of the firebox. Patience and strict ventilation remain your best safeguards against sudden combustion flashes.
Selecting the Right Lighter Design: Butane Wands vs. Plasma Arcs
Reaching deep inside a grill firebox requires specialized tools that keep your hands well away from heat ports. Standard pocket lighters should never be used because their short stems force your fingers dangerously close to the burner opening. Extended utility tools feature rigid stems or telescoping tubes that reach anywhere from ten inches to over two feet. For example, extendable rods like those on the Extra Long Lighter for Grill provide more than thirty inches of reach, creating a comfortable buffer from unexpected flare-ups.
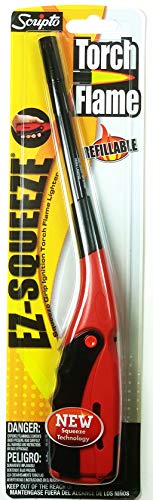
Refillable butane models remain popular due to their visible fuel windows and adjustable flame heights. Classic designs like the VIP Home Essentials – Handi Flame BBQ Grill Click and the Click N Flame BBQ Kitchen Long Reach Lighter provide continuous burning flames that light gas ports easily. When gusty backyard winds threaten to blow out standard soft flames, torch-style options like the Scripto Ez Squeeze Torch Flame BBQ Utility Lighter deliver a focused, pressurized jet flame that resists outdoor air currents.
Electric flameless designs offer a modern alternative that relies on high-voltage plasma arcs rather than liquid butane. Dual-arc units like the M1 Direct Premium Rechargeable Dual-Arc Plasma produce an intense electrical current that wind cannot extinguish. Similarly, flexible goose-neck designs like the GRILLMATIC Windproof, Rechargeable, Flexible Neck allow cooks to bend the head around grease shields and tight heat diffusers. These rechargeable units eliminate the need to purchase pressurized butane canisters, though they require periodic battery charging via USB cables.
Applying Lighters to Charcoal and Wood Smoker Setups
Charcoal kettles, ceramic kamados, and offset smokers operate on solid fuels that behave very differently from gas burners. You should never apply a lighter flame directly to cold charcoal briquettes without an appropriate fire starter. Safe starting mediums include wax paraffin cubes, tumbleweed wood shavings, or newspaper bundles placed under a metal chimney starter. Reaching a long-stem utility lighter into the bottom vents of a chimney starter ignites the kindling while keeping your hands clear of rising ash.
If you are adding smoky character to your gas cookbox, using dedicated accessories like smoker boxes for wood chips introduces delicate smoke without flaring. A focused utility lighter can ignite natural starter cubes tucked beneath wood chunks inside an offset firebox. Avoid using chemical lighter fluids whenever possible, as petroleum distillates impart harsh flavors and create volatile vapor plumes. Controlled manual ignition with clean starter materials yields consistent embers without safety surprises.
Managing airflow during the initial charcoal lighting phase dictates how quickly your briquettes transform into glowing coals. Open the bottom intake vents completely to draw fresh oxygen through the bottom of the chimney or fire basket. Once the starter material catches, allow the flame to climb naturally through the charcoal column without poking the coals. When the top layer of briquettes forms a light gray ash coat, pour the coals onto your charcoal grate and prepare to cook.
Enclosed Space Dangers: Why Grills Must Never Operate Indoors
Grill ignition must always take place in open outdoor settings that provide unobstructed ventilation. Operating any fuel-burning grill inside a garage, breezeway, screened porch, or shed presents lethal carbon monoxide risks. Carbon monoxide is a colorless, odorless, and tasteless gas produced by the incomplete combustion of propane, natural gas, charcoal, and wood pellets. Even running a grill inside an open garage with the main vehicle door raised allows deadly fumes to migrate into residential living areas.
Authoritative fire safety agencies emphasize that outdoor grills must sit clear of combustible siding, wooden deck railings, and low roof overhangs. Fire risks increase dramatically when manual lighting produces a minor pop or flash that can ignite nearby dry leaves or grease deposits. Installing high-grade cooking platforms like an outdoor kitchen barbecue island setup ensures non-combustible clearances and stable cooking foundations. Always position your cooking station on flat outdoor ground away from exterior building walls.
Never rely on temporary fans or partial door openings to ventilate a garage or enclosed porch while grilling. Structural fires and carbon monoxide poisoning occur quickly when heat plumes become trapped beneath garage ceilings and roof trusses. If inclement weather like rain or high wind prevents safe outdoor cooking, postpone your grilling session rather than moving the unit under cover. True outdoor cooking safety starts with respecting the strict physical boundary between open-air environments and residential structures.
Troubleshooting Igniter Modules and Maintaining Clean Burner Ports
A failed built-in igniter is usually caused by routine battery depletion or environmental dirt rather than broken mechanical switches. Electronic push-button igniters typically house a single AA or AAA battery behind the rubber button cap. Unscrewing this cap allows you to replace dead batteries and clean away any minor oxidation that interrupts circuit continuity. Piezoelectric click-style igniters generate an electrical pulse via mechanical friction, which can fail if grease coats the spark tip.
Inspect the ceramic electrode housing positioned next to the primary burner tube beneath the heat tent. Food drippings, rust scale, and spider webs often bridge the narrow spark gap, preventing the electric arc from reaching the gas stream. Gently scrubbing the metal tip and ceramic insulator with an old toothbrush or brass wire brush restores proper spark transmission. Ensure the burner tube ports remain clear of debris by poking clogged holes with an unfolded paperclip or fine wire.
Spiders and small insects frequently spin dense webs inside the burner venturi tubes during the off-season. These tiny obstructions disrupt the natural mixture of air and gas, forcing fuel backward toward the control valves. This hazardous condition, known as a flashback fire, causes flames to burn behind the control panel rather than inside the cookbox. Removing burner tubes annually and cleaning them with a dedicated venturi brush keeps gas flowing smoothly to the manual ignition ports.
Verifying Safe Flame Characteristics and Final Operation
Observing your burner flames after manual ignition confirms whether your fuel mixture is burning properly. A clean, efficient propane or natural gas flame displays a predominantly blue color with slight light yellow tips. Lazy orange or yellow flames indicate an improper air-to-fuel ratio, often caused by blocked venturi air shutters or insect nests inside burner tubes. If you observe irregular yellow flames or smell raw gas continuously, shut down the grill immediately and allow it to cool.
Regularly checking your regulator hose with a soapy water solution helps identify microscopic leaks before manual lighting. Spraying a mixture of dish soap and water across the tank connection and flexible hose reveals gas leaks through growing bubbles. Tightening loose fittings or replacing brittle rubber lines prevents hazardous fuel seepage during outdoor cooking sessions. Checking your gas connections periodically keeps your cooking setup dependable and safe.
Once all burners are lit and burning evenly, close the grill hood to allow the grates to preheat for cooking. Preheating burns off residual food particles and brings the cooking surface to proper searing temperatures. Keeping a long utility lighter stored safely in a weather-resistant grill drawer ensures you are never caught unprepared when an electronic igniter fails. Routine inspection and measured lighting habits will ensure every backyard cookout begins smoothly and safely.





Write Your Review
No reviews yet. Be the first to share your experience!