


Cooking over live coals offers an unmistakable smoky flavor that gas burners simply cannot replicate, but mastering the ignition process can feel intimidating for newcomers. When beginners ask how do you start charcoal grill equipment safely, they often worry about stubborn coals, unpleasant chemical fumes, or uneven temperatures across the cooking grate. Lighting charcoal does not require hazardous fluids or guesswork if you understand basic airflow principles and choose the right ignition method for your setup. Whether you are preparing a casual weeknight dinner or experimenting with savory Korean barbecue recipes, establishing clean heat is the vital first step toward outdoor cooking success.
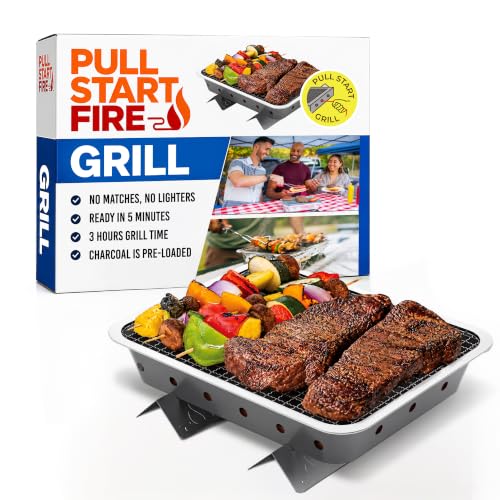
Different charcoal types, from dense briquettes to all-natural lump hardwood, react differently to heat and oxygen during the initial lighting phase. Utilizing dedicated fire starters, chimney starters, or self-contained options like the Pull Start Fire Grill, Natural Hardwood Charcoal helps cooks bypass messy petroleum fluids entirely. A clean ignition ensures your food absorbs sweet wood smoke rather than noxious fuel odors, preserving the authentic taste of your ingredients. Understanding the lighting sequence also protects your equipment and ensures you reach an optimal cooking temperature without unnecessary delays.
Essential Steps for Lighting and Managing a Charcoal Grill
Starting a charcoal grill requires three fundamental elements working together: fuel, ignition, and controlled oxygen flow. Rather than relying on volatile chemicals that taint your food, the most effective approach utilizes focused draft power or reliable solid starters to bring your coals to a steady, ash-covered glow. Once the charcoal catches and begins radiating uniform heat, you can arrange your fire bed for direct searing or gentle roasting. Taking time to master this ignition phase transforms outdoor cooking into a dependable culinary ritual.
Selecting Your Fuel: Hardwood Lump Versus Charcoal Briquettes
Lump charcoal consists of charred hardwood pieces that retain the natural grain of the timber. This fuel ignites quickly, produces minimal ash residue, and can reach intense temperatures exceeding eight hundred degrees Fahrenheit. Because the individual pieces vary in size, lump charcoal tends to burn faster than compressed alternatives. Cooks preparing quick weeknight steaks or thin chops often favor lump charcoal for its clean aroma and rapid heat.
Charcoal briquettes offer an alternative made from compressed sawdust and natural mineral binders. Their uniform pillow shape ensures consistent spacing and predictable airflow across the fire grate. Briquettes take slightly longer to light than lump charcoal, but they deliver a steady burn that lasts for hours without frequent replenishment. Backyard cooks managing long barbecue roasts often rely on briquettes for their temperature stability.
You can also combine both fuel types to capture the advantages of each material in a single session. Placing a base of compressed briquettes underneath a top layer of hardwood lump provides sustained longevity and aromatic smoke. When evaluating fuels, look for products free of artificial chemical binders or petroleum additives. Selecting quality fuel makes lighting easier and keeps chemical odors from settling into your food.
The Chimney Starter Method: Clean and Reliable Lighting
A chimney starter remains the standard tool for lighting charcoal without lighter fluid or chemical additives. This open-ended metal cylinder utilizes natural convection to draw fresh air up through a vertical column of fuel. As heat rises through the cylinder, it creates a draft that ignites adjacent coals from the bottom up. Most standard chimneys hold enough charcoal for a full kettle grill cookout in a single batch.
To operate a chimney starter, invert the cylinder and place one or two sheets of crumpled paper or a starter cube into the bottom cavity. Turn the cylinder upright on your lower charcoal grate and fill the top chamber with your chosen fuel. Light the starter through the bottom ventilation holes using a long match or lighter. Within ten to fifteen minutes, smoke will clear and flame will reach the top charcoal layer.
Wait until the top layer of charcoal develops a fine coating of gray ash before pouring. Put on heavy, heat-resistant barbecue gloves to protect your hands from sparks and heat waves. Grasp the chimney handle firmly, steady the secondary wire support loop, and dump the glowing embers directly onto the lower grill grate. Spread the coals immediately using a dedicated metal ash rake or heavy-duty tongs.
Alternative Ignition Methods: Electric Starters, Fire Cubes, and Instant Bricks
Electric charcoal starters provide an odorless lighting solution if you have access to an outdoor electrical outlet. These tools feature a heating loop that slides directly into a mound of charcoal. Once plugged in, the red-hot element ignites surrounding coals in approximately eight to ten minutes without open flames. You simply pull the starter out after ignition and place it on a heat-safe surface to cool.
For remote excursions or quick backyard meals, self-contained units offer practical convenience. The Pull Start Fire Grill, Natural Hardwood Charcoal pack incorporates a built-in pull string mechanism that eliminates the need for matches or external starters. According to product specifications, this portable three-pound system brings its pre-loaded hardwood charcoal brick to cooking heat in five minutes. It delivers up to three hours of heat on a stainless steel cooking grate, making it a functional option for tailgate events.
Petroleum lighter fluid remains widely available, but experienced outdoor cooks avoid it whenever possible. Chemical lighter fluids can leave behind persistent hydrocarbon residues that alter the flavor of your food. Fluid can also flare up uncontrollably if squirted onto warm coals, posing an immediate burn hazard. Natural fire-starting wax cubes, wood wool bundles, and self-igniting fuel bricks deliver far cleaner results with greater safety.
Crucial Airflow Dynamics: Intake and Exhaust Damper Control
Oxygen acts as the primary accelerator for charcoal combustion, making vent management your most powerful temperature tool. Most charcoal grills feature intake dampers located on the bottom bowl and exhaust dampers integrated into the lid. The bottom dampers pull fresh ambient air directly into the base of the burning coals. Opening the bottom vents wider feeds the fire more oxygen, which steadily drives the grill temperature higher.
The top exhaust vent draws air through the cooking chamber while expelling combustion gases and spent smoke. Leaving the exhaust vent at least partially open prevents bitter creosote from coating your food during longer sessions. Closing the top exhaust damper restricts airflow through the entire system, dampening the fire and bringing temperatures down. A balanced adjustment between top and bottom dampers allows you to maintain stable cooking heat.
Adjusting your dampers should always happen in small, measured movements rather than sudden wide swings. When you change vent openings, allow ten to fifteen minutes for the internal air temperature to stabilize before making another adjustment. Closing both vents completely cuts off oxygen, which suffocates the fire when you finish cooking. This smothering technique preserves remaining charcoal so you can relight it for your next cook.
Establishing Cooking Zones: Direct Versus Indirect Heat
Dumping hot coals in a flat, uniform layer across the entire grill floor severely limits your cooking control. Creating a two-zone fire setup provides both high radiant heat and gentle convective warmth inside the same grill. To build this arrangement, bank all your glowing coals onto one half of the lower grate while leaving the opposite side empty. This separation creates a direct searing zone over the coals and an indirect roasting zone on the cooler side.
The direct heat zone works best when you need rapid browning, caramelization, and deep sear marks on quick-cooking items. Steaks, burger patties, shrimp skewers, and sliced vegetables cook quickly directly over the glowing embers. Radiant infrared energy sears the exterior of the food while rendering exterior fats for rich flavor. Because flare-ups happen quickly over direct coals, keep tongs nearby to move items if dripping fats ignite.
The indirect heat zone acts like a conventional oven, allowing thicker cuts to cook through without scorching their surfaces. Whole chickens, thick pork roasts, and bone-in ribs cook thoroughly in this gentler zone while absorbing wood smoke. You can baste ribs with homemade glazes like cranberry barbecue sauce without burning delicate natural sugars over open flames. Cooks can also position dedicated smoker boxes for extra flavor over the hot side to bathe indirect meats in aromatic smoke.
Recognizing When Your Coals Are Ready to Cook
Patience during the preheating stage separates successful grilling from frustrated trial and error. Freshly ignited charcoal burns with aggressive yellow flames and thick white smoke that should never touch your food. As combustion stabilizes, the flame dies down and a delicate layer of gray ash spreads across the charcoal surface. Your grill is ready for cooking only when the majority of coals show this gray ash coating over an orange core.
Surface temperature checks help you confirm whether the cooking grate has absorbed sufficient heat for searing. You can gauge temperature by holding your palm safely four to five inches above the grate and counting seconds until heat forces you to pull away. Holding your hand there for two to three seconds indicates high heat. Five to six seconds indicates medium heat, while eight to ten seconds corresponds to a gentle, low zone.
Placing food onto the cooking surface too early leads to torn meat and unpleasant chemical flavors. Unready coals release volatile compounds that impart a harsh, bitter taste to animal proteins and vegetables. Rushing the process also means the cooking grate has not reached adequate thermal mass to prevent food from sticking. Giving the charcoal twenty minutes to mature ensures predictable heat output and clean grill marks.
Outdoor Safety Protocols and Safe Clearance Distances
Operating a charcoal grill indoors, inside a garage, or within any enclosed structure creates an immediate, life-threatening hazard. Burning charcoal produces high concentrations of carbon monoxide, an odorless and toxic gas that displaces oxygen in enclosed environments. Opening a garage door or operating fans does not provide adequate ventilation to counteract carbon monoxide accumulation. Fuel-burning grills must always remain fully outdoors in well-ventilated open air away from doors and windows.
Position your outdoor grill on a flat, non-combustible surface such as concrete, patio pavers, or packed gravel. Maintain a minimum clearance of ten feet from house siding, wooden fences, overhanging eaves, and low tree branches. Never set up a charcoal cooker underneath low wooden pergolas or canvas awnings where trapped heat and sparks could ignite structural materials. Always keep a bucket of clean sand, a garden hose, or a standard fire extinguisher within reach while cooking.
Safe disposal of spent charcoal requires careful planning because embers can retain heat long after the exterior turns black. Allow the grill to cool completely for at least twenty-four to forty-eight hours with all vents closed before cleaning the bowl. Transfer extinguished ashes into a dedicated metal disposal can equipped with a tight lid rather than a plastic trash bin. Wetting the ashes thoroughly with water adds an extra layer of protection before final disposal.
Troubleshooting Common Charcoal Starting Pitfalls
Coals that extinguish before reaching cooking temperature usually suffer from restricted oxygen flow. Check the lower kettle vents to confirm that accumulated ash from previous sessions is not choking off incoming air. Damp charcoal that has absorbed atmospheric moisture during humid weather or outdoor storage also struggles to stay lit. Storing your fuel bags in an airtight plastic bin inside a dry shed protects the charcoal from moisture degradation.
Grills that run excessively hot and burn through fuel too quickly typically have uncontrolled air leaks. Inspect the kettle lid to ensure it seats flush against the bowl perimeter without gaps or bent metal edges. Check bottom damper assemblies to verify that they close tightly when adjusted down. Reducing the total volume of fuel in your fire bed also helps tame runaway temperatures during smaller cooking sessions.
Food sticking often occurs when cooks place cold ingredients directly onto an unheated or dirty cooking grate. After arranging your hot coals, replace the grill lid and allow the grate to preheat for ten minutes before cooking. Run a stainless steel grill brush or wooden scraper over the hot bars to strip away carbonized residue from previous meals. A light wipe of high-smoke-point oil applied with folded paper towels helps create a smooth cooking surface.
Practical Takeaways for Consistent Backyard Grilling
Achieving predictable results on a charcoal grill comes down to developing a consistent routine. Measure your fuel portions carefully using your chimney starter or a scoop rather than dumping random amounts into the bowl. Monitor damper settings closely during the first fifteen minutes of cooking to establish your target temperature range. Reliable tools such as an instant-read digital meat thermometer eliminate guesswork and guarantee food safety on every plate.
Mastering fire control gives you the confidence to tackle everything from quick weeknight burgers to slow-cooked roasts. Respecting proper airflow principles, avoiding artificial chemical starters, and setting up dedicated heat zones will improve your cooking results. With practice and proper safety precautions, lighting your charcoal cooker becomes the easiest and most satisfying part of outdoor cooking.





Write Your Review
No reviews yet. Be the first to share your experience!