


Cooking over charcoal delivers unmatched smoky flavor, but timing the coals correctly often puzzles beginner and experienced backyard cooks alike. Anyone wondering how long does it take to start a charcoal grill can generally plan on fifteen to twenty-five minutes before the coals reach proper cooking readiness. Using a traditional chimney starter usually brings standard briquettes to a working heat in roughly fifteen to twenty minutes, whereas building a manual charcoal pyramid without specialized airflow tools can extend the wait past thirty minutes. Cooks who enjoy infusing authentic wood aroma into their cooking sessions often pair traditional charcoal beds with dedicated smoker boxes for added depth across slow afternoon roasts.
Achieving the right heat depends on air circulation, the specific fuel type you select, and the outdoor ambient conditions around your patio. Lump hardwood charcoal tends to ignite faster than dense briquettes, while windy or chilly weather can slow the initial ignition process. Instant lighting alternatives, such as pre-packaged charcoal bricks or pull-string igniters, claim to shorten ignition down to several minutes, but classic kettle setups demand a bit more patience to establish a glowing ember base. Understanding the visible cues of ready coals ensures your food cooks over steady radiating heat rather than acrid starting smoke.
Complete Guide to Charcoal Grill Start Times and Heat Readiness
Starting a charcoal grill requires patience and an understanding of combustion stages. While gas burners ignite instantly, charcoal must progress through ignition, smoke clearing, and ember development before it provides stable radiant heat. Knowing exactly how long does it take to start a charcoal grill allows outdoor cooks to coordinate prep work, side dishes, and meat seasoning smoothly. Taking the proper time during the ignition phase prevents acrid, bitter smoke from settling onto your food.
Typical Charcoal Startup Timelines by Fuel and Ignition Method
Under typical outdoor conditions, most charcoal grills require between fifteen and twenty-five minutes to reach optimal cooking heat. The fastest standard backyard method relies on a metal chimney starter, which concentrates heat and establishes glowing coals in roughly fifteen minutes. If you pile briquettes into a mound and rely solely on standard lighter fluid or wax fire starter cubes, expect the process to take twenty to thirty minutes before the flames subside and embers stabilize. Electric starters and torch-style lighters fall between ten and twenty minutes depending on how thoroughly the heating element contacts the fuel bed.
The total startup clock does not end the moment you see open flames dancing across the fuel. In fact, active flames indicate that the fuel is still consuming volatile compounds rather than burning cleanly. Specialized portable grills can reach cooking heat in as little as five minutes, whereas heavy ceramic kamados may require up to thirty minutes to saturate their thick walls. You must wait until the exterior surfaces of the coals develop a delicate coating of gray or white ash before adding ingredients.
Lump Charcoal Versus Charcoal Briquettes: How Fuel Changes the Clock
The type of charcoal you pour into the firebox dramatically influences how quickly your grill comes up to temperature. Lump charcoal consists of charred hardwood pieces with irregular shapes and porous internal structures that catch fire rapidly. These natural airflow channels allow lump charcoal to reach cooking temperature in ten to fifteen minutes, offering high initial heat that suits quick searing. The trade-off is that lump charcoal burns down faster, requiring replenishment during prolonged grilling sessions.
Charcoal briquettes are manufactured by compressing pulverized charcoal, starch binders, and mineral components into dense, uniform pillows. This uniform density means briquettes ignite more slowly, usually taking twenty to twenty-five minutes to fully ash over. The benefit of this slower ignition is a predictable, long-lasting burn pattern that holds steady heat across several hours. Storing fuel in airtight containers is critical because damp briquettes expend extra energy boiling off internal water, adding another ten minutes to ignition.
Comparing Common Lighting Methods: Chimney Starters, Cubes, and Fluid
How you choose to ignite your fuel directly impacts both startup timing and food flavor. A chimney starter remains widely regarded as the most efficient and reliable lighting tool available. By stacking fuel vertically inside a vented metal cylinder, the chimney creates a natural draft that pulls oxygen up through the coals, bringing the top layer to full glow in fifteen to twenty minutes without chemical accelerants. Cooks weighing traditional charcoal against fast modern alternatives like propane grills with infrared burners often find chimney starters offer the best balance of speed and authentic charcoal flavor.
Liquid lighter fluid is another traditional method, but it introduces distinct timing and flavor drawbacks. Saturating a pyramid of briquettes with petroleum distillate requires twenty to twenty-five minutes for the chemical odor to burn off completely. Rushing food onto the grates before lighter fluid fumes dissipate completely will impart a foul petroleum taste to meats and vegetables. Non-toxic paraffin wax cubes and electric element starters provide odorless alternatives, though electric tools require an accessible outdoor electrical outlet.
Portable and Instant-Lighting Options for Fast Outdoor Cooking
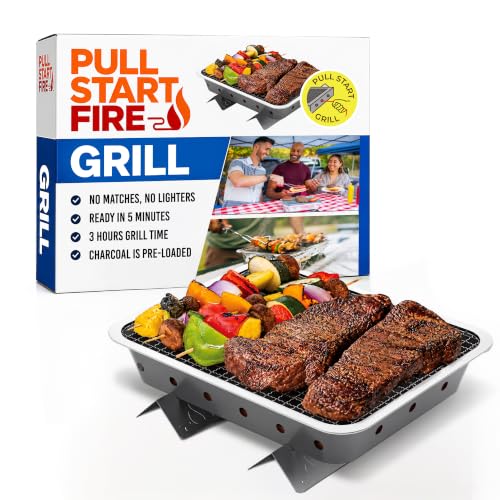
Campers, tailgaters, and patio cooks often face situations where waiting thirty minutes for coals to stabilize is impractical. In response, modern portable systems integrate single-pull ignition and pre-loaded charcoal bricks to speed up meal service. An example of this convenient category is the Pull Start Fire Grill, Natural Hardwood Charcoal, which features an integrated pull-string mechanism designed to ignite without matches, lighter fluid, or separate chimney hardware. The manufacturer states that this disposable unit reaches full cooking heat in five minutes, providing consistent heat for up to three hours across its stainless steel grate.
Disposable setups of this type weigh approximately three pounds and pack down compactly, making them practical emergency backups or quick campsite solutions. Because the charcoal brick sits on stabilizing feet with an engineered ignition core, it eliminates the guesswork of stacking coals or coaxing stubborn airflow. Fast-heating portable units excel with burgers, steaks, sausages, and vegetables because they provide uniform surface heat across the entire grate. After cooking, the unit cools down and can be discarded, avoiding the need to haul heavy bags of fuel or scrub greasy kettle grates.
Visible Signs That Coals Are Ready to Cook
Relying on a stopwatch alone can lead to underheated grates, so observing visual cues is essential. Unready charcoal produces dense, billowing white or grayish smoke as binders and initial wood moisture vaporize. This early smoke carries pungent, bitter creosote compounds that ruin food flavors. Once the fire catches properly, smoke output decreases sharply, transitioning into faint wisps of thin, translucent blue smoke.
The definitive indicator of cooking readiness is the appearance of a light gray or white ash layer covering the coals. When looking into the firebox, the briquettes or lump chunks should show glowing orange centers beneath this fine powdery veil. You can also perform a safe hand test by holding your palm five inches above grate level. If radiant heat forces you to pull away after two to three seconds, the grill has achieved high searing heat of approximately 450 to 500 degrees Fahrenheit.
Airflow Control and Damper Management for Faster Heating
Oxygen fuels combustion, making damper management a critical factor in how rapidly your grill starts. Most charcoal grills feature bottom intake dampers near the ash pan and top exhaust dampers on the lid. During the initial lighting and preheating phase, both top and bottom vents should remain wide open to draw maximum oxygen through the fuel bed. Restricting airflow too early chokes the emerging fire and prolongs the startup phase by several minutes.
Once you dump chimney-started coals into the kettle and position the cooking grate, close the lid while keeping the vents fully open. Allowing the grill to preheat with the lid closed for five to ten minutes burns off residual grate grease and heats the metal bars thoroughly. After the grill reaches your target temperature, you can adjust the bottom damper halfway to regulate subsequent heat levels for steady medium cooking.
Weather and Ambient Conditions That Impact Lighting Speed
Outdoor environmental factors regularly alter charcoal startup timelines. Grilling during a chilly autumn evening or cold winter afternoon draws thermal energy away from thin metal grill walls. Cold ambient air slows coal ignition and demands five to ten extra minutes of preheating before grates reach searing temperatures. Adding ten to twenty percent more fuel helps overcome cold weather heat loss in uninsulated metal kettles.
Wind introduces conflicting challenges depending on how your grill is positioned. A gentle breeze can accelerate startup by forcing extra oxygen into open intake dampers, but strong gusts cause erratic turbulence and blow ash across your patio. High relative humidity and high elevations also slow combustion because thinner air supplies less concentrated oxygen. Setting up an outdoor windbreak while maintaining safe clearances keeps your fire stable and predictable under adverse weather conditions.
Building Direct and Two-Zone Cooking Fires
How you arrange your coals after ignition dictates cooking flexibility and temperature zones. Spreading all ready embers evenly across the firebox creates a single direct-heat zone ideal for fast-cooking items like burgers and thin steaks. However, this arrangement leaves no safe retreat if dripping fat ignites sudden grease flare-ups. A direct-only bed cooks quickly but limits your ability to manage thicker cuts of poultry or pork that require extended cooking times.
A two-zone fire setup provides vastly superior versatility for backyard cooking. To build this arrangement, bank all glowing coals against one side of the firebox while leaving the opposite side empty. The side directly above the coals serves as a high-heat searing zone, while the coal-free side provides gentle indirect heat. Once your meats finish roasting on the indirect side, brushing them with a tangy mustard barbecue sauce recipe allows the glaze to caramelize gently without scorching over open flames.
Essential Safety Rules and Location Clearances
Operating a charcoal grill demands strict adherence to outdoor fire safety practices. Burning charcoal produces significant quantities of carbon monoxide, an invisible, odorless gas that displaces oxygen in the bloodstream. For this reason, fuel-burning grills must never be operated inside a home, camper, tent, garage, or enclosed patio, even if garage doors or windows are left wide open. Adequate air circulation cannot overcome rapid toxic gas buildup in semi-enclosed spaces.
Grills should always be positioned outdoors on a stable, level, non-combustible surface such as concrete, pavers, or dirt. Maintain a minimum clearance of ten feet from house walls, wooden railings, overhangs, dry vegetation, and outdoor structures. Once cooking finishes, close both top and bottom dampers completely to starve the remaining coals of oxygen. Allow the coals to cool completely inside the grill for at least twenty-four hours before transferring remnants into a dedicated metal ash bucket with a tight-fitting lid.
Routine Ash Clearing and Grate Preparation for Reliable Airflow
Neglecting maintenance between grilling sessions directly extends startup times on future cooks. Accumulated ash sitting in the bottom of a charcoal kettle absorbs ambient moisture and hardens into a dense sludge that blocks bottom intake vents. When air cannot enter the base freely, newly lit coals struggle for oxygen, dragging out the lighting process and causing temperatures to stall unexpectedly. Clearing old ash before every single cook ensures unrestricted airflow from start to finish.
Cleaning your cooking grates should also be integrated into the preheating routine. After the coals are dumped and the lid has remained closed for five minutes, the intense radiant heat loosens baked-on food debris from previous sessions. Use a stiff grill brush or wooden scraper to clean the hot metal bars thoroughly before placing fresh ingredients on the grill. A light wipe with high-smoke-point cooking oil on a folded paper towel seasons the surface and discourages meat from sticking.
Practical Takeaways for Reliable Heat Management
Mastering charcoal startup timing comes down to matching your fuel choice with the right ignition technique and proper airflow management. Investing fifteen to twenty minutes with a quality chimney starter and dry charcoal pays dividends in clean-burning heat, steady temperatures, and rich wood-smoke flavors. Avoid rushing the process with excessive lighter fluid or adding meat while thick white smoke billows from the vents. By waiting for a thorough ash layer and maintaining open dampers, you ensure every cookout delivers tender, perfectly seared results.




Write Your Review
No reviews yet. Be the first to share your experience!