


Switching from portable propane tanks to a continuous utility supply frees outdoor cooks from the frustration of running out of fuel mid-sear. Learning how to install a natural gas grill gives you uninterrupted heat for quick weeknight dinners and extended weekend barbecues alike. Connecting a grill directly to your home gas line transforms a backyard patio into a permanent cooking hub, especially when paired with a custom outdoor cooking island setup that keeps your prep area organized. Natural gas burns cleanly, delivers steady fuel flow, and eliminates recurring trips to exchange heavy twenty-pound propane cylinders.
Proper installation requires careful attention to gas line pressure, secure plumbing fittings, and strict outdoor safety protocols. Whether you mount a factory-built natural gas model or use a conversion kit to adapt a dual-fuel cart, the connection process must always prevent leaks. Gas plumbing demands the right pipe thread sealants, calibrated natural gas orifices, and thorough leak testing before lighting a single burner. Taking deliberate, cautious steps guarantees that your outdoor kitchen runs reliably while protecting your home, family, and cooking equipment.


Pros
- Endless fuel supply – no more running out of propane mid-burger flip
- Easy installation with clear instructions and included tools for most Weber Genesis and Spirit models
- Solid build with CSA-certified hose and brass fittings that handle outdoor conditions well
- Comes with extra orifices for future maintenance or replacement if needed
Cons
- Only works with Weber propane grills that are convertible – not all models are compatible, so double-check your grill's model number
- Installation requires basic DIY skills; if you're not handy with gas connections, you might want a professional
- Natural gas provides slightly less BTUs than propane, so max heat may be a touch lower for extreme searing
If you're tired of hauling propane tanks to the refill station or running out of gas right when the burgers are almost done, the Garsoo Propane to Natural Gas Conversion Kit might be exactly what your backyard setup needs. This kit is designed to convert select Weber propane grills – including Genesis, Genesis II, Spirit, and Spirit II models – to run on your home's natural gas line. That means unlimited fuel for all those weekend BBQs, tailgates at home, and patio cookouts.
This kit is best suited for backyard grillers and outdoor entertainers who have a natural gas hookup available. If you're the type who hosts big parties or cooks low-and-slow on weekends, not having to worry about propane levels is a huge win. Campers and tailgaters who move their grill around won't benefit as much since natural gas requires a fixed connection, but for patio and deck setups, it's a game-changer in convenience.
In terms of real-world cooking performance, the key advantage here is consistent heat. The included regulator maintains a steady natural gas flow, which translates to even temperatures across your cooking grates. You'll still get good searing on steaks and burgers, though natural gas burns at a slightly lower BTU than propane, so the absolute top-end heat might be a hair less. For most grilling tasks – from fast burgers to indirect cooking for chicken or ribs – the difference is minimal. The 10-foot hose gives you flexibility to position your grill without being right on top of the gas hookup.
Build quality feels solid for the price. The hose is CSA certified, made from durable rubber that resists cracking in sun and weather. The brass fittings are 100% solid brass, not plated steel, which means they won't rust or corrode over time. The kit also includes 16 brass orifices plus 4 spares – that's enough to cover a range of Weber models and leave you with backups if any get lost or clogged. The included PTFE tape and hex wrench make installation more straightforward, though you'll still need basic DIY skills and a wrench for the gas line connection.
Setup takes about 20 to 40 minutes depending on your comfort level with gas fittings. The instructions are clear and step-by-step, but if you're not confident working with gas, it's smart to call a professional. Once installed, cleanup is the same as any Weber grill – just brush the grates and wipe down the exterior. The real maintenance benefit is that you never have to clean or swap propane tanks again. Storage is easier too, since there's no tank taking up space underneath.
One realistic limitation is compatibility. This kit only fits certain Weber models, so you must check your grill's exact series and year before buying. Also, because natural gas is less energy-dense than propane, you might notice slightly slower preheat times on very cold days. But for the vast majority of backyard cooks, the trade-off is well worth it. If you have a natural gas line on your patio and want to stop messing with propane, this Garsoo kit is a practical, well-made solution that delivers on its promise.


Pros
- Endless fuel supply for long grilling sessions and big parties
- Easy to install with included parts and instructions
- Sturdy build quality with weather-resistant materials
- Eliminates the hassle of propane tank monitoring and refills
- Provides consistent gas flow for reliable cooking temperatures
Cons
- Requires a natural gas line hookup near your grill – not portable like propane
- Compatibility limited to specific Weber models – verify your model number first
- Some users may need a professional plumber for gas line installation
If you’re a backyard griller or BBQ enthusiast who’s tired of running out of propane halfway through a cookout, this Dingbaayee conversion kit is a practical solution. It allows you to convert select Weber Genesis and Spirit propane grills to natural gas, so you can hook up directly to your home’s gas line and forget about tank swaps. This kit is best suited for homeowners with an existing natural gas hookup who want a steady, uninterrupted fuel source for weekend BBQs, patio parties, or low-and-slow smoking sessions.
In terms of real-world cooking performance, a natural gas conversion delivers consistent heat from start to finish. You won’t experience the pressure drop that sometimes happens with a propane tank as it empties. That means your grill maintains even temperatures for searing steaks, roasting veggies, or smoking ribs. The included regulator ensures proper gas flow, so you get reliable performance every time you fire it up. Just keep in mind that natural gas generally provides slightly less BTU output than propane, but most users won’t notice a difference in everyday grilling.
Build quality is solid. The rubber hose is thick and flexible, resistant to cracking and weather damage, while the brass fittings are corrosion-resistant. The quick-connect fitting makes attaching and detaching the hose simple. The kit also includes four orifices to adjust the gas flow for your specific grill model, so you get the right air-to-fuel ratio for clean burning. This attention to detail helps prevent flare-ups and ensures your grill runs efficiently.
Installation is straightforward if you’re handy with basic tools. The kit comes with everything you need: a 10-foot hose, regulator, quick-connect, adapter fittings, and orifices. You’ll need to remove the propane orifices and replace them with the natural gas ones, then connect the hose to your grill’s manifold and the gas line. The instructions are clear, but if you’re not comfortable working with gas connections, it’s wise to hire a licensed plumber. One limitation is that this kit is only compatible with specific Weber models – always double-check your grill’s model number before buying.
Storage and maintenance are minimal. The hose can be coiled and stored out of the way when not in use, and the brass fittings won’t rust. Since there’s no propane tank to exchange or refill, cleanup is easier and you’ll never worry about tank capacity. The main drawback is that you lose portability – once connected to natural gas, your grill is essentially fixed in place. But for dedicated patio setups, that’s rarely an issue.
Overall, this conversion kit is a smart upgrade for anyone with a compatible Weber grill and a natural gas line. It eliminates the hassle of propane, saves money over time, and delivers consistent heat for all your grilling needs. If you entertain often or love long smoking sessions, this is a reliable choice that simplifies outdoor cooking.
Before buying, confirm that your Weber grill model is listed in the compatibility guide. This kit works with many Genesis, Genesis II, Spirit, and Spirit II models, including Silver, Gold, Platinum, SX, SPX, and various series numbers. The kit includes four orifices and a 10-foot 1/2-inch natural gas hose with a quick-connect fitting. Installation involves removing the propane orifices, installing the natural gas orifices, and connecting the hose to your grill’s manifold and the gas line. A 3/4-inch UNF male flare to 3/8-inch flare adapter is included for flexibility. For safety, always leak-test connections with soapy water before use. If your grill doesn’t have a quick-connect port, you may need an additional adapter. Some users may prefer professional installation if they’re unfamiliar with gas fittings.

Pros
- Provides an uninterrupted natural gas supply without the expense or hassle of swapping propane tanks
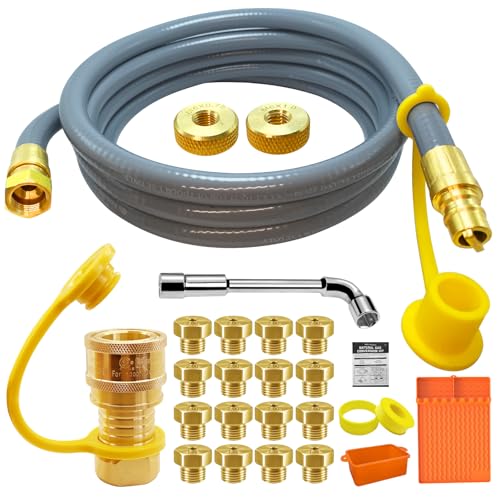
- All-in-one package includes every wrench, thread checker, orifice, and tape roll required for setup
- High-grade solid brass fittings and CSA-certified hose offer durable, weather-resistant outdoor safety
- Silicone drip liner and tool pad add immediate convenience to daily flat-top cleaning and tool storage
Cons
- Not compatible with portable tabletop griddles including Blackstone 17-inch, 22-inch, or model 1902 units
- Ties the griddle to an exterior natural gas outlet, removing the portability needed for camping or off-site tailgating
The BBQHKCX 5249 Natural Gas Conversion Kit is designed specifically to convert popular Blackstone 28-inch and 36-inch outdoor griddles from standard bottled propane to a dedicated residential natural gas line. For backyard cooks, dedicated BBQ lovers, and home entertainers who fire up the flat top several times a week, hauling 20-pound propane tanks to the refill station is a persistent chore. This setup bridges the gap between commercial-style convenience and backyard cooking by tapping directly into your home gas supply.
In terms of real-world cooking performance, the conversion provides dependable, steady output up to 45,000 BTUs. Natural gas delivers consistent burner pressure without the pressure drops that often plague propane tanks in chilly weather or when fuel levels run low. Whether searing a dozen smash burgers, griddling pancakes and bacon for a crowd, or stir-frying vegetables at high heat, the burners hold their temperature zones reliably across the entire steel cooktop.
Outdoor durability is critical for gas connections exposed to the elements. This kit features a 10-foot CSA-certified flexible rubber hose built to withstand weather shifts, UV exposure, and heat near the griddle body without premature cracking. The fittings and 3/8-inch quick-disconnect coupler are machined from solid brass, minimizing the risk of corrosion and providing a tight, leak-resistant connection year after year on an open patio or deck.
Setup is direct and comprehensive because the kit supplies 16 natural gas orifices, an orifice removal wrench, two thread checkers, and gas-rated Teflon thread sealant. You will not have to make unexpected trips to the local hardware store to hunt down small fittings. The manufacturer also throws in practical cooking accessories: a heavy-duty silicone tool mat that shields side shelves from grease and heat, along with a reusable silicone grease cup liner that makes post-cook cleaning fast and mess-free.
The main limitation lies in mobility and compatibility. This kit is strictly tailored for full-sized Blackstone 28-inch and 36-inch platforms, rangetop combos, and Tailgater units. It does not fit the smaller 17-inch or 22-inch tabletop models or model 1902. Additionally, tying your flat top to a fixed patio gas outlet eliminates the ability to pack it in a truck bed for campsite cooking unless you reverse the conversion.
For permanent backyard cooking stations, patio installations, and outdoor kitchens, this natural gas conversion kit offers massive long-term value. It delivers steady heat consistency, eliminates the fear of running out of fuel halfway through cooking dinner, and equips your flat top with handy accessories that elevate your grilling routine.
Installing this conversion kit is a straightforward DIY task for any confident griller. The process involves removing the griddle top, unbolting the factory burners, and using the included custom orifice wrench to swap out the small propane orifices for the larger natural gas versions.
BBQHKCX includes two dedicated thread checking tools to help you identify the correct orifice thread pitch before tightening anything down. Wrapping all threaded brass joints with the supplied yellow gas-rated Teflon tape ensures an airtight seal at every junction.
Once all orifices are secured and the 10-foot hose is attached via the 3/8-inch quick-connect fitting, performing a standard soapy water bubble test on all connection points is essential before firing up the burners for your first cook.
Switching your Blackstone flat top to natural gas transforms your patio into an uninterrupted cooking hub. There is no longer any need to keep spare propane cylinders stashed around the yard or worry about a flame dying out while searing steaks during a party.
Because line-supplied natural gas maintains a uniform delivery pressure, you get rock-solid burner control across low, medium, and high heat settings. This consistency makes multi-zone griddling easier, allowing you to toast buns gently on one side while maintaining a scorching sear on the other.
The included silicone tool mat keeps spatulas and scrapers from dirtying your prep shelves, while the flexible grease cup liner catches cooking runoff for quick disposal, helping keep your patio clean after every cookout.
Essential Steps for Setting Up an Outdoor Natural Gas Grill
Understanding Gas Supply Line Dynamics and Operating Pressure
Natural gas systems operate at significantly lower delivery pressure than standard bottled liquefied petroleum gas. Residential gas lines in North America typically supply gas at roughly seven inches of water column, which equals about one-fourth of a pound per square inch. Liquid propane systems, by comparison, push fuel into burner valves at approximately eleven inches of water column. Because natural gas carries less energy per cubic foot than propane, appliances require higher volumetric flow rates to produce equivalent heat output.
Your home plumbing must provide an adequate volume of fuel through appropriately sized pipes to support the total British Thermal Unit rating of your outdoor burners. A natural gas supply line with an inside diameter of one-half inch generally supplies sufficient fuel for typical four-burner grills over short distances from the main meter. Running lengthy pipe runs across long yards or connecting high-capacity cookers often demands three-quarter-inch iron pipe to prevent severe pressure drops. When fuel volume falls below appliance specifications, burners will struggle to reach searing temperatures and will exhibit weak, sputtering flames.
Required Tools, Plumbing Materials, and Safety Supplies
Gathering the correct plumbing tools beforehand prevents interrupted work and reduces the risk of damaging brass fittings. You will need two adjustable pipe wrenches or open-end mechanics wrenches to tighten connections using the counter-torque method. A dedicated orifice hex driver or socket tool allows you to remove delicate brass jets without rounding off soft metal corners. Pipe thread sealant formulated specifically for natural gas, often recognizable by its yellow color or gas-rated Teflon labeling, is mandatory for tapered pipe threads.
Never use standard white plumbing tape designed for water pipes, as volatile hydrocarbons will degrade water-rated tape and induce dangerous leaks. A plastic spray bottle or small foam paintbrush filled with a thick soapy water leak test mixture serves as your primary leak-testing apparatus. Clean shop towels and a wire brush help you prepare pipe ends by clearing away accumulated rust, dust, or old joint compound. Wearing protective eye goggles and durable work gloves shields your hands and eyes from metal burrs while handling threaded iron pipes.
Dedicated Factory Units Versus Dual-Fuel Conversion Kits
Purchasing a factory-built natural gas grill means the internal manifolds, burner valves, and fuel orifices are calibrated for low-pressure utility gas right out of the box. Many popular backyard grills, however, arrive configured for liquid propane and require an aftermarket conversion kit to operate on natural gas. Conversion kits from brands like Garsoo, Dingbaayee, and JNWYXIE supply the larger brass orifices, quick-disconnect fittings, and ten-foot flexible hoses needed for this transition. Dual-fuel grills from manufacturers like Char-Broil rely on specialized kits such as the Miumoon 8216842R04 assembly to adapt internal valves.
Conversion involves replacing the restrictive propane orifices with wider natural gas jets that allow greater fuel volume into the venturi tubes. Because natural gas contains less energy per unit of volume, attempting to run a propane-calibrated orifice on natural gas results in tiny, unusable flames. Conversely, running high-pressure propane through enlarged natural gas openings creates massive, uncontrollable fireballs that present extreme safety hazards. Flat-top griddle owners converting equipment like Blackstone twenty-eight or thirty-six inch cooking surfaces must use matched kits such as the BBQHKCX 5249 package designed specifically for those manifold dimensions.
Preparing the Exterior Gas Stub-Out and Shutoff Valve
Every safe outdoor cooking installation begins by verifying the presence of an accessible manual shutoff valve on the exterior supply line. This quarter-turn ball valve allows you to instantly isolate the outdoor cooking area from the rest of your household gas plumbing during maintenance or emergencies. Before attaching any fittings, rotate the handle ninety degrees perpendicular to the pipe to ensure the fuel supply remains completely closed. Inspect the exposed male iron threads on the supply stub for corrosion, hardened pipe dope, or flattened ridges that could compromise a seal.
Positioning your grill near a convenient rolling prep station allows you to keep utensils and platters within arm’s reach while maintaining safe clearances around the gas line. Clean the exposed iron threads using a stiff wire brush to create a smooth contact surface for new fittings. If an existing cap covers the stub-out, hold the upstream pipe steady with one wrench while backing off the cap with a second wrench. This dual-wrench technique prevents accidental loosening of hidden joints behind exterior siding or masonry walls.
Installing the Quick-Disconnect Coupling and Flexible Hose
A certified quick-disconnect fitting provides a convenient and safe method for disconnecting your grill hose when storing equipment or protecting lines during severe weather. Apply two to three wraps of yellow gas-rated Teflon tape clockwise around the male National Pipe Taper threads of the supply line. Thread the female quick-connect coupler onto the pipe by hand to ensure the threads mesh smoothly without cross-threading. Finish tightening the joint using two wrenches, holding the pipe nipple firmly while turning the brass coupling until snug and properly aligned.
Most conversion assemblies, including kits from Garsoo and Dingbaayee, feature a ten-foot rubber hose with an integrated one-half-inch quick-connect male plug. Pull back the spring-loaded locking collar on the female socket, insert the male hose plug firmly until it clicks, and release the collar to lock the connection. Tug gently on the flexible hose to verify that the internal ball bearings have engaged securely within the locking groove. Route the flexible hose across your patio floor so that it avoids foot traffic, sharp masonry edges, and radiant heat coming from the grill grease tray.
Converting Internal Burner Orifices and Pressure Regulators
If you are converting an existing propane grill to natural gas, you must access the burner tubes and manifold to change the orifices. Remove the cooking grates, flame tamers, and burner retaining clips to slide the stainless steel burner tubes off their manifold mounting pegs. Use the small hex socket tool included in your conversion kit to unthread the brass propane orifices from the manifold valves. Match the replacement natural gas orifices according to the burner BTU specifications outlined in your kit documentation, noting that natural gas orifices feature visibly larger center holes.
Outdoor cooks who enjoy diverse cooking styles often pair their plumbed gas burners with a hybrid griddle and smoker setup to handle delicate breakfast items and slow-smoked meats on the same patio. Thread each new natural gas orifice into the valve by hand before gently tightening it with the hex wrench, taking care not to over-tighten soft brass. Reinstall the burner tubes over the new orifices, ensuring the venturi openings seat fully over the brass spuds. Mount any included natural gas low-pressure regulator in line according to the directional fuel flow arrow stamped onto the regulator body.
Conducting the Essential Soapy Water Leak Test
Never attempt to ignite your grill until you have completed a comprehensive leak test across every newly assembled joint. Prepare a testing solution by mixing equal parts liquid dish soap and warm water in a clean spray bottle or shallow bowl. Ensure all grill control knobs on the front fascia remain turned to the completely closed off position. Slowly open the manual gas shutoff valve on your exterior wall to pressurize the flexible hose and manifold assembly without flowing gas through the burners.
Apply the soapy mixture generously over the pipe stub, the quick-disconnect junction, the regulator fittings, and the connection at the grill manifold. Watch each wet joint closely for at least two full minutes to see if expanding soap bubbles appear. Growing clusters of bubbles indicate that escaping gas is pushing through the threaded joint, requiring immediate correction. If bubbles appear, shut off the gas valve immediately, loosen the leaking joint, apply fresh thread sealant, retighten the fittings, and repeat the leak test from the start.
Adjusting Air Shutters for Clean Flame Combustion
Natural gas requires a specific ratio of primary air to achieve clean, efficient combustion across your main cooking grates. After verifying that no gas leaks exist, open the grill hood completely and ignite one main burner following the manufacturer lighting instructions. Observe the color and behavior of the flame along the entire length of the stainless steel burner tube. Proper natural gas combustion produces stable blue flames with small, soft light-blue cones at each burner port and occasional faint yellow tips.
Flames that display heavy orange or yellow streaks signify incomplete combustion caused by insufficient primary air entering the venturi tube. To correct yellow flames, loosen the small retaining screw on the combustion air shutters and rotate the sleeve open slightly to admit more oxygen. If the flames roar loudly or lift entirely off the burner ports, the shutter is admitting too much air and should be closed slightly. Tighten the retaining screw once the flame burns with a quiet, steady blue profile, and repeat the adjustment for each remaining burner.
Critical Outdoor Clearances and Life Safety Protocols
Operating a gas grill demands strict adherence to outdoor fire safety practices and minimum clearance guidelines from combustible materials. Position the grill on a level, fire-resistant surface such as concrete, pavers, or brick, keeping it at least ten feet away from vinyl siding, wooden fences, and overhanging roof eaves. Radiant heat and rising grease vapors can warp siding, ignite patio umbrellas, or trigger house fires if cooking equipment sits too close to building structures. Always keep a dry chemical fire extinguisher rated for grease and electrical fires nearby in case of unexpected flare-ups.
Gas grills must never be operated inside a garage, carport, enclosed porch, breezeway, or screened patio enclosure under any circumstances. Operating fuel-burning appliances in enclosed or partially enclosed spaces creates severe risks of deadly carbon monoxide poisoning and catastrophic building fires. Opening a garage door or running a household fan does not provide adequate ventilation to safely disperse toxic combustion gases or prevent heat accumulation. Outdoor natural gas cooking belongs exclusively in open-air environments where fresh air circulates freely and exhaust vapors dissipate immediately into the atmosphere.
Long-Term Maintenance and Fuel Line Protection
Routine upkeep keeps your outdoor gas plumbing operating safely and extends the usable lifespan of rubber hoses and brass fittings. Always push the protective rubber dust plug into the quick-disconnect socket whenever the grill hose is uncoupled to keep out spiders, mud daubers, and dirt. Insects frequently build nests inside open gas fittings and burner venturi tubes, blocking gas flow and causing hazardous flashback fires behind control panels. Inspect the entire length of your flexible gas hose before each cooking season, checking for surface cracks, dry rot, stiff spots, or rodent chewing damage.
Replace worn hoses immediately if you observe any brittleness, deep cracking, or outer rubber degradation. Keep the grill covered with a water-resistant, ventilated outdoor cover during rainy months to shield brass connections and valve stems from driving moisture and corrosive salt air. Periodically check that the manual shutoff valve handle turns smoothly and does not stick or corrode over time. Taking systematic care of your natural gas installation ensures uninterrupted outdoor meals, reliable burner heat, and complete peace of mind across years of backyard entertaining.




Write Your Review
No reviews yet. Be the first to share your experience!