


Stepping out to the patio for an outdoor meal begins with a reliable and safe startup routine. Understanding how to turn on gas grill weber units correctly ensures steady burner performance and prevents unburned propane from collecting beneath the cookbox. Whether you own a four-burner cart model or a compact tabletop unit, following the proper lighting sequence protects your equipment and sets the stage for accurate cooking temperatures. Setting your platters and cooking utensils on sturdy rolling outdoor prep tables before igniting the burners keeps your cooking station organized and clear of hot surfaces.
Modern gas cookers feature dependable ignition systems, but skipping fundamental precautions can trigger stubborn regulator lockouts or delayed ignition hazards. Always lifting the cookbox lid before opening any gas supply line remains the most vital safety habit for every outdoor cook. Taking a minute to confirm tight fuel fittings and clear burner ports avoids uneven flames and weak heat output. With a few deliberate checks, you can start your gas cooker smoothly and preheat your grates for whatever recipe is on the menu.

Pros
- Excellent heat consistency and searing performance from PureBlu burner system.
- Heavy-duty porcelain-enameled cast-iron grates retain heat and resist rust.
- Grease management system with pull-out tray makes cleanup nearly effortless.
- Sturdy build quality with durable wheels for moving around the patio.
Cons
- Very heavy (over 200 pounds) and requires two people to assemble and move.
- Premium price point may be steep for casual or occasional grillers.
- Does not include a side burner or rotisserie kit, which some competitors offer at this price.
The Weber Genesis E-415 is a four-burner liquid propane gas grill built for backyard enthusiasts who take their outdoor cooking seriously. Designed around Weber's PureBlu burner technology, this grill aims to deliver even heat from edge to edge, making it a solid choice for everything from quick weeknight burgers to full weekend BBQ spreads. It's ideal for dedicated backyard grillers, patio cooks, and anyone who loves hosting outdoor gatherings without fussing with charcoal or propane tank swaps mid-cook.
Cooking performance is where the Genesis E-415 shines. The PureBlu burners feature a tapered shape and raised flame openings that resist clogging from drippings, so you get consistent flame across all four burners. The porcelain-enameled cast-iron grates excel at holding heat for a nice sear on steaks and chops. Below the grates, Flavorizer bars catch drippings and vaporize them, adding that smoky backyard flavor while funneling grease away from the burners to minimize flare-ups. The large cooking surface easily accommodates a full meal, and the warming rack keeps buns or side dishes hot without taking up main grill space.
Build quality is typical Weber: robust and designed to last. The lid is well-insulated, the grates are heavy and feel solid, and the whole unit sits on sturdy wheels that roll smoothly across a patio or deck. The side tables offer plenty of room for prepping and plating, and the overall fit and finish inspire confidence. Weather resistance is good thanks to the porcelain enamel finish, but keeping the grill covered when not in use will extend its life even further.
Cleanup is one of the easiest you'll find on a gas grill at this level. The grease management system uses a pull-out tray located under the cookbox, so you just slide it out, empty it, and wipe it down. No scraping or disassembling required. For a grill that sees heavy use during summer weekends, that convenience is a huge plus.
That said, this grill has some real-world limitations. It's very heavy, so it's not portable at all and requires two people for assembly and placement. The price is high, which might not make sense if you only grill a few times a year. And while the Genesis offers plenty of standard features, you won't find a side burner or rotisserie unless you buy the higher-end models.
Overall, the Weber Genesis E-415 is a fantastic choice for the dedicated backyard griller who wants reliable, even heat, great searing, and hassle-free cleanup. If you cook for a family or love hosting backyard parties and want a workhorse grill that will hold up for years, this is well worth the investment. Just make sure you have the space, the budget, and a friend to help set it up.
The Weber Genesis E-415 is built around four PureBlu burners that deliver a consistent, even flame across the entire cooking surface. This means you can set up different heat zones easily, direct for searing and indirect for slower cooking. The porcelain-enameled cast-iron grates retain heat exceptionally well, giving you a satisfying sear on steaks and burgers without cold spots.
The Flavorizer bars are a key part of the cooking experience. They catch drippings and instantly vaporize them, creating that signature smoky grilled flavor while funneling excess grease away from the burners. This reduces flare-ups dramatically, so you spend less time fighting flames and more time flipping food.
The warming rack is generously sized and holds buns, veggies, or even smaller items like shrimp skewers while the main course cooks below. Overall, the Genesis E-415 handles fast grilling, low-and-slow cooking, and everything in between with confidence.


Pros
- Perfect fit for Weber Traveler grill - no wobbling or gaps
- Heavy-duty cast iron holds heat well for even cooking
- Lip edge and grease holes make cooking messy foods cleaner
- Lightweight and easy to store or carry alongside your portable grill
- Affordable upgrade to add griddle cooking without buying a full flat top
Cons
- Covers only half the grill - you lose some grate space for direct grilling
- Cast iron requires regular oiling and care to prevent rust
- No pre-seasoning included - you need to season the griddle before first use
If you own a Weber Traveler portable gas grill and wish you could cook pancakes, bacon, or delicate veggies without them falling through the grates, this Uniflasy cast iron griddle is a smart addition. It's a half-size griddle that sits directly on your existing grill, giving you a flat cooking surface while leaving the other half open for traditional grilling. This is ideal for tailgaters, campers, RV owners, and backyard cooks who want more versatility from a single portable grill.
Performance-wise, the griddle heats up evenly thanks to its heavy cast iron construction. It holds temperature well even when you load it with food, which matters for breakfasts at the campsite or searing scallops during a tailgate. The raised lip around the edge is a thoughtful touch - it keeps eggs or small pieces from sliding off, and the grease drainage holes prevent oil from building up, making cleanup easier. You still get some smoke and sizzle that griddle fans love.
Build quality is solid for the price. The matte cast iron feels durable and resists warping under high heat. However, like most bare cast iron, it needs a little maintenance: you should oil it after each use and store it dry to avoid rust. The instructions mention scraping and wiping with oil - follow that routine and it'll last. One downside: it only covers half the grill, so you can't use the whole cooking area as a griddle. But for most portable grilling scenarios, that compromise is fine since you can still cook burgers or steaks on the other side.
Setup couldn't be simpler. Just place it on the grill grate over one burner and you're ready. No modification or tools needed. It's also lightweight enough to pack with your grill for camping trips or tailgate parties. When not in use, it stacks neatly inside or next to your Traveler without taking up much space.
Realistically, this is a nice upgrade if you often cook foods that benefit from a flat surface - think eggs, crepes, hash browns, or even quesadillas. It won't replace a full-sized Blackstone griddle for big gatherings, but for a portable grill it expands your menu considerably. If you already love your Weber Traveler and want to cook breakfast or delicate items more easily, this griddle is a practical, budget-friendly choice.
Comprehensive Guide to Starting and Operating a Weber Gas Grill
Starting an outdoor gas cooker is a quick process, but it requires a strict operational sequence to ensure safety and equipment reliability. Gas grills rely on pressurized fuel that must mix smoothly with oxygen at the burner tube ports before meeting a spark. When you understand the relationship between the fuel cylinder, the pressure regulator, and the individual control valves, you eliminate common startup failures such as weak flames or delayed ignition. Following a consistent lighting routine guarantees your cooker reaches proper grilling temperatures while protecting everyone nearby.
Essential Safety Rules Before You Strike a Flame
The most critical rule when learning how to light any gas grill is to always open the cookbox lid completely before turning on the fuel or pressing the ignition switch. Liquid propane and natural gas are heavier than air, meaning unignited vapor settles quickly in the base of the cookbox and beneath the flavorizer bars. If you attempt to ignite a closed grill, trapped gas can ignite all at once, creating an explosive flash that can blow the lid open and cause serious burn injuries. Keeping the lid fully propped open allows fresh air to circulate and gives any stray gas an immediate escape route.
Safe placement is equally crucial for fire prevention and personal health. Gas cookers must only be operated outdoors in open spaces with sufficient clearance from vinyl siding, wooden deck rails, and low roof overhangs. You must never operate a gas grill inside a garage, breezeway, shed, or enclosed porch, even if the overhead garage door is wide open. Fuel combustion produces dangerous carbon monoxide, an odorless gas that accumulates quickly in partially enclosed structures. Positioning the grill on a stable, level outdoor surface keeps grease draining properly toward the catch pan and isolates flames from nearby walls.
Inspecting Fuel Lines, Tanks, and Regulator Connections
Before starting the ignition sequence, examine your fuel supply line and tank fitting to verify that every connection is secure and undamaged. On standard backyard cart units, check the flexible rubber hose running from the propane tank up to the manifold for cracking, dry rot, or abrasion. The black coupling nut on modern Type 1 tank valves features internal threads that must seat square and hand-tight against the cylinder valve collar. If you notice any hissing sound or smell the distinctive sulfur odor of fuel additive before touching the control knobs, do not attempt to light the grill.
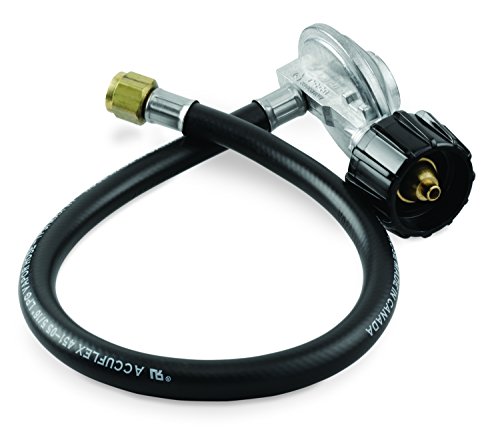
Routine leak checks using a soapy water solution provide an easy way to verify an airtight seal on your connection points. Mix equal parts liquid dish soap and water in a small container, then brush the mixture over the cylinder valve, hose fittings, and regulator body. Turn the propane tank valve counterclockwise to pressurize the line while keeping all grill burner knobs in the OFF position. If expanding soap bubbles form along the hose or around the valve collar, gas is escaping and the connection must be tightened or replaced. Using a dedicated replacement such as the Weber Hose and Regulator Kit ensures the proper twenty-one-inch hose length and four-inch regulator sizing for compatible Genesis and Summit cart frames manufactured after 2002.
The Standard Step-by-Step Gas Ignition Sequence
Once you have verified that the cookbox lid is open and the line is sound, you can begin the lighting sequence in earnest. Start by rotating the handwheel on the propane cylinder slowly counterclockwise until it stops at full open. Opening this tank valve too rapidly can trigger the internal safety excess-flow mechanism inside the regulator, severely restricting fuel volume. Give the system two or three seconds to fully pressurize the manifold before you touch any burner knobs on the control panel.
Next, locate the primary ignition burner, which is typically burner number one on the far left side of multi-burner control panels. Push the primary burner control knob inward firmly and rotate it counterclockwise to the START or HIGH position. Pushing the knob opens the internal valve port, allowing gas to travel through the manifold orifice into the burner tube. Immediately press and hold the electronic igniter button, or listen for the mechanical snap of the piezo system depending on your specific grill model. You should hear a steady clicking noise as the electrode generates electrical sparks over the burner ports.
Look through the cooking grates toward the front of the burner tube to visually verify that a blue flame has caught along the ports. Ignition should occur within five seconds of turning the control knob to the START position. If the burner fails to light within five seconds, turn the control knob back to the OFF position immediately. Leave the grill lid wide open and wait at least five full minutes to allow accumulated gas fumes to disperse completely before attempting the lighting sequence again.
Lighting Additional Burners and Managing Heat Zones
After the primary ignition burner is burning with a clean blue flame, you can proceed to light the remaining burners across the cookbox. Most modern multi-burner units utilize crossover ignition tubes or individual spark electrodes wired to each control valve. To light the adjacent burners, simply push their control knobs in and turn them to the HIGH position one at a time, moving sequentially from left to right. The flame from the established burner will ignite the gas entering the neighboring tube across the connecting channel, eliminating the need to trigger the igniter button repeatedly.
Activating specific burners gives you precise control over cooking zones across the porcelain-enameled cast-iron grates. If you plan to cook thick cuts or prepare a crispy barbecue chicken wings recipe, establishing a two-zone indirect setup keeps food from charring over direct heat. You can achieve this by keeping the outside burners on medium while leaving the center burners completely off, creating a roasting environment in the middle. When searing steaks or burgers, running all main burners on high delivers intense radiant heat reflected upward by the internal flavorizer bars.
How to Light a Weber Gas Grill Manually with a Match
Dead ignition batteries, corroded wire terminals, or damp ceramic electrodes can occasionally prevent the electric spark generator from functioning. You can still safely light the grill manually using an ordinary match, provided you follow the dedicated manual ignition procedure. Every freestanding grill includes a flexible wire matchstick holder, often tethered to the inside of the cart frame or stored on the rear leg. Never hold a match in your bare fingers down inside the cookbox, as a sudden flare of gas can burn your hand.
To light manually, place an ordinary wooden match into the spring clip at the end of the wire tool and strike the match. With the grill lid fully open, lower the lit match down through the cooking grates directly beside the burner ports of burner one, or insert it through the match-lighting access hole on the cookbox side. Once the flame is positioned right beside the burner tube ports, push and turn the burner control knob to the START or HIGH position. The burner will catch instantly, allowing you to withdraw the wire tool safely before lighting the secondary burners across the crossover system.
Resetting the Regulator Bypass Mode When Flames Stay Low
One of the most frequent frustrations outdoor cooks encounter is a grill that lights successfully but refuses to heat beyond two hundred and fifty or three hundred degrees. This symptom is almost always caused by a tripped safety feature known as regulator bypass mode. Modern Type 1 propane regulators include a spring-loaded excess flow check valve designed to shut down fuel delivery if a hose ruptures. If you open the tank valve while a burner knob is left open, or if you open the tank valve too fast, the sudden rush of gas trips this safety disk and chokes fuel flow down to a tiny trickle.
Resetting the regulator bypass requires a straightforward calibration routine that takes only a couple of minutes to complete. Begin by turning all grill control knobs to the OFF position, followed by closing the handwheel on the propane tank completely. Disconnect the black coupling nut from the propane tank valve, then reconnect it firmly by hand to reset the internal valve pin. Slowly open the tank handwheel counterclockwise, turning it just a fraction of an inch at first so gas gently equalizes pressure inside the hose before opening it fully. Wait thirty seconds for the system to settle, then open the lid and light the primary burner following the standard sequence.
Ignition and Temperature Control Across Different Weber Models
While the general principles of gas ignition apply broadly, individual model lines feature distinct burner designs and control layouts. Premium cart designs such as the Weber Genesis E-415 feature PureBlu burners with tapered openings engineered to produce consistent flames across the full cookbox. These four-burner layouts incorporate raised flame ports that help keep drippings and food particles away from ignition zones, reducing clogs and corrosion. Grills in this series also house extensive grease management systems with pull-out trays beneath the cookbox, which must be cleaned regularly to prevent flare-ups during ignition.
Connected platforms like the Weber Spirit EX-325 smart gas grill integrate digital monitoring alongside mechanical burner controls. This setup pairs high-output Boost Burners in a dedicated sear zone with a digital thermometer screen that links to smart devices via the Weber Connect application. When lighting a smart grill, the ignition steps remain manual and mechanical, but the digital display immediately confirms whether burner heat is rising steadily. The built-in wired meat probe and mobile alerts let you monitor internal food temperatures without hovering over the cookbox, while optional accessories like motorized rotisserie accessories expand your options for slow-roasting.
Portable and tabletop units require slightly different fuel and burner management than large backyard carts. The Weber Q 2800N+ liquid propane grill features a specialized Plus burner that works in tandem with the primary burner, expanding its range between two hundred and fifty and seven hundred degrees. When lighting this unit, ignite the main burner first before engaging the center Plus burner for high-heat searing. If you operate portable cookers like the Weber Traveler or Q series with a full twenty-pound tank, you will need an adapter hose like the Weber Adapter Hose for Q Series and Gas Go-Anywhere models. For flat-top cooking on a portable frame, adding an accessory like the Uniflasy Cast Iron Griddle for Weber Traveler allows you to fry delicate foods, though you must always ensure grease drainage holes remain unobstructed before lighting.
Preheating the Grates and Routine Post-Cook Shutdown
Once all desired burners are burning smoothly with clean blue flames, close the grill lid completely to begin the preheating cycle. Preheating for ten to fifteen minutes allows the porcelain-enameled cast-iron grates to absorb heat, creating optimal conditions for bold sear marks and natural food release. The internal temperature gauge should climb steadily toward five hundred degrees during this initial preheat stage. Once the cooking surface is thoroughly heated, use a brass or stainless-steel grill brush to scrape away any charred residue left behind from prior grilling sessions.
Following a proper shutdown sequence is just as important as starting the grill correctly because it protects the fuel delivery hardware for your next meal. When your cooking is complete, turn all burner control knobs on the front panel to the OFF position, extinguishing the flames immediately. Next, walk to the fuel cylinder and turn the handwheel clockwise until the valve is seated firmly closed. Allowing the grill to cool down completely with the lid down prevents airborne debris from settling on the grates, while checking the slide-out grease tray ensures hot drippings do not accumulate into a fire hazard.
Mastering the correct lighting sequence transforms outdoor cooking from an uncertain chore into a smooth, dependable ritual. Keeping the lid open, verifying clean gas connections, and opening your fuel tank slowly will eliminate the vast majority of ignition headaches. Routine cleaning of burner ports, igniter electrodes, and grease trays preserves the lifespan of your cast-iron grates and burner tubes for seasons to come. With proper safety habits firmly established, you can fire up your burners with total confidence whenever you are ready to cook outdoors.


Write Your Review
No reviews yet. Be the first to share your experience!