


Starting your outdoor barbecue should feel effortless, yet a failing push-button igniter often stops dinner before the cooking surface even warms up. When the piezo sparker or electronic starter refuses to click, learning how to light a propane grill with a lighter gives you an immediate, reliable solution to get back to cooking. Taking this manual approach requires careful attention to gas flow and proper physical clearance so you avoid dangerous fuel flare-ups. Propane gathers quickly in open air, so following a deliberate sequence keeps the cooking environment predictable and secure.
Many grill owners face this frustrating situation after seasonal storage, wet weather, or a drained AA starter battery. Whether you cook over a freestanding cart, a compact tailgate unit, or a complete outdoor kitchen island with built-in lights, manual ignition is an essential technique for any outdoor cook. By understanding how to control gas delivery and position a flame near the burner ports safely, you can resume meal preparation without unnecessary delay or risk.
Pros
- Dual-light pack provides balanced illumination across cooking grates and side shelves
- Flexible 5-inch gooseneck and zoomable beam allow customized lighting coverage without tools
- Heat-resistant aluminum alloy housing holds up well near active cooking areas
- Strong magnetic base allows quick placement and repositioning on magnetic steel surfaces
Cons
- Magnetic base will not adhere to non-magnetic stainless steel, aluminum, or non-ferrous alloy grill bodies
- Requires three AAA batteries per light that must be purchased separately
- Five-inch gooseneck length may be slightly short if your only magnetic mounting spot is far from the grates
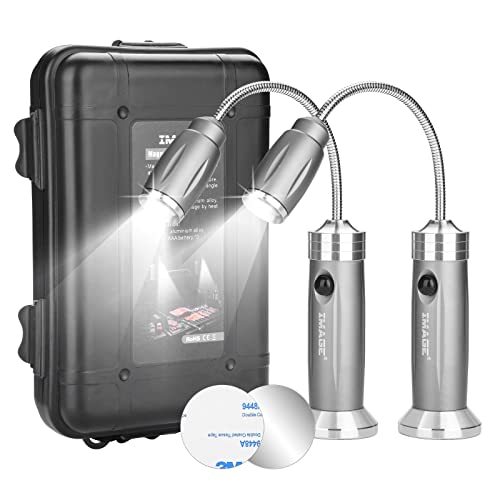
The IMAGE Magnetic Barbecue Grill Light Set includes two compact, battery-powered LED lights designed to solve poor visibility during evening cooks. Grilling steaks, burgers, or chicken after sundown often leaves you squinting over darkened cooking grates or fumbling with a handheld flashlight. This two-piece set is aimed at backyard barbecue enthusiasts, weeknight family cooks, campers, and patio grillers who want simple, direct illumination over their grill surface without dealing with bulky clamps or extension cords.
Each light features a bright LED emitter paired with an adjustable focal length. This zoomable head allows you to switch between a wide floodlight that covers a broad section of the grates and a tighter spotlight aimed at specific items or temperature zones. The 5-inch flexible gooseneck and swivel head let you position the beam precisely where you need it, helping you monitor searing progress and food placement without tying up your hands while handling tongs or spatulas.
Crafted from durable aluminum alloy, the light housings are designed to withstand heat when placed near the perimeter of active outdoor grills. The base houses a magnet designed to cling firmly to magnetic steel grill bodies, side shelves, or metal cart frames. Because the unit uses an aluminum casing rather than lightweight plastics, it is better equipped to handle standard outdoor cooking environments and warm operating conditions.
Operating these lights is straightforward, with tool-free angle adjustments and a simple push-button interface. Each light requires three standard AAA batteries, which are not included, and the manufacturer lists up to 48 hours of run time per set of batteries. Their lightweight build of under half a pound makes them easy to reposition, store in a patio drawer between uses, or toss into a tailgating bag. Beyond the grill, the magnetic base makes them useful around the garage or workshop for mechanical repairs.
A crucial limitation highlighted by the manufacturer involves grill material compatibility. The magnetic base requires a ferrous, magnetic metal surface to grip properly. Many modern grills feature non-magnetic high-grade stainless steel, cast aluminum, or alloy parts that will not hold a magnet. In addition, the 5-inch gooseneck is relatively compact, meaning you must mount the light reasonably close to your cooking grates to achieve adequate coverage.
For grillers who own a steel-framed grill, cart, or side shelf and frequently find themselves cooking family dinners or game-day meals after dark, this two-pack from IMAGE provides solid practical value. As long as you confirm your grill surface holds a magnet before buying and keep extra AAA batteries on hand, these lights offer an affordable, hands-free lighting solution for your outdoor setup.
The mounting system relies entirely on a built-in magnetic base. This allows rapid attachment and repositioning anywhere on a ferrous metal surface, including painted steel grill frames, steel side shelves, smoker firebox surrounds, and metal carts.
Before purchasing, it is essential to check your grill with a household magnet. High-nickel stainless steel, cast aluminum hoods, and specialized alloys frequently used on outdoor cookers are non-magnetic and will not support this light without an added steel mounting plate.
Each unit is powered by three standard AAA batteries, keeping the setup cordless and portable. The manufacturer estimates up to 48 hours of run time, though real-world battery life will depend on battery quality and operating temperatures.
The adjustable focus collar moves forward and backward to transition the LED beam from a concentrated spot beam to a broad flood. This flexibility helps illuminate either a single zone on your grates or a broader food preparation surface.


Pros
- Strong magnetic mount stays put even when you're scraping grates or flipping burgers
- Flexible gooseneck positions light at any angle, perfect for seeing into dark grill corners
- Three color temperatures let you match the light to your cooking task - warm for ambiance, white for detail
- Rechargeable and portable, ideal for campers and tailgaters who don't have power nearby
Cons
- Magnet only works on metal surfaces, so it won't attach to non-metal grills or tables
- Battery life may be limited on the highest brightness setting, requiring mid-cook recharges for long sessions
- The gooseneck may loosen over time with frequent adjustment, though it holds well initially
The Dicross magnetic grill light is a simple but brilliant tool for anyone who loves cooking outdoors after sunset. Whether you're a backyard griller trying to see if those steaks have perfect crosshatch marks, a tailgater flipping burgers in a dark parking lot, or a camper cooking dinner at a dim campsite, this light makes a huge difference. It's not a grill, smoker, or griddle - it's an accessory that enhances your outdoor cooking experience by letting you actually see what you're doing.
This light is best suited for backyard grillers, BBQ enthusiasts, campers, tailgaters, RV owners, and patio cooks who often find themselves grilling in low light. If you've ever tried to check the doneness of chicken thighs at dusk or struggled to see the flame on a portable propane stove, you'll appreciate how this light solves that problem. The magnetic base is surprisingly strong - it snaps onto any metal surface and stays put even when you're scraping the grates or adjusting the gooseneck. For non-metal grills, you might need to find a metal bracket or use the included (not included, but you can improvise) hook, but most grills have plenty of steel parts.
In terms of real-world performance, this light delivers. The ultra-bright LED has three color modes: white for true-to-life color, neutral for a balanced look, and warm for a cozy ambiance. There's also a super bright mode that cranks up the lumens when you really need to see every detail - like when you're checking for flare-ups or trying to read a meat thermometer. The knob-style control is intuitive: twist to turn on and adjust brightness, short press to cycle through colors, long press for super bright. It's easy to operate even with greasy fingers.
Build quality is solid for the price. The housing is black plastic that feels durable enough to handle occasional bumps and splatters. The gooseneck is flexible and holds its position well, though like any gooseneck, it may loosen after many adjustments. The light is not fully waterproof, but it can handle light rain or splashes from the grill - just don't submerge it. The rechargeable battery is a big plus: no cords to trip over, and you can charge it via USB-C (likely, though not specified) before your cookout. Portability is excellent thanks to the built-in carrying handle, making it easy to toss in a camping bin or tailgate kit.
Setup is literally zero - just charge it, stick it on your grill, and adjust the angle. Cleanup is minimal: wipe the body with a damp cloth if it gets greasy. The main limitation is battery life on super bright mode; you might get 4-6 hours, but for a long overnight brisket cook, you may need to recharge mid-session. Also, the magnet only works on ferrous metal, so aluminum grills or stainless steel with low magnetic properties may not hold as well. Test it first.
Overall, the Dicross magnetic grill light is a practical, affordable upgrade for any outdoor cook who values visibility. It's not going to make your brisket taste better, but it will help you cook it more precisely and safely. I recommend it for anyone who grills after dark, camps with a portable stove, or tailgates in poorly lit lots. For the price, it's a no-brainer addition to your outdoor cooking gear.
This magnetic grill light shines (literally) in several outdoor cooking scenarios. For backyard grillers, it attaches to the side shelf or hood of your gas or charcoal grill, illuminating the cooking surface so you can see when to flip burgers or check for flare-ups. Campers will love using it on portable stoves or camp grills - just stick it to the metal frame and adjust the gooseneck to light up your cooking area. Tailgaters can mount it on the tailgate of a truck or on a metal folding table to keep the grill area bright during those late-night game day cookouts. RV owners can use it on the outdoor kitchen or grill attachment that comes with many RVs. It's also handy for non-cooking tasks like reading a map at the campsite or working on a repair in a dim garage.
The Dicross grill light is rechargeable, which means no disposable batteries to buy and no cords to limit where you place it. The built-in lithium-ion battery charges via a USB cable (likely USB-C, though the product page doesn't specify). A full charge should give you several hours of use on the standard brightness settings, though the super bright mode will drain it faster. For most grilling sessions - a couple of hours for burgers and steaks - you'll have plenty of juice. If you're doing an overnight smoke, you might need to charge it during the day or have a backup power bank handy. The charging port is likely covered by a rubber flap to keep out moisture, but avoid exposing it to heavy rain while charging.

Pros
- Sturdy rust-resistant aluminum construction provides better durability than common plastic grill lights
- Dual rotation joints allow flexible 180-degree body and 90-degree head positioning to target dark spots on the grates
- Tool-free clamp mounts quickly on standard handles across gas, charcoal, and griddle setups
- Cordless, battery-operated design makes it easy to transfer between different outdoor cookers
Cons
- Requires three AA batteries that are not included in the package
- Clamp mechanism is designed for standard handles and may not fit uniquely contoured or oversized lid grips
- Lens requires regular wiping to prevent smoke and grease film from reducing illumination brightness
The Light Accents LED BBQ Grill Light is an outdoor cooking accessory designed to bring clear, focused illumination to evening grilling sessions. Whether you are searing steaks after sunset, checking burgers for a weeknight family dinner, or monitoring a brisket on a pellet smoker late into the night, this clamp-on light eliminates the frustration of juggling a handheld flashlight or relying on weak patio lighting. It is tailored for backyard grillers, flat top griddle cooks, tailgaters, and anyone who frequently cooks outdoors in low-light conditions.
In terms of lighting performance, the unit utilizes ultra-bright LEDs to cast a wide, even beam across your cooking surface. The standout feature is its dual-axis movement, offering 180-degree body rotation paired with 90-degree head rotation. This flexibility allows cooks to direct light precisely where it is needed, banishing dark shadows in the corners of the cookbox and making it easier to monitor crust development, browning, and food placement without constantly adjusting your stance.
Build quality is a notable step up from common plastic grill lights. Built from rust-resistant aluminum, the housing is engineered to withstand heat rising from the cookbox as well as typical outdoor humidity and weather exposure. The durable construction helps ensure the light maintains its integrity over repeated seasons of backyard cooking, resisting the warping or cracking that often plagues lower-grade plastic accessories.
Setup is fast and hassle-free, requiring no tools for installation. The clamp mechanism is engineered to attach in three straightforward steps onto standard handles found on Weber grills, Blackstone griddles, charcoal kettles, and pellet smokers. Because it runs on three AA batteries rather than an electrical cord, you have complete freedom of movement. You can easily unclamp the unit and transfer it between your gas grill and your griddle or pack it up for a weekend camping trip.
There are a few realistic limitations to keep in mind before buying. The clamp is built to fit standard-sized round or rectangular handles, so grillers with custom, extra-thick, or unusually contoured lid grips should verify clearance before purchasing. Additionally, the required three AA batteries are not included, and like any outdoor cooking light, the lens will require periodic wiping to remove grease film and smoke residue to maintain peak brightness.
Overall, the Light Accents LED BBQ Grill Light is a sensible, well-built accessory that delivers practical value for evening barbecue cooks. With its sturdy aluminum frame, versatile rotation angles, and tool-free mounting, it makes a reliable addition to any outdoor kitchen setup or a thoughtful gift for the dedicated griller in your household.
The tool-free clamp design allows for quick attachment to standard lid handles across a wide range of outdoor cookers, including popular gas grills, charcoal kettles, and flat top griddles like Blackstone.
Moving the light between different cooking stations takes only moments, making it a convenient option for cooks who own multiple grills or want to pack reliable lighting for tailgates and campsite cookouts.
Crafted with a rust-resistant aluminum body, this grill light provides greater heat and weather tolerance compared to basic plastic alternatives.
The rotating joints are built to hold their position steadily during cooking, ensuring the beam stays focused on the grates even as you open and close the grill lid.
Manual Ignition Guide: How To Light A Propane Grill With A Lighter
Igniting a gas grill manually is a simple, standardized task once you master the fundamental sequence of fuel management and physical positioning. Knowing exactly when to spark your lighter, how long to wait before resetting, and how to verify steady burner output transforms an intimidating chore into a routine backyard habit.
The Essential Golden Rule: Always Open the Grill Lid
Opening a propane grill requires one mandatory first step that cooks must never skip. Before turning any gas knob or striking a flame, lift the grill hood completely. Liquid propane is heavier than air, meaning unburned gas settles inside the cookbox rather than floating away into the atmosphere. If the lid stays closed while fuel begins flowing, unburned gas collects rapidly inside the firebox. Introducing a spark or open flame to an enclosed, gas-filled chamber causes an immediate combustion explosion that can singe hair, cause severe facial burns, and damage the grill frame.
Leaving the hood propped wide open allows wind currents and ambient air to disperse excess vapor continuously. This open ventilation ensures that gas only ignites directly above the burner tube ports where intended. Never attempt to light a grill with the lid partially resting on the body or cracked open by a few inches. Make sure the lid rests fully against its rear stops before you reach for your fuel tank or lighting tool.
Step-by-Step Manual Lighting Procedure
Igniting a gas burner by hand follows a precise order of actions that prioritizes personal safety. First, confirm that all burner control knobs on the front control panel sit firmly in the off position. Next, turn the handwheel on top of your propane cylinder counterclockwise until the valve opens completely. Listen closely for any hissing sounds and check for the distinct sulfur smell of mercaptan, which signals an active leak along the regulator hose.
Once you confirm there are no line leaks, prepare your lighting tool before releasing any gas at the burner. Ignite your long-stemmed lighter and position the flame directly adjacent to the primary burner ports on one side of the cookbox. The primary burner is usually the one closest to the built-in igniter or designated with an ignition lightning bolt icon on the dial. Holding the flame in place first guarantees that gas encounters fire the precise instant it leaves the burner tube.
With the flame positioned steadily next to the burner holes, depress the control knob for that specific burner and turn it to the high setting. Gas should ignite smoothly within three seconds, creating a soft whoosh followed by an even row of small blue flames. As soon as the burner catches, you can withdraw the lighter wand safely and set it aside on a heat-resistant side shelf.
Choosing the Proper Lighting Tool for Safe Clearance
Attempting to light a gas grill with a pocket lighter or standard cardboard book matches creates an unnecessary burn hazard. Propane ignition generates a sudden expansion of heat that quickly reaches several inches above the burner surface. Keeping your fingers, wrists, and knuckles at a safe distance requires dedicated lighting equipment with extended reach. Standard disposable lighters lack the reach necessary to access burner tubes resting beneath thick cast-iron or stainless-steel cooking grates.
A long-reach butane model such as the VIP Home Essentials – Handi Flame BBQ Grill Click provides a practical solution for manual fire starting. With a total length measuring ten and one-quarter inches, its durable metal wand keeps hands well outside the heat zone during the critical ignition phase. This model also features an instant electric click ignition, an adjustable flame dial, and a clear fuel window so you can monitor butane levels before starting outdoor cooking sessions.
Electronic flameless tools offer a wind-resistant alternative for cooks who frequently encounter breezy backyard conditions. The GRILLMATIC Windproof, Rechargeable, Flexible Neck lighter produces an electric arc that stays active in heavy wind or rain without relying on liquid butane fuel. Its three-hundred-and-sixty-degree flexible neck bends easily around heavy grill grates or into awkward grease-tray angles to reach recessed burners. Built-in safety features, including an automatic power shutoff after seven seconds of continuous pressing and an LED battery volume display, add reliable control during outdoor operation.
Using the Dedicated Match Hole Versus Top Grate Access
Most modern propane grill manufacturers engineer a dedicated manual lighting hole into the lower grill body. This port is typically located on the lower left or lower right side panel of the casting, positioned level with the burner tubes. Grill makers include this feature specifically to eliminate the need to reach through hot cooking grates or lift heavy heat tents. Inserting an extended lighter wand through this exterior port places the flame right beside the burner tube with zero obstruction.
If your grill lacks an accessible lighting hole or the port is blocked by an auxiliary shelf, lighting through the cooking surface is the alternative method. You should carefully lift away one section of the cooking grates and remove the underlying flavorizer bar or heat deflector before lighting. Removing these components allows you to place the lighter flame directly over the gas ports without guessing their location. Never blindly shove a lighter through grates in the dark, as the flame might rest inches away from the actual gas stream.
After the primary burner ignites successfully, use a sturdy heat-resistant silicone glove or barbecue tongs to replace the heat deflector and grate. Do not touch bare metal components with your unprotected hands once gas starts burning inside the chamber. Preparing the cookbox beforehand ensures you maintain steady physical balance and clear sightlines throughout the entire procedure.
The Critical Five-Minute Reset Rule for Delayed Ignition
Every outdoor cook must know what action to take if a burner fails to catch fire immediately. If you turn the burner control dial to high and do not observe ignition within five seconds, turn the knob back to the off position right away. Leaving the burner dial open while repeatedly clicking a lighter allows raw gas to build up inside the cookbox. Trapped vapor creates a dangerous pocket that expands exponentially with every passing second.
Authoritative fire safety guidelines dictate that you must keep the grill lid wide open and wait a minimum of five full minutes before attempting a second ignition. This waiting period provides sufficient time for outdoor breezes to dissipate lingering propane clouds completely. Do not hover over the grill body or stick your head into the firebox during this waiting period. Step back, let fresh air circulate, and check your equipment while the chamber clears.
During this pause, verify that your propane tank valve is opened fully and confirm that the tank contains liquid fuel. You can also inspect the lighter flame height to ensure it produces a steady, wind-resistant ignition source. Once five minutes have passed without any lingering propane smell, you can safely repeat the manual lighting sequence from the beginning.
Lighting Secondary Burners and Ensuring Cross-Ignition
Multi-burner gas grills are designed to share ignition across the manifold once the first burner establishes a steady flame. After your primary burner is burning with a clean blue flame, you rarely need to stick a lighter back inside the grill for the remaining tubes. Most grill cookboxes feature crossover channels or small transfer tubes that route a tiny ribbon of gas between adjacent burner housings.
To light adjacent burners, simply push and rotate the second burner control dial to the high position. The flowing gas contacts the established flame from the primary burner and catches automatically within two to three seconds. You will typically hear a soft pop as the flame jumps across the crossover tube, followed by an even glow across the new burner surface. Repeat this sequential process for third or fourth burners as needed for your cooking plan.
If an adjacent burner fails to catch within five seconds of opening its valve, turn that specific dial back to off. Some older grills suffer from rusted or grease-clogged crossover channels that prevent the flame from jumping the gap. In that situation, you must manually light the secondary burner using the long-reach lighter wand just like you did with the primary tube. Whether you plan to sear meat directly or prepare a slow-cooked meal like our Korean beef barbecue recipe, establishing predictable multi-zone heat across every burner remains vital.
Ensuring Clear Visibility With Dedicated Grill Lighting
Manual lighting becomes considerably more hazardous in low-light conditions, evening hours, or shaded patios. Attempting to locate burner ports and verify that gas has actually caught fire is difficult when casting shadows across the cookbox. A yellow, flickering burner flame can easily blend into twilight or dim porch lighting, leading cooks to assume the gas is off when it is actively burning. Using dedicated task lighting ensures you can clearly see the blue flame rings, fuel connections, and burner tube alignment.
Hands-free magnetic work lights provide targeted illumination right where manual lighting tools need to go. A versatile option like the Magnetic Ultra-Bright Barbecue Grill Light uses high-strength magnetic bases to secure directly to steel grill shelves or cart frames. Its five-inch flexible gooseneck and aluminum alloy housing allow cooks to point intense LED light directly down into the burner wells without taking hands off the lighting wand. The manufacturer highlights an adjustable focal distance so you can widen the beam across the whole cookbox or narrow it onto a specific ignition port.
For larger cooking stations or griddles where lighting needs shift, the rechargeable BBQ Grill Lights for Outdoor Grill offers adjustable brightness knobs and three color temperature modes. The flexible gooseneck holds its position reliably while you handle lighter wands and gas dials. Alternatively, handle-mounted options such as the Light Accents LED BBQ Grill Light clamp directly onto circular grill lid handles to illuminate the entire cooking area. Built with rust-resistant aluminum construction, its one-hundred-and-eighty-degree body rotation and ninety-degree head rotation ensure no dark corners obscure your view of the burner tubes.
Troubleshooting Why Your Built-In Igniter Failed
Relying on manual ignition is a wonderful backup skill, but identifying why the push-button ignition system failed in the first place restores everyday grilling convenience. The most common cause on battery-powered spark igniters is simply an exhausted or corroded battery. Unscrewing the rubberized push-button cap on the front console exposes the internal AAA or AA battery housing. Replacing the cell with a fresh alkaline battery and cleaning any chalky white residue from the contact spring often resolves the problem immediately.
On rotary or mechanical click igniters, the failure usually stems from misaligned or dirty electrode tips inside the cookbox. Dripping marinade, charred grease, and meat debris regularly coat the ceramic insulator and metal sparking prong located beside the burner tube. When coated in hardened carbon, the electric charge cannot jump the small gap to create a visible spark. Gently brushing the ceramic post and metal wire tip with a brass wire brush or rubbing alcohol removes non-conductive buildup.
Venturi tubes that feed air and propane into the burner represent another frequent source of ignition failure. Small outdoor insects, particularly spiders, love to spin dense yellow webs inside the dark, hollow venturi pipes during seasonal storage. These spider webs block proper gas flow or create an improper air-to-fuel ratio, preventing the push-button spark from catching the gas stream. If you introduce accessories like smoker boxes for gas grills, keep them positioned so wood chip ash does not fall into open burner ports or spark electrodes.
Strict Outdoor Safety Protocols and Garage Warnings
Propane grills are designed strictly for open-air outdoor operation, and this requirement becomes doubly critical during manual lighting. Under no circumstances should you ever light or operate a propane grill inside a garage, carport, covered breezeway, shed, or enclosed patio. Even with a garage door open to the driveway, unburned propane gas or combustion byproducts can pool inside corners and create severe hazards. Authoritative fire safety agencies explicitly warn that fuel-burning outdoor cookers produce dangerous levels of odorless carbon monoxide that can accumulate rapidly inside semi-enclosed structures.
Grill positioning requires a minimum clearance of at least ten feet from house walls, wooden deck railings, vinyl siding, and low-hanging roof overhangs. Ensure the grill sits firmly on a flat, non-combustible surface such as concrete, pavers, or gravel rather than dry grass or unsealed wood planks. Never leave a lit grill unattended, especially right after manual lighting when you are still confirming that all burners have established stable combustion. Keep children and family pets far outside the perimeter while you manage fuel valves and open flames.
Always maintain a working class-B fire extinguisher or dry chemical extinguisher within rapid reach of your outdoor cooking area. Never attempt to extinguish a propane-fueled fire with water, as water can spread burning grease and will not stop high-pressure gas leaks. If you ever notice uncontrolled flames leaking around the propane tank hose, regulator, or valve connection, do not attempt to light the grill. Turn off the cylinder valve immediately if safe to do so, move away from the appliance, and contact local emergency fire services.
Practical Verification Before Cooking
Once all desired burners are ignited and burning steadily, take thirty seconds to inspect the flame characteristics across the entire cooking surface. A properly functioning propane burner displays a uniform row of blue flames with small light-blue cones at the base and tiny yellow tips. If you observe tall, roaring yellow flames, the air shutter on the venturi tube may be closed too tightly or blocked by debris. Conversely, if the flames appear weak, lazy, and barely touch the burner holes, your regulator may have tripped its internal safety bypass valve.
To reset a tripped regulator, turn off the burner knobs and close the propane cylinder valve completely. Wait two minutes, then reopen the tank valve very slowly, turning it just a fraction of an inch at a time so pressure equalizes gradually along the line. Once the cylinder valve is fully opened, follow the manual lighting sequence once again to achieve full cooking output. Checking these operational details ensures your equipment operates reliably, safely, and cleanly throughout your entire barbecue session.





Write Your Review
No reviews yet. Be the first to share your experience!